1. Introduktion
This manual provides detailed instructions for the installation, operation, and maintenance of your Zalman Z9 Neo Plus PC Case. Please read this guide thoroughly before beginning assembly to ensure proper setup and to maximize the performance and longevity of your system components.
The Zalman Z9 Neo Plus is a midi tower PC case designed to accommodate a wide range of computer components, offering efficient cooling and convenient cable management solutions.
2. Pakkens indhold
Verify that all components are present before proceeding with installation. The package should contain:
- Zalman Z9 Neo Plus PC Case (1 unit)
- Accessory Box (containing screws, standoffs, cable ties, and user guide)
3. Nøglefunktioner
The Zalman Z9 Neo Plus PC Case includes several features designed for ease of use and optimal system performance:
- Effektiv køling: Pre-installed fans (typically 5) for effective airflow.
- Støvfiltre: Removable dust filters located at the front and bottom for easy cleaning and system protection.
- Kabelstyring: Dedicated routing channels and tie-down points behind the motherboard tray to keep cables organized and improve airflow.
- PSU kappe: A dedicated compartment for the power supply unit to conceal cables and enhance aesthetics.
- Drive Bays: Support for multiple 3.5-inch HDDs and 2.5-inch SSDs, including an optical drive bay.
- Sidepanel: Acrylic side panel to showcase internal components.
- Forreste I/O-porte: Conveniently located USB 2.0 and audio ports on the top panel.
4. Opsætning og installation
4.1 Tjekliste før installation
- Ensure you have all necessary components (motherboard, CPU, RAM, GPU, PSU, storage drives).
- Gather appropriate tools (screwdriver set, cable ties).
- Work on a clean, static-free surface.
4.2 Åbning af sagen
Remove the side panels by unscrewing the thumb screws located at the rear of the case. Carefully slide the panels backward and lift them off. The front panel may also have a hinged door for access to optical drive bays.
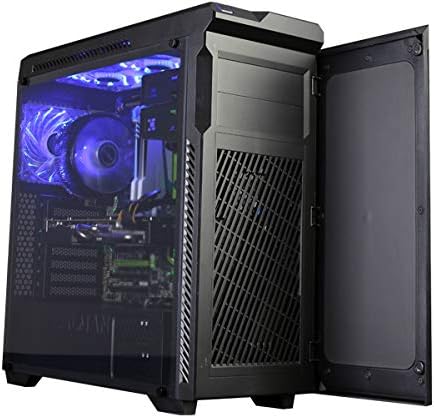
Image: The Zalman Z9 Neo Plus PC case shown with its front door open, revealing the intake vents and optical drive bays. This view demonstrates access to the front panel components.
4.3 Installation af bundkort
- Installer I/O-skjoldet i den bageste åbning af kabinettet.
- Ensure motherboard standoffs are correctly aligned with your motherboard's screw holes. Install additional standoffs if necessary.
- Carefully place the motherboard onto the standoffs, aligning it with the I/O shield.
- Fastgør bundkortet med de medfølgende skruer. Spænd ikke for hårdt.

Billede: En intern view of the Zalman Z9 Neo Plus PC case, showcasing a fully assembled system with a motherboard, CPU cooler, graphics card, and organized cabling. Blue LED fans are visible, indicating active cooling.
4.4 Installation af strømforsyningsenhed (PSU).
- Position the PSU in its designated compartment at the bottom rear of the case, typically with the fan facing downwards (if there's a filtered vent) or upwards.
- Fastgør strømforsyningen til kabinettet med skruer bagfra.
4.5 Installation af lagerdrev
- 3.5-inch HDDs: Slide the drive into the tool-less drive trays (if applicable) or secure with screws in the drive cage.
- 2.5-inch SSDs: Mount SSDs to dedicated 2.5-inch brackets or adapters, then secure them in the case.
- Optical Drives: Remove the front panel bay cover, slide the optical drive into the 5.25-inch bay, and secure it with screws or tool-less clips.
4.6 Installation af udvidelseskort (f.eks. grafikkort)
- Fjern de nødvendige dæksler til udvidelsespladserne fra bagsiden af kabinettet.
- Insert the expansion card firmly into the corresponding PCIe slot on the motherboard.
- Fastgør kortet med en skrue eller en fastholdelsesklips.
4.7 Frontpanelforbindelser
Connect the front panel cables (USB, audio, power switch, reset switch, HDD LED, Power LED) to the appropriate headers on your motherboard. Refer to your motherboard manual for exact header locations.

Image: A top-down perspective of the Zalman Z9 Neo Plus PC case, highlighting the top-mounted I/O panel with USB ports and audio jacks, along with the ventilation grilles for top-mounted fans or radiators.
4.8 Kabelstyring
Utilize the cable routing holes and tie-down points behind the motherboard tray to organize and secure cables. This improves airflow and gives your build a cleaner appearance.

Image: The Zalman Z9 Neo Plus PC case displayed from an angled front view, visasing its sleek black exterior and the illuminated interior components with blue LED lighting, visible through the side panel.
5. Betjening
Once all components are installed and secured, close the side panels. Connect your peripherals (monitor, keyboard, mouse) and power cable. Press the power button on the front panel to start your system. The pre-installed fans will begin operating to provide cooling.
6. Vedligeholdelse
6.1 Rengøring af støvfiltre
Regularly check and clean the removable dust filters located at the front and bottom of the case. Gently slide them out, clean with water and mild soap, or use compressed air, and ensure they are completely dry before reinserting.
6.2 Generel rengøring
Brug en blød, damp cloth to wipe down the exterior surfaces of the case. For the acrylic side panel, use a microfiber cloth and a non-abrasive cleaner specifically designed for plastics to avoid scratches.
7. Fejlfinding
7.1 Systemet tænder ikke
- Kontroller, om strømkablet er korrekt tilsluttet til både strømforsyningen og stikkontakten.
- Sørg for, at strømafbryderen på strømforsyningen er i 'ON'-positionen.
- Kontroller, at kablet til strømafbryderen på frontpanelet er korrekt tilsluttet bundkortets header.
7.2 Ventilatorer drejer ikke
- Confirm that all fan cables are properly connected to the motherboard fan headers or a fan controller.
- Tjek BIOS/UEFI-indstillingerne for kontrol af blæserhastighed.
7.3 Front Panel USB/Audio Ports Not Working
- Ensure the USB and audio cables from the front panel are correctly connected to their respective headers on the motherboard.
- Check motherboard drivers for proper functionality.
8. Specifikationer
| Feature | Detalje |
|---|---|
| Modelnavn | Z9 NEO PLUS |
| Sagstype | Midi-tårnet |
| Farve | Sort |
| Materiale | Polycarbonat (PC) |
| Produktmål (LxBxH) | 3.94 x 3.94 x 3.94 cm (omtrentligt, ifølge de angivne data) |
| Varens vægt | 2.2 pounds (Approximate, as per provided data) |
| USB 2.0 porte | 2 |
| Kompatible enheder | CPU (General PC components) |
9. Garanti og support
For garantioplysninger og teknisk support henvises til den officielle Zalman-side. webwebstedet eller kontakt din lokale forhandler. Gem din købsbevis til garantikrav.
Zalman is committed to providing quality products and support. If you encounter any issues not covered in this manual, please reach out to their customer service.


