1. Introduktion
This manual provides essential information for the safe and efficient operation of your Casio XJ-F10X LED XGA Projector. Please read this manual thoroughly before using the projector and retain it for future reference. Understanding the instructions will ensure optimal performance and extend the lifespan of your device.
2. Vigtige sikkerhedsinstruktioner
Overhold følgende sikkerhedsforanstaltninger for at forhindre skader på projektoren og sikre brugerens sikkerhed:
- Bloker ikke ventilationsåbningerne. Sørg for tilstrækkelig plads omkring projektoren for korrekt luftgennemstrømning.
- Udsæt ikke projektoren for regn eller fugt for at mindske risikoen for brand eller elektrisk stød.
- Brug kun den netledning, der følger med projektoren, eller en godkendt erstatningsledning.
- Avoid looking directly into the projector lens when the light source is active, as it can cause eye damage.
- Forsøg ikke selv at servicere dette produkt. Overlad al service til kvalificeret servicepersonale.
- Placer projektoren på en stabil, plan overflade for at forhindre den i at falde.
3. Pakkens indhold
Bekræft at alle varer er til stede i pakken:
- Casio XJ-F10X Projector
- Strømledning
- Fjernbetjening (med batterier)
- VGA-kabel
- Brugervejledning (dette dokument)
4. Produktet er slutview
Familiarize yourself with the various parts and controls of your Casio XJ-F10X projector.
4.1 Frontpanel

The front panel features the projection lens, which emits the image. Ventilation grilles are located on the side to ensure proper cooling during operation. A small infrared receiver for the remote control may also be present.
4.2 Bagpanel og tilslutninger

The rear panel houses all the necessary input and output ports for connecting external devices. These include:
- HDMI Type A x 2: For digital video and audio input (HDCP support).
- VGA (D-Sub 15-pin): For analog computer input.
- S-video: Til analog videoindgang.
- Sammensat video (RCA): For standard definition video input.
- Audio In (RCA L/R, 3.5mm mini jack): Til analog lydindgang.
- Audio Out (3.5mm mini jack): Til tilslutning af eksterne lydsystemer.
- RS-232: Til projektorstyring via en computer eller et styresystem.
- USB (Type A, Type B): Til service eller firmwareopdateringer.
- Strømindtag: Til tilslutning af netledningen.
4.3 Betjeningselementer på øverste panel
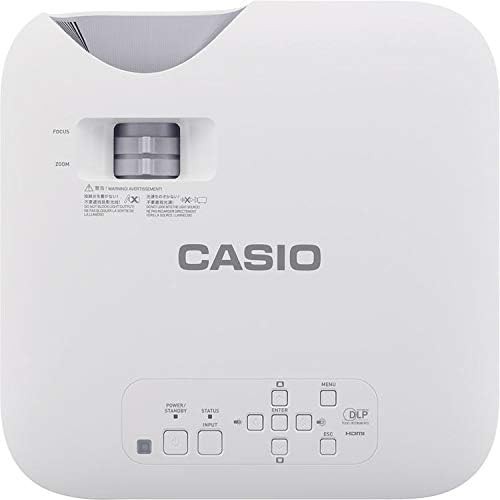
The top panel provides direct access to essential projector functions:
- Power knap: Tænder eller slukker for projektoren.
- Input knap: Selects the input source (HDMI, VGA, etc.).
- Menu-knap: Åbner skærmmenuen (OSD).
- Navigationsknapper (op/ned/venstre/højre): Bruges til at navigere gennem menupunkter.
- Enter knap: Bekræfter valg i menuen.
- ESC knap: Afslutter den aktuelle menu eller vender tilbage til den forrige skærm.
- Zoom-greb: Justerer billedstørrelsen.
- Fokusring: Sharpens the projected image.
5. Opsætningsvejledning
5.1 Projektorplacering
Proper placement is crucial for optimal image quality.
- Afstand: Position the projector at an appropriate distance from the screen to achieve the desired image size. Refer to the specifications for throw ratio details.
- Vinkel: Ensure the projector is perpendicular to the screen for a rectangular image. Use the keystone correction function if the image appears trapezoidal.
- Ventilation: Maintain clear space around the projector's ventilation openings to prevent overheating.
5.2 Tilslutning af enheder
Follow these steps to connect your source devices:
- Ensure the projector and all source devices are powered off before making connections.
- Connect the appropriate video cable (HDMI, VGA, S-Video, or Composite) from your source device to the corresponding input port on the projector's rear panel.
- If using an analog video input (VGA, S-Video, Composite), connect an audio cable from your source device's audio output to the projector's Audio In port. HDMI carries both video and audio.
- Connect the power cord to the projector's power inlet and then to a grounded electrical outlet.
6. Betjeningsvejledning
6.1 Tænd og sluk
- Tænd: Press the Power button on the projector's top panel or the remote control. The projector will reach full brightness in approximately 5 seconds due to its Direct On/Off function.
- Sluk: Press the Power button again. The projector will shut down immediately without a cool-down period.
6.2 Basic Projection
- Turn on the projector and your source device.
- Tryk på Input button on the projector or remote control repeatedly to select the correct input source (e.g., HDMI 1, VGA).
- Juster Zoom lever to achieve the desired image size on the screen.
- Juster Fokus ring until the image appears sharp and clear.
- If the image is distorted (trapezoidal), use the keystone correction feature in the OSD menu to correct it.
7. Vedligeholdelse
7.1 Rengøring af projektoren
- Linse: Tør forsigtigt linsen af med en blød, fnugfri klud, der er specielt designet til optiske overflader. Brug ikke slibende rengøringsmidler.
- Casing: Tør projektoren c afasing with a soft, dry cloth. For stubborn dirt, slightly dampRengør kluden med vand og et mildt rengøringsmiddel, og tør derefter tør.
- Ventilation: Periodically check and clean the ventilation grilles to ensure they are free from dust and debris. Use a soft brush or compressed air.
7.2 Lyskildens levetid
The Casio XJ-F10X utilizes a mercury-free LED hybrid light source, offering exceptional durability and a long operational life of up to 20,000 hours without requiring lamp replacement. This significantly reduces maintenance needs and costs.
8. Fejlfinding
Hvis du støder på problemer med din projektor, kan du se følgende almindelige problemer og løsninger:
- Intet billede:
- Sørg for, at projektoren er tændt, og at netledningen er korrekt tilsluttet.
- Bekræft, at den korrekte inputkilde er valgt.
- Check the connection cable between the projector and the source device.
- Sørg for, at kildeenheden er tændt og udsender et signal.
- Mørkt billede:
- Check the projector's brightness settings in the OSD menu.
- Ensure the room is sufficiently dark for projection.
- Ingen lyd:
- If using an analog video input, ensure the audio cable is connected.
- Kontroller lydstyrkeindstillingerne på både projektoren og kildeenheden.
- Ensure the correct audio input is selected if applicable.
- Billedet er sløret:
- Juster fokusringen på projektorlinsen.
- Sørg for, at projektoren er placeret i en passende afstand fra skærmen.
- Billedet er trapezformet:
- Use the keystone correction function in the OSD menu to adjust the image shape.
- Prøv at placere projektoren så vinkelret på skærmen som muligt.
9. Tekniske specifikationer
| Feature | Specifikation |
|---|---|
| Modelnummer | XJ-F10X |
| Indfødt opløsning | XGA (1024 x 768) |
| Lysstyrke | 3,300 lumen |
| Kontrastforhold | 20,000:1 |
| Display Chip | 0.65" DLP Chip |
| Lyskilde | Hybrid LED |
| Lyskildeliv | Op til 20,000 timer |
| Linsetype | 1.5x Manual Zoom & Focus |
| Aspektforhold | 4:3 Native |
| Indgange | HDMI Type A x 2, S-Video, VGA, RS-232, Composite Video, RCA Audio In |
| Produktdimensioner | 11.8 x 11.8 x 3.8 tommer |
| Varens vægt | 10.78 pund |
10. Garanti og kundesupport
The Casio XJ-F10X Projector is covered by a 3-year parts and labor warranty. The LED hybrid light source is covered by a 5-year or 10,000-hour warranty, whichever comes first. For technical support, service, or warranty claims, please contact Casio customer support through their official webwebstedet eller de kontaktoplysninger, der følger med din købsdokumentation.
Please have your model number (XJ-F10X) and purchase date available when contacting support.


