Indledning
This manual provides detailed instructions for the installation, operation, and maintenance of your Votamuta 8-inch Wall-Mounted Shower System. Please read this manual thoroughly before installation and use to ensure proper function and longevity of the product. Keep this manual for future reference.
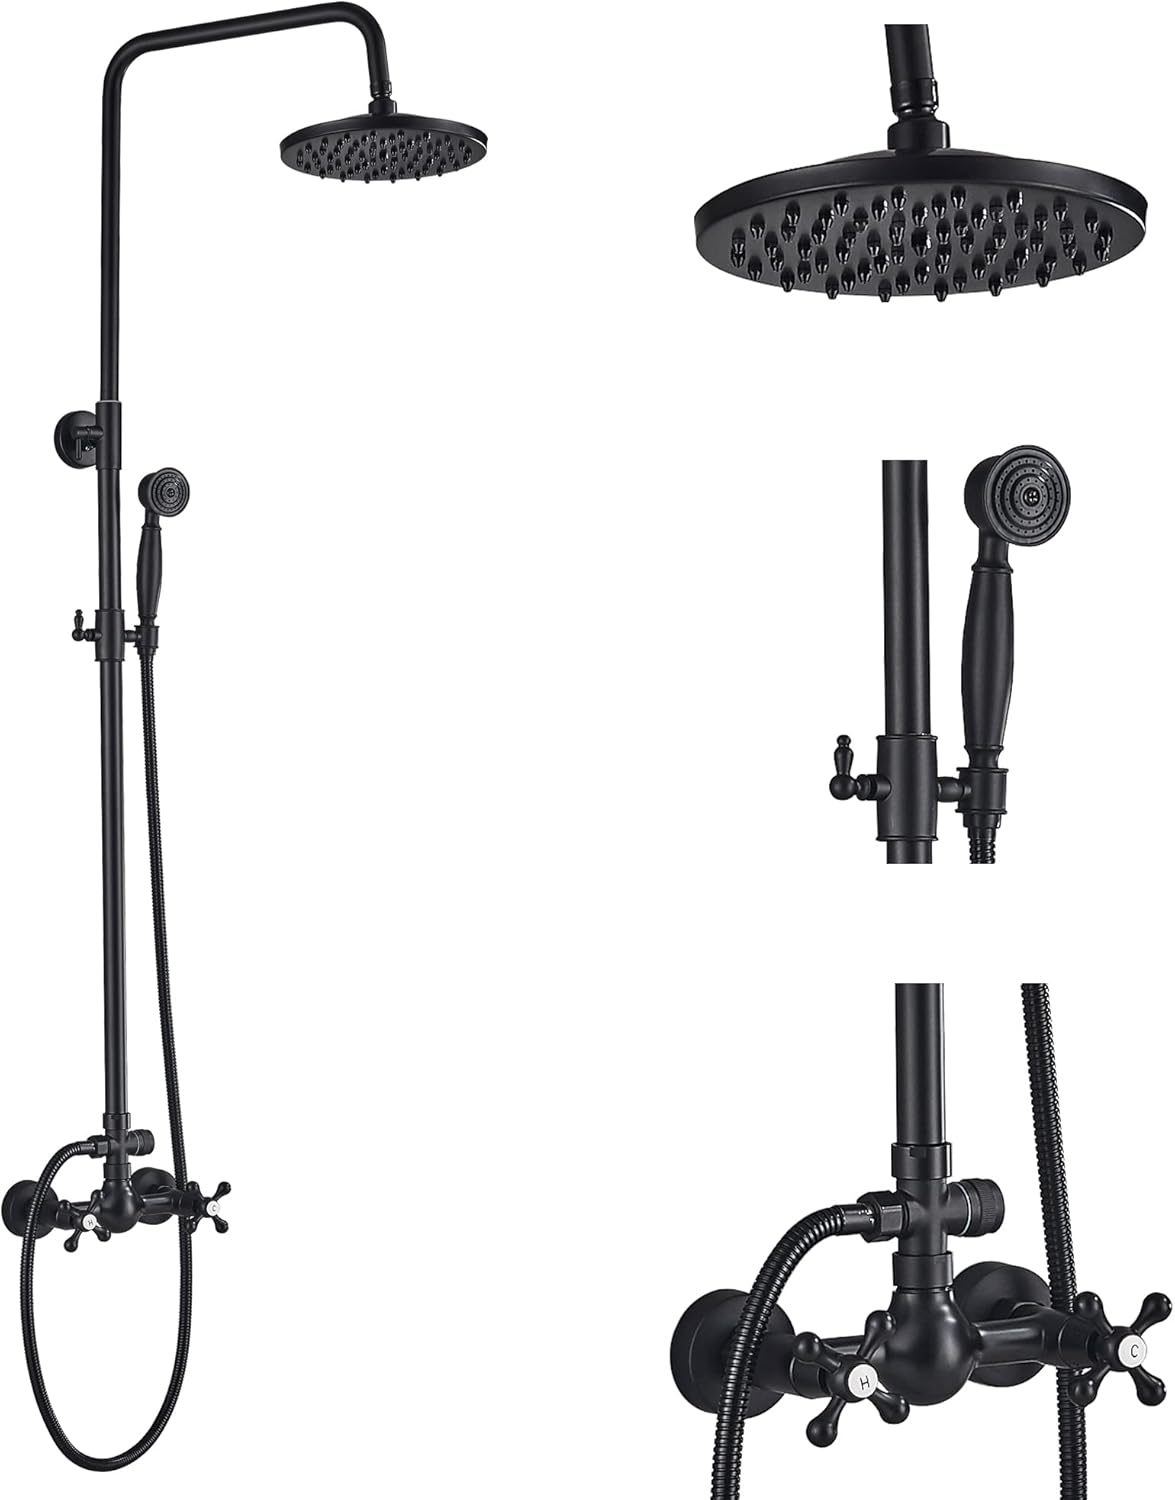
Figur 1: Overview of the Votamuta Wall-Mounted Shower System in Oil-Rubbed Bronze finish, featuring an 8-inch rainfall shower head and a handheld sprayer.
Produktkomponenter
The Votamuta shower system includes the following main components:
- 8-inch Rainfall Shower Head (Brass)
- Handheld Shower Sprayer (Brass head, ABS plastic holder)
- 150 cm Shower Hose
- Exposed Pipe Faucet with Cold and Hot Water Handles (Zinc Alloy handles, Brass body)
- Functions Diverter
- Adjustable Height Shower Tube (80-120 cm)
- Ceramic Valve Type
- Wall Mounting Hardware (Brass adapters, wall cover plate/connector)

Figure 2: Detailed diagram illustrating the numbered components of the Votamuta shower system, including the rainfall shower head, handheld shower, handheld shower holder, shower hose, functions diverter, cold water handle, hot water handle, straight shower tube, wall cover plate/connector, and height adjustable shower tube.
Specifikationer
| Mærke | Votamuta |
| Modelnummer | VO2017091853 |
| Slutte | Olie-gnidet bronze |
| Materiale til hoveddelen | Messing |
| Shower Head Material | Messing |
| Handheld Sprayer Head Material | Messing |
| Handheld Sprayer Holder Material | ABS plast |
| Håndtag Materiale | Zinklegering |
| Ventil type | Keramisk |
| Brusehovedstørrelse | 20.3 cm (8 tommer) |
| Bruserslange Længde | 150 cm (59 tommer) |
| Wall Hole Distance | Adjustable 13-17 cm (5.1-6.3 inches) |
| Tilslutningsstandard | G1/2" |
| Adjustable Shower Height | 80-120 cm (31.5-47.2 tommer) |
| Pakkedimensioner | 81.28 x 31.75 x 8.89 cm |
| Varens vægt | 3.36 kg |

Figure 3: Diagram showing the product dimensions, including the 35cm shower arm, 20cm shower head, and adjustable height range of 80-120cm. It also illustrates the brass adapters and the adjustable hole distance for wall mounting (5.1-6.3 inches).
Installationsvejledning
Before beginning installation, ensure you have all necessary tools and that your water supply is turned off. Professional installation is recommended.
Trin før installation:
- Trin 1: Connect the brass adapters (provided) to your water supply lines.
- Trin 2: Adjust the lever and distance of the adapters to fit the faucet body.
- Trin 3: Turn on the water supply for a short period to flush out any dust or impurities from the pipes. Then turn off the water supply again.
Vigtigste installationstrin:
- Trin 4: Assemble the main shower set components as shown in the diagram (faucet body, diverter, shower bar, hand shower holder).
- Trin 5: Place the pre-assembled shower system against the wall to find the proper mounting position. Mark the required drilling holes for the shower bar bracket.
- Trin 6: Drill a hole for the upper part of the shower bar bracket and secure it with screws.
- Trin 7: Place the decorative covers over the brass adapters.
- Trin 8: Install the pre-assembled shower faucet body to the connections on the wall.
- Trin 9: Connect the shower hose, handheld shower, and rainfall shower head to their respective ports.

Figure 4: Step-by-step visual guide for installing the Votamuta shower system, detailing the connection of brass adapters, assembly of the faucet body and shower bar, and final attachment of shower components.
Note: An extension bar of 30 cm (ASIN B01IR1UD4Q) is available for purchase if a taller shower height is desired.
Betjeningsvejledning
Your Votamuta shower system offers two distinct water outlet modes: rainfall shower and handheld shower.
- Vandtemperaturkontrol: Use the hot water handle and cold water handle on the main faucet body to adjust the water temperature to your preference.
- Valg af tilstand: The system features a diverter switch to select between the rainfall shower head and the handheld sprayer. Turn the diverter knob to direct water flow to your desired outlet. Both modes operate separately.
- Rainfall Shower Head: The 8-inch rainfall shower head provides a wide, gentle water flow. It features a 360° horizontal swivel and 15° up and down adjustment for optimal positioning.
- Handheld Shower: The handheld sprayer offers focused water delivery and can be adjusted in height along the shower bar for user convenience.

Figure 5: Illustration of the two operational modes: Rainfall Shower Head with its swivel and tilt adjustments, and the Handheld Shower. It also indicates the hot water handle, cold water handle, and the diverter for water outlet mode selection.
Opretholdelse
Regular cleaning and maintenance will help preserve the finish and functionality of your shower system.
- Rengøring af finishen: To clean the oil-rubbed bronze finish, use a soft, damp cloth and mild soap. Avoid abrasive cleaners, harsh chemicals, or scouring pads, as these can damage the finish. Wipe dry immediately after cleaning to prevent water spots.
- Cleaning Shower Nozzles: Over time, mineral deposits may accumulate in the shower head and handheld sprayer nozzles. Gently rub the rubber nozzles with your finger or a soft brush to dislodge any buildup. For stubborn deposits, a solution of equal parts white vinegar and water can be used, applied with a soft cloth. Rinse thoroughly.
- Kontrol af forbindelser: Periodically check all connections for leaks. Tighten any loose connections carefully to prevent damage.
Fejlfinding
| Problem | Mulig årsag | Løsning |
|---|---|---|
| Lavt vandtryk | Clogged shower nozzles; partially closed water supply valve; mineral buildup in pipes. | Clean shower nozzles as described in Maintenance. Ensure water supply valves are fully open. Consult a plumber if mineral buildup in pipes is suspected. |
| Leaks from Connections | Løse forbindelser; slidte skiver/tætninger. | Tighten connections carefully. Replace any damaged washers or seals. Ensure plumber's tape was used during installation. |
| Omlederen skifter ikke korrekt | Mineral buildup in diverter mechanism. | Flush the system by running water through both outlets. If the issue persists, professional inspection may be required. |
| Finish Discoloration/Peeling | Use of abrasive cleaners; harsh chemicals; prolonged exposure to standing water. | Refer to Maintenance section for proper cleaning instructions. Avoid harsh cleaning agents. Ensure the product is wiped dry after use. |
Garanti og support
Information regarding specific warranty terms for Votamuta products is not provided in this manual. For warranty claims, technical support, or to inquire about replacement parts, please contact the seller or manufacturer directly through your purchase platform.
Please have your model number (VO2017091853) and purchase details ready when contacting support.