Indledning
This manual provides detailed instructions for the installation, operation, and maintenance of your Blackvue DR750S-2CH dashcam system, including the Power Magic Pro hardwiring kit. Please read this manual thoroughly before using the product to ensure proper functionality and to maximize your device's lifespan.

Image: The Blackvue DR750S-2CH dashcam system, showing both the front and rear camera units. The front camera is larger and features the 'BLACKVUE CLOUD FHD 60FPS' branding, while the rear camera is more compact.
1. Opsætning
1.1 Pakkens indhold
Bekræft at alle komponenter er til stede i din pakke:
- Blackvue DR750S-2CH Front Camera
- Blackvue DR750S-2CH Rear Camera
- Power Cord (for cigarette lighter socket)
- Tilslutningskabel til bagkamera
- Power Magic Pro Hardwire Kit
- 16 GB MicroSD-kort
- Mounting Hardware (adhesive pads, cable clips)
- Brugervejledning (dette dokument)
1.2 MicroSD Card Preparation
Before initial use, it is recommended to format the included MicroSD card. This ensures optimal performance and compatibility. Use the Blackvue Viewer software on your computer for formatting. Regular formatting (e.g., once a month) is recommended for stable operation.
1.3 Kamerainstallation
- Forreste kamera: Monter frontkameraet midt på forruden, helst bag den bageste delview spejl, for at sikre uhindret view. Clean the windshield surface thoroughly before attaching the adhesive mount.
- Bagkamera: Mount the rear camera on the center of your rear window. Ensure the lens is clear of any obstructions.
- Kabelføring: Carefully route the power cable and the rear camera connection cable along the vehicle's headliner and A-pillars to conceal them and prevent interference with driving.
1.4 Power Magic Pro Installation
The Power Magic Pro allows the dashcam to operate in Parking Mode after the vehicle's ignition is turned off, while preventing vehicle battery drain. Professional installation is recommended for the Power Magic Pro.

Image: The Blackvue Power Magic Pro unit, a black rectangular box with 'POWER MAGIC PRO' printed on it, featuring dip switches for voltage and timer settings. This device manages power supply to the dashcam in parking mode.
- Tilslut til køretøjets strømforsyning: Connect the Power Magic Pro's red wire to a constant power fuse (BATT+), the yellow wire to an accessory power fuse (ACC+), and the black wire to a ground point.
- Connect to Dashcam: Plug the dashcam's power cable into the Power Magic Pro's output.
- Konfigurer indstillinger: Use the dip switches on the Power Magic Pro to set the desired voltage cut-off (e.g., 12.0V, 12.5V) and timer (e.g., 12H, 24H, INF) to protect your vehicle's battery.
2. Betjening af dashcam'et
2.1 Power On and Recording Modes
Once powered, the dashcam will automatically begin recording. The DR750S-2CH supports various recording modes:
- Normal optagelse: Kontinuerlig optagelse under kørsel.
- Hændelsesoptagelse: Triggered by impacts detected by the G-sensor.
- Optagelse i parkeringstilstand: Activated when the vehicle is parked, detecting motion or impacts.

Image: A diagram of the Blackvue DR750S-2CH front camera highlighting the speaker and recording LED. The recording LED changes color to indicate the current recording mode: Red for Normal, Orange for Event, and Green for Parking Mode. Icons for Various Recording Options, Impact Detection, and Motion Detection are also shown.
2.2 LED Indicators and Voice Guidance
The dashcam provides visual and audible feedback:
- Optagelses-LED: Indicates the current recording mode (Red for Normal, Orange for Event, Green for Parking).
- GPS LED: Blue when GPS reception is active.
- Voice Alarms: The dashcam announces status changes, such as power on, recording start, mode changes, and shutdown. Voice guidance can be customized or turned off via the Blackvue App/Vieweh.
2.3 Wi-Fi Connectivity and Blackvue App
The DR750S-2CH features built-in Wi-Fi for seamless connection to your smartphone or tablet via the Blackvue App.
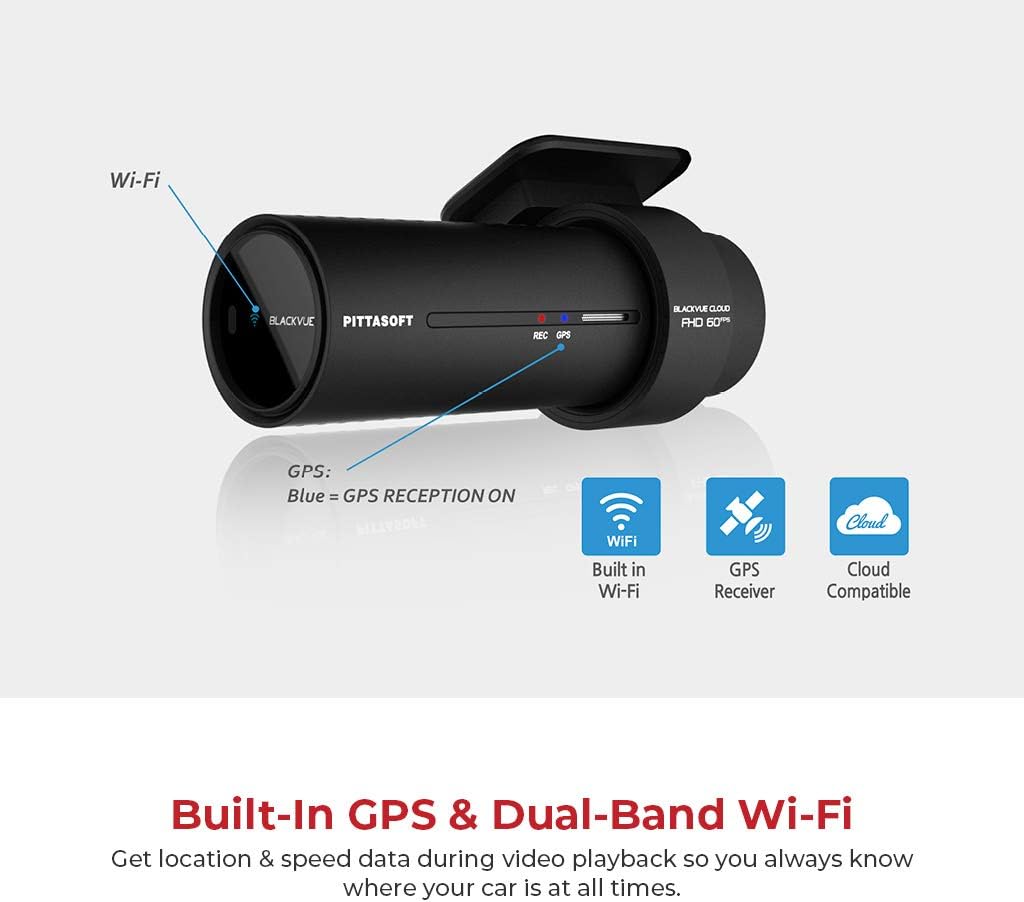
Image: A diagram of the Blackvue DR750S-2CH front camera highlighting the GPS and Wi-Fi features. It shows the GPS antenna and indicates 'Blue = GPS RECEPTION ON'. Icons for Built-in Wi-Fi, GPS Receiver, and Cloud Compatible are displayed.
- Opret forbindelse til Wi-Fi: Turn on the dashcam's Wi-Fi by pressing the Wi-Fi button (or using the proximity sensor if configured). On your mobile device, connect to the Blackvue Wi-Fi network (default SSID and password are in the manual or on the device).
- Blackvue App: Download the Blackvue App from your device's app store. Use the app to:
- View live footage fra kameraerne.
- Afspil optagede videoer.
- Download videos to your mobile device.
- Adjust dashcam settings (e.g., recording quality, G-sensor sensitivity, voice guidance).
2.4 GPS-funktionalitet
The built-in GPS module records vehicle speed and location data, which can be viewed during video playback using the Blackvue App or Vieweh software.
2.5 Proximity Sensor and Buttons

Image: A diagram of the Blackvue DR750S-2CH front camera showing the customizable proximity sensor on the left side and the Wi-Fi (ON/OFF) / Format button on the right side. Instructions for toggling Wi-Fi, resetting Wi-Fi password/SSID, and formatting the microSD card are provided.
- Nærhedssensor: By default, waving your hand near the sensor triggers manual recording. This function can be customized via the Blackvue App to toggle audio recording ON/OFF.
- Wi-Fi knap: Press to toggle Wi-Fi ON/OFF. Hold for 5 seconds to reset Wi-Fi password and SSID.
- Formatér-knap: Hold the Wi-Fi button for 5 seconds and then press the proximity sensor to format the MicroSD card.
3. Vedligeholdelse
3.1 Administration af microSD-kort
Regular maintenance of the MicroSD card is crucial for reliable operation. Over time, frequent writing and deleting of files can degrade the card's performance. It is recommended to:
- Format Regularly: Format the MicroSD card using the Blackvue App or Viewer software at least once a month.
- Use High-Quality Cards: Always use genuine, high-endurance MicroSD cards recommended by Blackvue.
- Sikkerhedskopier vigtige fødevarertage: Regularly transfer important video files to a computer or cloud storage to prevent accidental loss.
3.2 Rengøring
Keep the camera lenses and the dashcam body clean using a soft, dry cloth. Avoid using harsh chemicals or abrasive materials that could damage the device.
4. Fejlfinding
If you encounter issues with your Blackvue DR750S-2CH, refer to the following common solutions:
- Dashcam tænder ikke: Check power connections. Ensure the Power Magic Pro is correctly installed and configured, and that your vehicle's power outlet is functional.
- Problemer med Wi-Fi-forbindelse: Ensure Wi-Fi is enabled on the dashcam. Try resetting the Wi-Fi password and SSID by holding the Wi-Fi button for 5 seconds. Restart both the dashcam and your mobile device.
- GPS registrerer ikke data: Ensure the GPS LED is blue, indicating active reception. If not, try repositioning the dashcam or driving in an open area. Format the MicroSD card.
- Parking Mode not activating: Verify the Power Magic Pro is correctly wired to a constant power source and its settings (voltage cut-off, timer) are appropriate.
- Video quality issues: Ensure camera lenses are clean. Format the MicroSD card. Check recording settings in the Blackvue App.
For further assistance, consult the Blackvue support webwebsted eller kontakt kundeservice.
5. Specifikationer
| Feature | Specifikation |
|---|---|
| Modelnavn | DR750S-2CH |
| Front kamera sensor | STARVIS CMOS Sensor (Approx. 2.1 M Pixel) |
| Bagkamerasensor | STARVIS CMOS Sensor (Approx. 2.1 M Pixel) |
| Video opløsning | Front: 1080p Full HD (60fps), Rear: 1080p Full HD (30fps) |
| Forbindelse | Built-in Wi-Fi (802.11n), Built-in GPS |
| Særlige funktioner | Built-In Microphone, Cloud Compatible, Enhanced Night Vision |
| Opbevaring | MicroSD Card (up to 128GB supported, 16GB included) |
| Optagelsestilstande | Normal, Event, Parking (Motion Detection, Impact Detection) |
| Kontrolmetode | Voice, Blackvue App |
| Dimensions (Front Camera) | 10.16 x 2.54 x 2.54 cm |
| Vægt | 953 g (total package weight) |
6. Garanti og support
Your Blackvue DR750S-2CH dashcam is covered by a manufacturer's warranty. For specific warranty terms and conditions, please refer to the warranty card included in your product packaging or visit the official Blackvue website. For technical support, firmware updates, and frequently asked questions, please visit the Blackvue support portal.


