1. Introduktion
This manual provides comprehensive instructions for the safe and effective use of the PCE Instruments PCE-170 A Light Meter. This device is designed for measuring illuminance (lux or foot-candles) in various environments, such as offices, factories, and outdoor settings. It features a wide measurement range, fast response time, and a compact design for ease of use.
Læs venligst denne manual grundigt, inden du bruger apparatet, og gem den til senere brug.
2. Sikkerhedsoplysninger
Observe the following safety precautions to prevent injury and avoid damage to the device:
- Udsæt ikke enheden for ekstreme temperaturer, fugt eller direkte sollys.
- Undgå kraftige vibrationer eller stød.
- Forsøg ikke at åbne eller ændre enheden. Overlad al service til kvalificeret personale.
- Keep the light sensor clean and free from obstructions to ensure accurate readings.
- Fjern batteriet, hvis enheden ikke skal bruges i længere tid, for at forhindre lækage.
- Bortskaf batterier og enheden i henhold til lokale regler.
3. Produktet er slutview
The PCE-170 A Light Meter consists of a main unit with a display and control buttons, and an integrated light sensor.

Figur 1: Front view of the PCE-170 A Light Meter, showing the display, control buttons, and light sensor at the top.
3.1 Komponenter
- Lyssensor: Located at the top of the device, protected by a white dome. This silicon photodiode measures incident light.
- LCD-skærm: A 5-digit display showing measurement values, units (lux/fc), and function indicators (e.g., AUTO RANGE, HOLD, MIN, MAX).
- Tænd/sluk-knap (tænd/sluk): Tænder eller slukker for enheden.
- CAL-knap: Used for zero adjustment.
- HOLD knap: Fryser den aktuelle aflæsning på displayet.
- fc/lx Button: Toggles between foot-candle (fc) and lux (lx) measurement units.
- RANGE knap: Manually selects measurement ranges or activates auto-ranging.
- Batterirum: Located at the rear, houses the 9V battery.

Figur 2: Nærbillede view of the LCD display, showing a reading of "534 lx" and "AUTO RANGE 4 000".
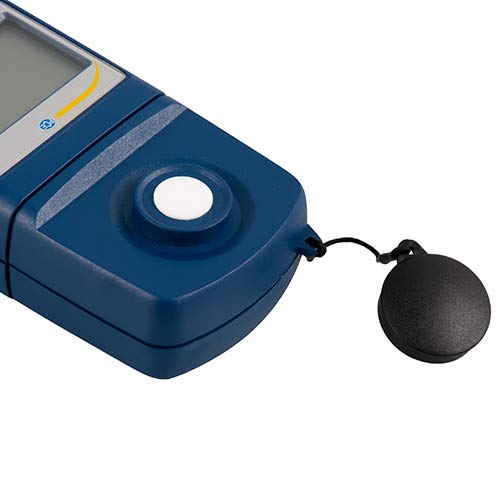
Figur 3: Detaljeret view of the light sensor at the top of the device, with its protective cap removed.
4. Opsætning
4.1 Batteriinstallation
- Find batteridækslet på bagsiden af enheden.
- Slide the cover open or unscrew it, depending on the model.
- Insert one 9V battery, observing the correct polarity (+/-).
- Sæt batterirummets dæksel på igen.
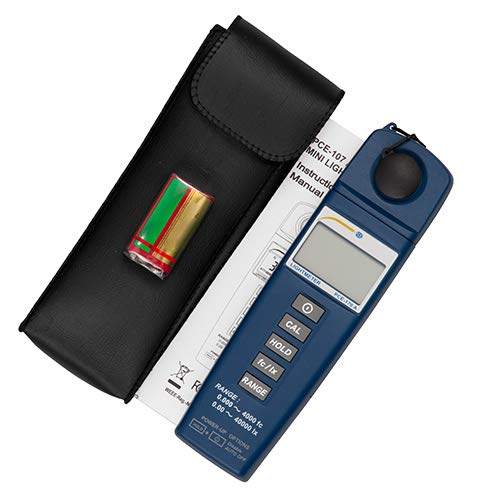
Figur 4: The PCE-170 A Light Meter shown with its carrying case and the included 9V battery, ready for installation.
4.2 Indledende tænding
Tryk på Magt button to turn on the device. The display will illuminate and show a reading. If the battery symbol appears, replace the battery.
5. Betjeningsvejledning
5.1 Tage en måling
- Tænd enheden ved hjælp af Magt knap.
- Ensure the light sensor is clean and unobstructed.
- Position the light sensor at the location where illuminance is to be measured. Ensure the sensor is facing the light source directly for accurate readings.
- The current illuminance value will be displayed on the LCD.

Figur 5: A user measuring light levels in an office environment with the PCE-170 A Light Meter.
5.2 Changing Measurement Units (fc/lx)
Tryk på fc/lx button to toggle between foot-candles (fc) and lux (lx) units. The selected unit will be indicated on the display.
5.3 HOLD-funktion
Tryk på HOLDE knappen for at fryse den aktuelle aflæsning på displayet. Tryk på den igen for at slippe holdeknappen og genoptage livemålinger.
5.4 Zero Adjustment (CAL)
For at udføre en nuljustering:
- Place the light sensor in a completely dark environment (e.g., cover it with the protective cap or place it in a dark box).
- Tryk på CAL button. The display should show "0.00" or a value very close to zero.
- If the display does not show zero, repeat the process.
5.5 Valg af område
The device typically operates in auto-ranging mode. To manually select a range or cycle through available ranges, press the RANGE button. The display will indicate the active range. Press and hold the RANGE button to return to auto-ranging mode.
5.6 Min/Max Function (Power-Up Option)
The PCE-170 A supports Min/Max recording. To activate this feature, refer to the power-up options indicated on the device label (e.g., press and hold a specific button during power-on). This function records the minimum and maximum illuminance values detected during a measurement session.
6. Vedligeholdelse
6.1 Rengøring
Wipe the device with a soft, dry cloth. Do not use abrasive cleaners or solvents. Keep the light sensor clean and free of dust or smudges, as this can affect measurement accuracy.
6.2 Opbevaring
When not in use, store the PCE-170 A Light Meter in its carrying case in a cool, dry place, away from direct sunlight and extreme temperatures. Remove the battery if storing for extended periods.
7. Fejlfinding
| Problem | Mulig årsag | Løsning |
|---|---|---|
| Enheden tændes ikke. | Dødt eller forkert installeret batteri. | Kontroller batteriets polaritet, eller udskift det med et nyt 9V-batteri. |
| Display shows "OL" (Overload). | Light intensity exceeds the current measurement range. | Switch to a higher measurement range using the RANGE button, or move to a less intensely lit area. |
| Upræcise aflæsninger. | Dirty sensor, incorrect zero adjustment, or sensor not facing light source correctly. | Clean the sensor, perform zero adjustment in darkness, and ensure the sensor is properly oriented. |
| Skærmen er tom eller flimrer. | Lavt batteri. | Udskift 9V batteriet. |
8. Specifikationer
| Parameter | Værdi |
|---|---|
| Måleområder | 0.00 ... 40,000 lux / 0.000 ... 4000 fc |
| Opløsning | 0.01 lux / 0.001 fc |
| Nøjagtighed | ±3% of measurement value + 5 digits |
| Overbelastningsindikator | "OL" |
| Målehastighed | Hvert 2. sekund |
| Driftstemperatur | 0 ... 40°C / 32 ... 104°F |
| Lyssensor | Silicon photodiode, corrected cosine angle |
| Vise | 5-cifret LCD |
| Strømkilde | 9V batteri (inkluderet) |
| Dimensioner | 33 x 54 x 196 mm / 1.3 x 2.1 x 7.7 tommer |
| Vægt | 180 g / <1 lb (approx. 9.17 ounces) |
8.1 Leveringsomfang
The standard delivery package includes:
- 1 x PCE-170 A Lux Meter
- 1 x 9V batteri
- 1 x bæretaske
- 1 x Brugermanual (dette dokument)
9. Garanti og support
PCE Instruments provides a warranty for this product against defects in materials and workmanship. For specific warranty terms and conditions, please refer to the warranty card included with your purchase or visit the official PCE Instruments website. For technical support, service, or calibration inquiries, please contact PCE Instruments customer service.
PCE Instruments USA: Besøg butik


