1. Introduktion
Thank you for choosing the BECA BHT-2000GALTP Smart Floor Heating Thermostat. This device is designed to provide intelligent and efficient control over your electric floor heating system, ensuring optimal comfort and energy savings. Featuring a modern black screen display and intuitive touch controls, this thermostat offers 5+2 weekly programming capabilities to suit your lifestyle.

Figur 1: Forside view of the BECA BHT-2000GALTP Smart Floor Heating Thermostat, displaying temperature, time, and mode indicators.
2. Sikkerhedsoplysninger
Please read this section carefully before installation and operation to prevent personal injury or damage to the product.
- Installation must be carried out by a qualified electrician in accordance with local electrical codes and regulations.
- Always disconnect power at the circuit breaker before installing, cleaning, or servicing the thermostat.
- Udsæt ikke termostaten for vand eller for høj luftfugtighed.
- Sørg for, at alle ledningsforbindelser er sikre og korrekt isolerede.
- Denne termostat er kun beregnet til indendørs brug.
3. Pakkens indhold
Bekræft at alle varer er til stede i pakken:
- BECA BHT-2000GALTP Thermostat Unit
- Monteringsskruer (2)
- Brugervejledning (dette dokument)
4. Specifikationer
| Feature | Specifikation |
|---|---|
| Model | BHT-2000GALTP |
| Strømforsyning | AC 95~240V, 50/60Hz |
| Belastningsstrøm | 3A |
| Dimensioner (L x B x H) | 8.61 x 8.61 x 1.32 cm |
| Farve | Sort |
| Baggrundsbelysning | Ja |
| IP-vurdering | IP20 |
| Sensor | NTC |
5. Installation (Opsætning)
The thermostat is designed for installation into a standard 86mm square or European 60mm round wall box. Ensure the power supply is disconnected before beginning installation.
- Turn off the main power supply to the heating system at the circuit breaker.
- Separate the mounting plate from the thermostat unit by gently prying the bottom clips.
- Connect the wiring according to the diagram in Section 6.
- Mount the back plate into the wall box using the provided screws.
- Align the thermostat unit with the mounting plate and snap it into place.
- Genopret strømmen til varmesystemet.

Figur 2: Sideprofile of the thermostat, illustrating its compact design for wall mounting.
6. Ledningsdiagram
Proper wiring is essential for the safe and correct operation of your thermostat. Refer to the diagrams below and ensure all connections are secure.

Figur 3: Bagside view of the thermostat with terminal labels for power, load, and NTC sensor.
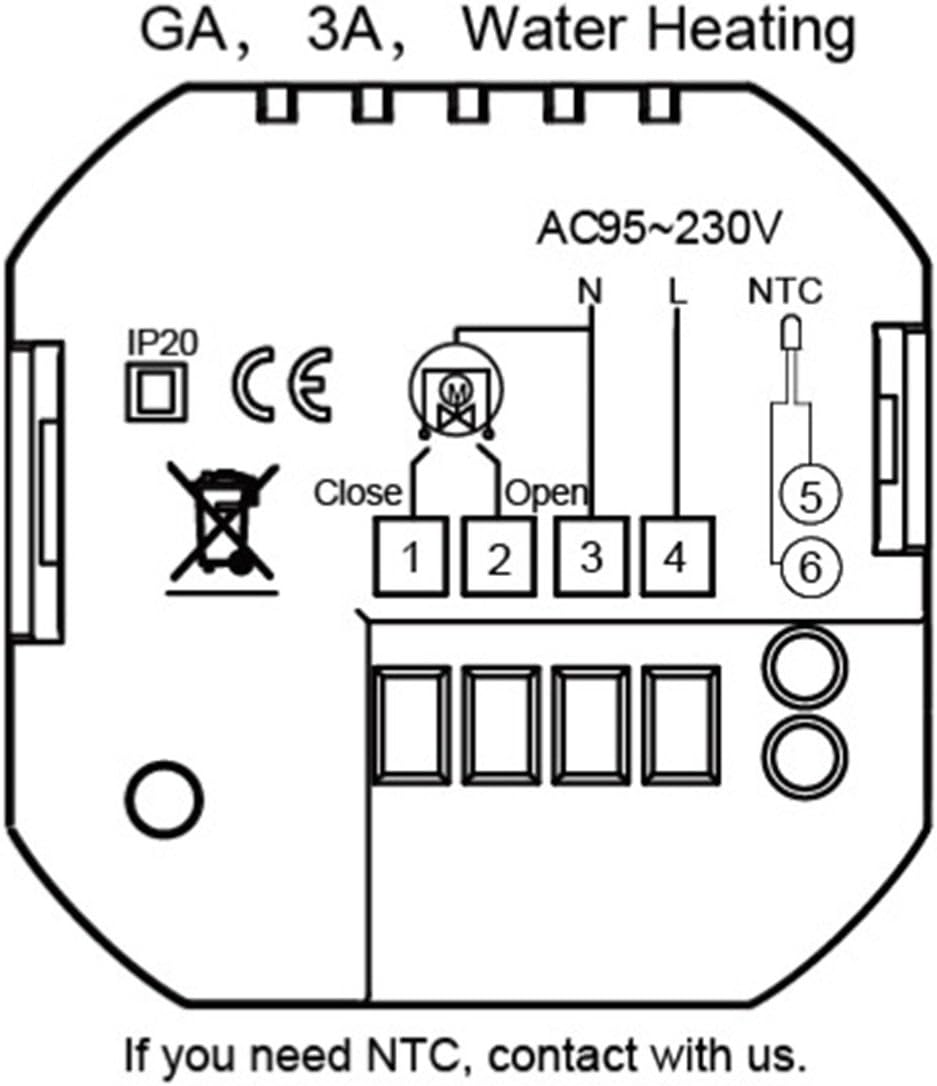
Figure 4: Detailed wiring schematic for GA, 3A, Water Heating models. Connect Live (L) and Neutral (N) to terminals 3 and 4 respectively. Connect the heating load to terminals 1 and 2. The NTC floor sensor connects to terminals 5 and 6.
Terminalbeskrivelser:
- N: Nulledning til strømforsyning.
- L: Faseledning til strømforsyning.
- 1, 2: Load connections for the heating element.
- 5, 6: NTC sensor connections (for floor temperature sensing).
7. Betjening
The thermostat features a clear display and touch buttons for easy operation.

Figure 5: Thermostat display and button function overview.
Knap funktioner:
- M (tilstand): Press to switch between Manual mode and Program mode.
- ⏱ (Clock/Time): Press to set time and date. Hold to enter programming settings.
- ⏻ (Strøm): Tryk for at tænde/slukke termostaten.
- ▲ (Up Arrow): Increase temperature or adjust settings.
- ▼ (Down Arrow): Decrease temperature or adjust settings.
Indstilling af tid og dato:
- With the thermostat ON, press the ⏱ button once. The hour digit will flash.
- Bruge ▲ og ▼ for at justere timen.
- Trykke ⏱ igen for at gå til minutter, og brug derefter ▲ og ▼ at justere.
- Trykke ⏱ again to move to the day of the week (1-7, Monday-Sunday), then use ▲ og ▼ at justere.
- Trykke ⏱ again or wait 10 seconds to save and exit.
8. Programming (5+2 Weekly Schedule)
The thermostat supports 5+2 weekly programming, allowing you to set different temperatures for weekdays (Monday-Friday) and weekends (Saturday-Sunday) across six time periods each day.
- With the thermostat ON, hold the ⏱ button for 3-5 seconds to enter programming mode. The display will show "WEEK" and the first period (Period 1) for weekdays.
- Bruge ▲ og ▼ to adjust the start time for Period 1.
- Trykke ⏱ to move to the temperature setting for Period 1. Use ▲ og ▼ for at justere den ønskede temperatur.
- Repeat steps 2 and 3 for Period 2 through Period 6 for weekdays.
- After setting all 6 periods for weekdays, the display will switch to weekend programming (Saturday-Sunday). Repeat the process for Period 1 through Period 6 for weekends.
- Once all periods are set, press ⏱ again or wait 10 seconds to save the settings and exit programming mode.
Default Program Settings (Example):
| Periode | Time (Mon-Fri) | Temp (Mon-Fri) | Time (Sat-Sun) | Temp (Sat-Sun) |
|---|---|---|---|---|
| 1 | 06:00 | 22 ℃ | 08:00 | 23 ℃ |
| 2 | 08:00 | 18 ℃ | 11:00 | 20 ℃ |
| 3 | 11:30 | 18 ℃ | 14:00 | 20 ℃ |
| 4 | 13:30 | 18 ℃ | 17:00 | 23 ℃ |
| 5 | 17:00 | 22 ℃ | 20:00 | 20 ℃ |
| 6 | 22:00 | 18 ℃ | 22:00 | 18 ℃ |
9. Vedligeholdelse
The BECA BHT-2000GALTP thermostat requires minimal maintenance.
- Rensning: Tør skærmen af og casing med en blød, damp klæde. Brug ikke slibende rengøringsmidler eller opløsningsmidler.
- Ingen dele, der kan serviceres af brugeren: Forsøg ikke selv at åbne eller reparere termostaten. Overlad al service til kvalificeret personale.
10. Fejlfinding
Hvis du støder på problemer med din termostat, kan du se følgende almindelige problemer og løsninger:
| Problem | Mulig årsag | Løsning |
|---|---|---|
| Termostaten har ingen strøm/displayet er slukket. | Ingen strømforsyning; afbryder udløst; løse ledninger. | Check power supply at the circuit breaker. Ensure wiring connections are secure (refer to Section 6). |
| Heating system not turning on/off as expected. | Incorrect temperature setting; thermostat in wrong mode (Manual/Program); wiring issue. | Verify desired temperature is set correctly. Check thermostat mode (M button). Inspect wiring. |
| Temperaturaflæsningen virker unøjagtig. | Sensor issue; thermostat location. | Ensure the NTC sensor is properly connected and not damaged. Avoid placing thermostat near heat sources or drafts. |
| Kan ikke gå ind i programmeringstilstand. | Knap ikke holdt længe nok. | Hold ⏱ knappen i 3-5 sekunder. |
11. Garanti og support
For garantioplysninger eller teknisk support, kontakt venligst din forhandler eller producenten direkte. Gem din købskvittering som købsbevis.
Manufacturer: BECA


