1. Introduktion
This manual provides comprehensive instructions for the installation, operation, and maintenance of your AIBOO Linkable Under Cabinet LED Lighting System. This system features hardwired 12V slim aluminum dimmable puck lights with a wireless controller, designed for ambiance lighting in various indoor settings. Please read this manual thoroughly before installation and use.
2. Vigtige sikkerhedsoplysninger
- Elektrisk sikkerhed: This product is designed for 110V/120Vac input and requires hardwiring. Installation should be performed by a qualified electrician or an individual with intermediate knowledge of electrical wiring to prevent electric shock or fire hazards. Ensure power is disconnected at the circuit breaker before any installation or maintenance.
- Ingen stikkontakt: This system does NOT include a wall plug power adapter. It is intended for direct wiring into your electrical system.
- Kun indendørs brug: This lighting system is designed for indoor use in dry locations. Do not expose to moisture or water.
- Ventilation: Sørg for tilstrækkelig ventilation omkring LED-driveren for at forhindre overophedning.
- Komponentkompatibilitet: Use only the components provided or specified by AIBOO. Using incompatible parts may damage the system or pose a safety risk.
3. Pakkens indhold
Bekræft, at alle nedenstående varer er inkluderet i din pakke:
- LED Puck Lights (6 units)
- RF Wireless Remote Control (1 unit)
- LED Controller (1 unit)
- 12V 1A Hardwired LED Driver (Power Adapter) (1 unit)
- 5ft Extension Cords (2 units)
- 6-Way Splitter (1 unit)
- Mounting Stickers (12 units)
- Monteringsskruer (12 enheder)

4. Produktspecifikationer
| Mærke | AIBOO |
| Modelnummer | YK-300000197 |
| Lys farve | 6000K dagslys hvid |
| Materiale | Metal (Puck Light Housing), Plastic (Shade) |
| Puck Light Dimensions | 6 cm L x 6 cm B x 0.8 cm H (2.36" L x 2.36" B x 0.31" H) |
| Strømkilde | Ledningsbaseret elektrisk (fastmonteret) |
| Voltage | 12 Volts (DC output from driver) |
| Lyskildetype | LED |
| Lysstyrke | 1200 Lumens (Total for 6 lights) |
| Særlige funktioner | Dimmable, Linkable, Remote Control |
| Kontrolmetode | RF trådløs fjernbetjening |
| UPC | 712411875756 |

5. Opsætning og installation
Before beginning installation, ensure the main power supply to the installation area is turned off at the circuit breaker.
5.1 Ledningsdiagram ovenforview

5.2 Hardwired Power Adapter Connection
The system includes a hardwired power adapter (LED Driver) designed to connect directly to a 110V/120Vac circuit. This adapter converts AC power to 12V DC for the LED lights. A wall plug is not included.
- Sluk for strømmen ved hovedafbryderen.
- Connect the input wires of the LED driver to your 110V/120Vac circuit wiring. Ensure proper polarity (live to live, neutral to neutral, ground to ground) according to local electrical codes.
- Fastgør alle forbindelser med passende ledningsforbindelser.
5.3 Connecting the Puck Lights
The puck lights can be connected in two primary configurations: Series Connection or Parallel Connection.
5.3.1 Serieforbindelse
In a series connection, the puck lights are linked one after another. This method is suitable for linear installations where lights are spaced evenly in a line.

- Connect the LED controller to the output of the hardwired LED driver.
- Connect the first puck light to the LED controller.
- Connect the subsequent puck lights to each other using their integrated cables.
- Use extension cords if additional length is required between lights.
5.3.2 Parallelforbindelse
For installations requiring lights to branch out from a central point, the 6-way splitter allows for parallel connection.
- Connect the LED controller to the output of the hardwired LED driver.
- Connect the 6-way splitter to the LED controller.
- Connect individual puck lights to the available ports on the 6-way splitter.
- Use extension cords if additional length is required for individual lights.
5.4 Mounting the Puck Lights
The puck lights can be mounted using either the provided screws or adhesive stickers.
- Forberedelse af overfladen: Sørg for, at monteringsfladen er ren, tør og glat.
- Klæbende montering: Peel the backing from the adhesive sticker and firmly press the puck light onto the desired surface. Hold for 30 seconds to ensure a strong bond.
- Skrue montering: Use the provided screws to secure the puck lights to the surface. Pre-drilling pilot holes may be necessary depending on the material.
6. Betjeningsvejledning
The AIBOO LED Lighting System is controlled by an RF wireless remote control.
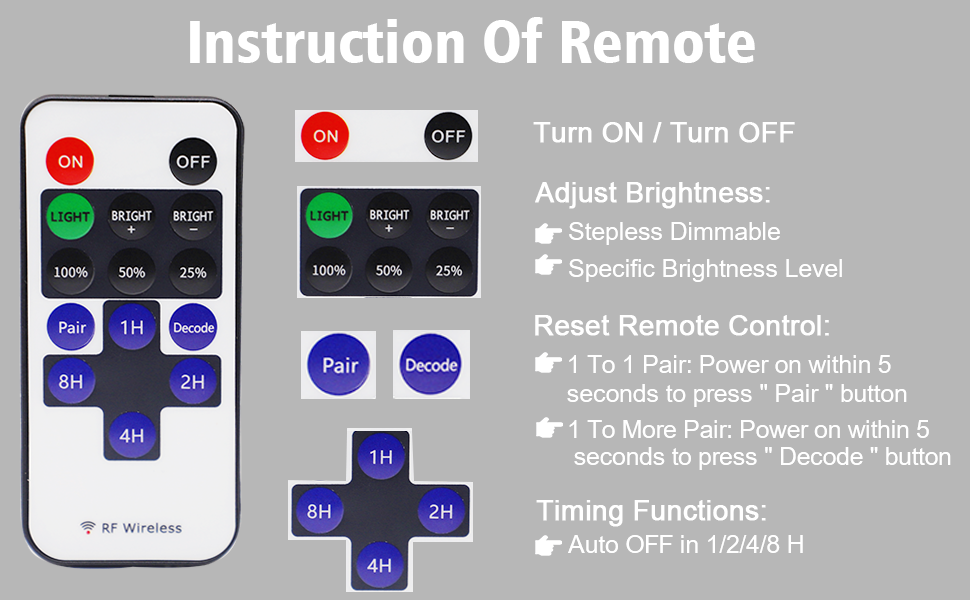
6.1 Fjernbetjeningsfunktioner

- TIL/FRA: Tryk på ON button to turn the lights on, and the SLUKKET knappen for at slukke dem.
- Justering af lysstyrke:
- Trykke LIGHT + or LIGHT - to gradually increase or decrease brightness (stepless dimming).
- Brug 100 %, 50 %, 25 % buttons for quick brightness presets.
- Parring: To pair the remote with the controller, press the Par button within 5 seconds of powering on the lights until the lights flicker.
- Decoding (1 to More Pair): To pair one remote with multiple controllers, press the Afkode button within 5 seconds of powering on the lights until the lights flicker.
- Timingfunktioner: Trykke 1H, 2H, 4H, eller 8H to set the lights to automatically turn off after 1, 2, 4, or 8 hours, respectively.


7. Vedligeholdelse
The AIBOO LED Lighting System requires minimal maintenance.
- Rensning: Ensure the lights are off and cool before cleaning. Wipe the puck lights and controller with a soft, dry cloth. Do not use abrasive cleaners or solvents.
- Inspektion: Periodically check all connections for tightness and inspect cables for any signs of damage.
- Udskiftning af batteri: The remote control requires 1 CR2 battery. Replace the battery when the remote's range decreases or it stops responding.
8. Fejlfinding
If you encounter issues with your AIBOO LED Lighting System, refer to the following common problems and solutions:
| Problem | Mulig årsag | Løsning |
|---|---|---|
| Lysene tænder ikke. | No power to the LED driver; Remote control battery is dead; Remote not paired; Loose connections. | Check circuit breaker. Replace remote battery. Re-pair remote (see Section 6.1). Verify all cable connections are secure. |
| Lights are flickering or strobing. | Too many lights connected to a single power supply; Faulty power supply. | Ensure no more than 6 lights are connected to one power supply. If flickering persists, inspect the power supply for signs of damage (e.g., warped casing, discoloration). A damaged power supply may need replacement. |
| Fjernbetjeningen reagerer ikke. | Remote control battery is dead; Remote is out of range; Remote is not paired with the controller. | Replace the CR2 battery in the remote. Move closer to the LED controller. Re-pair the remote with the controller (see Section 6.1). |
| Lights do not dim or respond to brightness controls. | Remote not paired correctly; Controller malfunction. | Re-pair the remote (see Section 6.1). If the issue persists, contact customer support. |
9. Garantioplysninger
AIBOO products are manufactured to high-quality standards. For specific warranty details regarding your Linkable Under Cabinet LED Lighting System, please refer to the warranty card included with your purchase or visit the official AIBOO webwebsted. Gem din købskvittering som købsbevis i tilfælde af garantikrav.
10. Kundesupport
For technical assistance, troubleshooting, or product inquiries, please contact AIBOO customer support.
- U.S. Live Customer Support: Monday - Friday, 9 AM - 5 PM (EST)
- Online ressourcer: Besøg AIBOO Store on Amazon for yderligere produktinformation og support.


