1. Introduktion
This manual provides detailed instructions for the installation, operation, and maintenance of your Steinel XLED Home 2 S LED Floodlight with Motion Detector. Please read these instructions carefully before initial use and keep them for future reference. This product is designed for outdoor use, providing efficient and reliable illumination with integrated motion detection capabilities.
Nøglefunktioner:
- Freely swiveling LED panel, adjustable up to 180° for flexible light direction.
- Energy-efficient 13.7 W LED with 1550 lumens brightness and 3000 K warm white light.
- 180° infrared motion detector with a maximum range of 10 meters, vertically adjustable by 90° and horizontally by 180°.
- Adjustable time delay (8 seconds - 35 minutes) and twilight threshold (2-2000 lux).
- Long LED lifespan of 50,000 hours and efficient HCMC cooling system.
2. Sikkerhedsinstruktioner
WARNING: Installation and maintenance must be performed by a qualified electrician in accordance with national wiring regulations and local electrical codes.
- Ensure the power supply is disconnected before installation, maintenance, or repair work.
- Produktet må ikke ændres på nogen måde. Uautoriserede ændringer kan kompromittere sikkerheden og ugyldiggøre garantien.
- This product is designed for outdoor use (IP44 rating). Ensure proper sealing during installation to maintain water resistance.
- Do not look directly into the LED light source when illuminated, as it may cause eye damage.
- Hold emballagemateriale utilgængeligt for børn.
3. Pakkens indhold
Kontroller, at alle komponenter er til stede og ubeskadigede ved udpakning.

- Steinel XLED Home 2 S LED Floodlight with Motion Detector
- Mounting hardware (screws, wall plugs, spacers, sealing plugs)
- Brugsanvisning / Hurtigstartguide
4. Produktet er slutview
The Steinel XLED Home 2 S features a robust design with a highly adjustable LED panel and an integrated infrared motion sensor. The unit is designed for easy installation and flexible light positioning.


5. Installation
The Steinel XLED Home 2 S is designed for straightforward wall mounting. Ensure the mounting surface is suitable and stable.
5.1 Monteringssted
- Choose a location that provides the desired illumination area and allows for optimal motion detection.
- Avoid mounting near heat sources or objects that might cause false triggers (e.g., moving branches, reflective surfaces).
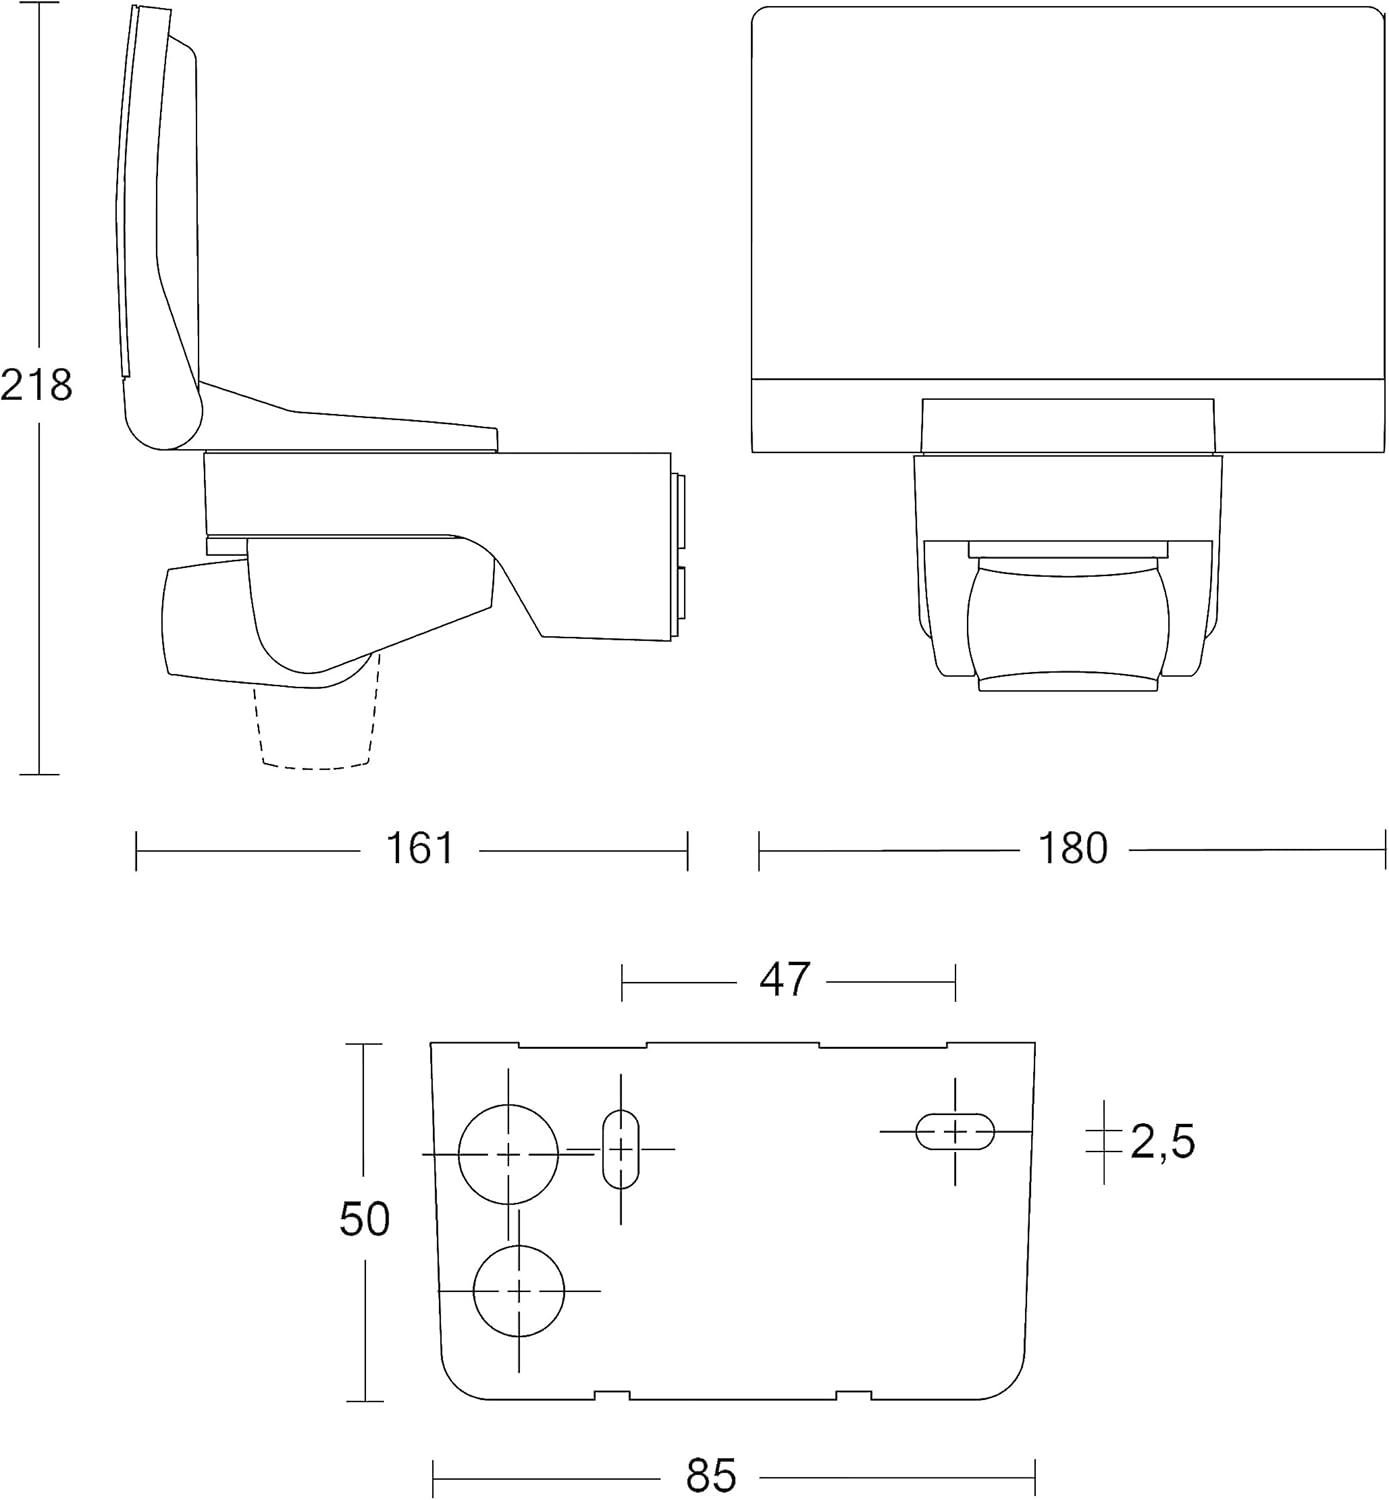
- Consider the product dimensions for proper placement.

5.2 Elektrisk tilslutning
Vigtig: Disconnect power at the main circuit breaker before proceeding with electrical connections.
- Remove the mounting plate from the floodlight unit.
- Route the electrical cable through the designated opening in the mounting plate.
- Connect the live (L), neutral (N), and earth (PE) wires to the corresponding terminals. Ensure secure connections.
- Mount the plate to the wall using the provided screws and wall plugs.
- Attach the floodlight unit to the mounted plate and secure it with the small screw at the bottom.
The intelligent mounting concept simplifies installation and wiring.
6. Opsætning og konfiguration
The Steinel XLED Home 2 S offers adjustable settings for optimal performance.
6.1 Adjusting the LED Panel
The LED panel can be swiveled up to 180° horizontally and vertically. Loosen the adjustment screws slightly, position the panel to direct light as desired, and then tighten the screws to secure it.

6.2 Adjusting the Motion Sensor
The 180° infrared motion sensor can be adjusted vertically by 90° and horizontally by 180° to precisely define the detection zone. Adjustment dials for time delay and twilight threshold are located on the underside of the sensor unit.

- Tidsforsinkelse: Use the corresponding dial to set how long the light remains on after motion is detected. Settings range from 8 seconds to 35 minutes.
- Twilight Threshold: Use the corresponding dial to set the ambient light level at which the sensor becomes active. This prevents the light from activating during daylight hours. Settings range from 2 lux (dark) to 2000 lux (daylight).
- Sensororientering: Physically rotate the sensor head to cover the desired detection area. The detection range is up to 10 meters.

7. Betjening
Once installed and configured, the Steinel XLED Home 2 S operates automatically. The light will activate when motion is detected within the set range and ambient light conditions, remaining on for the programmed duration.
The highly efficient LED technology combined with the opal lens ensures maximum lighting comfort and uniform illumination.
8. Vedligeholdelse
The Steinel XLED Home 2 S is designed for minimal maintenance.
- Rensning: Rengør produktet regelmæssigt med en blød, damp cloth. Do not use abrasive cleaners or solvents, as these can damage the surfaces. Ensure the sensor lens is kept clean for optimal detection.
- LED levetid: The integrated LEDs have a lifespan of approximately 50,000 hours, eliminating the need for frequent bulb changes.
- Kølesystem: The HCMC (Highly Conductive Magnesium Composite) cooling system efficiently dissipates heat, contributing to the long lifespan of the LEDs.
9. Fejlfinding
If you experience issues with your Steinel XLED Home 2 S, refer to the following common problems and solutions:
| Problem | Mulig årsag | Løsning |
|---|---|---|
| Lyset tændes ikke. | No power supply; Twilight threshold set too high (daylight mode); Sensor obstructed; Faulty LED. | Check power connection; Adjust twilight threshold to a lower lux value; Clear sensor path; Contact support if LED is faulty. |
| Lyset forbliver tændt konstant. | Continuous motion in detection area; Time delay set too long; Sensor malfunction. | Check for constant movement; Reduce time delay setting; Reposition sensor to exclude unwanted areas; Contact support if sensor is faulty. |
| Light turns on without apparent motion (false triggers). | Sensor too sensitive; Environmental factors (e.g., moving branches, small animals, heat sources, reflections). | Reduce sensor sensitivity (if adjustable, not explicitly stated for this model but common); Adjust sensor orientation to exclude problematic areas; Ensure no objects are causing interference. |
| Detektionsområdet er for kort eller inkonsekvent. | Sensor orientation incorrect; Obstructions; Temperature differences. | Adjust sensor angle and tilt; Clear any obstructions; Ensure sensor is not directly facing strong heat or cold sources. |
10. Specifikationer
| Feature | Detalje |
|---|---|
| Modelnummer | 33088 |
| Mærke | STEINEL |
| Dimensioner (L x B x H) | 16.1 x 18.0 x 21.8 cm (7.64 x 7.09 x 6.34 tommer) |
| Vægt | 0.576 kg (570 gram) |
| Farve | Hvid |
| Materiale | Plast |
| Lyskilde | LED |
| Strømforbrug | 13.7 W |
| Lysstrøm | 1550 lumen |
| Farvetemperatur | 3000 K (varm hvid) |
| Bevægelsessensor type | Infrarød (PIR) |
| Detektionsvinkel | 180° |
| Detektionsområde | Maks. 10 m |
| Tidsindstilling | 8 sec. - 35 min. |
| Tusmørkeindstilling | 2-2000 lux |
| Beskyttelsesklasse | IP44 (stænksikker) |
| Strømkilde | Elektrisk med ledning |
| Montering påkrævet | Ja |
| Brug | Udendørs |
11. Garanti og support
The Steinel XLED Home 2 S comes with a 5 års producentgaranti. For warranty claims or technical support, please contact your retailer or visit the official Steinel webwebsted. Gem din købsbevis for at validere garantien.
For additional information and product registration, please refer to the documentation included in your package or visit the Steinel Brand Store.


