1. Introduktion
This manual provides detailed instructions for the installation, operation, and maintenance of your Focal FPX1.1000 Class D Mono Amplifier. Please read this manual thoroughly before attempting installation or operation to ensure proper function and safety. Retain this manual for future reference.
2. Sikkerhedsinstruktioner
Observe the following safety precautions to prevent injury or damage to the amplifier and vehicle:
- Professionel installation anbefales: Installation of car audio equipment can be complex. It is highly recommended that a qualified professional install this amplivligere.
- Afbryd batteriet: Frakobl altid bilens negative batteripol, inden du påbegynder elektrisk arbejde, for at undgå kortslutninger.
- Korrekt ledningsføring: Use appropriate gauge wiring for power, ground, and speaker connections as specified in the installation section. Incorrect wiring can cause overheating, fire, or damage to components.
- Ventilation: Sørg for amplifier is mounted in a location with adequate ventilation to prevent overheating. Do not block cooling fins.
- Undgå fugt: Udsæt ikke ampmodstandsdygtig over for fugt eller vand.
- Sikker montering: Monter amplifier securely to prevent it from coming loose during vehicle operation, which could cause injury or damage.
- Sikringsbeskyttelse: Always use an external fuse on the main power wire, close to the battery, with the recommended ampslette.
3. Produktet er slutview
3.1 Nøglefunktioner
- CEA Power (4 Ohms): 1×420 Wrms
- Maximum Power (2 Ohms): 1×700 Wrms
- Maximum Power (1 Ohm): 1×1000 Wrms
- Bandwidth: 15Hz–250Hz
- Integrated Protections: Short Circuit, low impedance, reversal of polarity, DC, power drop, heat protection.
- Klasse D mono Amplifier design for high power and efficiency.
3.2 Hvad er der i æsken
- Focal FPX1.1000 Mono Amplivligere
- Brugervejledning (dette dokument)
- Monteringsudstyr (skruer osv.)
4. Installation og opsætning
Proper installation is crucial for optimal performance and safety. Consult a professional installer if you are unsure about any steps.
4.1 Monteringssted
Choose a mounting location that is:
- Dry and free from moisture.
- Godt ventileret for at muliggøre varmeafledning.
- Secure and protected from physical damage.
- Away from fuel lines, brake lines, and electrical wiring harnesses.
Almindelige steder inkluderer under et sæde, i bagagerummet eller bag et panel.
4.2 Ledningsforbindelser
Før du foretager nogen tilslutninger, skal du frakoble bilens negative batteripol.
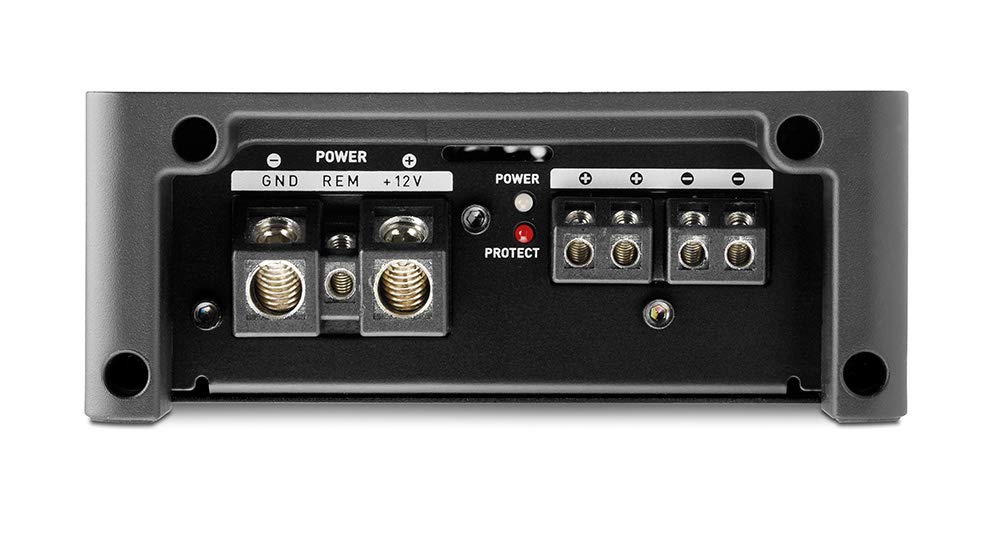
Image 1: Power and Speaker Terminal Connections. This image displays the rear panel of the amplifier, highlighting the power input terminals (GND, REM, +12V) and the speaker output terminals. A red 'PROTECT' indicator light is also visible.
- Strømledning (+12V): Run a heavy-gauge power wire (e.g., 4 AWG or larger, depending on total system power) directly from the positive terminal of the vehicle's battery to the +12V terminal on the amplifier. Install an inline fuse holder with the appropriate fuse (refer to specifications for recommended fuse size) within 18 inches (45 cm) of the battery.
- Jordledning (GND): Connect a heavy-gauge ground wire (same gauge as power wire) from the GND terminal on the amplifier to a clean, unpainted metal surface on the vehicle's chassis. Ensure a good electrical connection by scraping away any paint or rust. The ground wire should be as short as possible, ideally less than 3 feet (1 meter).
- Fjernbetjeningsledning (REM): Connect a smaller gauge wire (e.g., 18 AWG) from the REM terminal on the amplifier to the remote turn-on output of your head unit or other switched 12V source. This wire turns the amptænd og sluk for lyden med dit lydsystem.
- Højttaler output: Connect your subwoofer(s) to the speaker output terminals. Ensure correct polarity (+ to + and - to -). This is a mono amplifier, designed for a single subwoofer or multiple subwoofers wired to present a 1-ohm or 2-ohm load. Refer to your subwoofer's specifications for impedance matching.
- RCA-indgang: Connect RCA cables from the subwoofer output of your head unit to the INPUT CH1/CH2 RCA jacks on the amplivligere.

Image 2: Input and Control Panel. This image shows the front panel of the amplifier, featuring RCA input and output jacks, a remote port, and various control knobs for Gain, Subsonic filter, Bass Boost, Phase, and Low Pass Filter (LPF).
5. Betjeningsvejledning
Når den er installeret, skal du justere ampLifier-indstillinger for optimal lydgengivelse.
5.1 Control Panel Adjustments
- GAIN (Input Sensitivity): Denne kontrol passer til amplifier's input sensitivity to the output level of your head unit. Start with the gain at minimum (Min) and slowly increase it until you hear distortion, then back off slightly. Do not use the gain control as a volume knob.
- SUBSONIC: This filter removes extremely low frequencies that are inaudible and can waste amplifier power or damage subwoofers. Adjust it to a frequency below your subwoofer's resonant frequency or port tuning frequency (typically 15-30Hz).
- BASS BOOST: This control provides an increase in bass output at a specific frequency. Use sparingly to avoid distortion and potential damage to subwoofers.
- FASE: This control adjusts the phase of the subwoofer output relative to the main speakers (0° to 180°). Adjust for the best blend and impact with your front speakers.
- LPF (lavpasfilter): This filter allows only frequencies below the set point to pass through to the subwoofer. Adjust it to blend smoothly with your main speakers, typically between 50Hz and 80Hz.
5.2 Power and Protection Indicators
- Strømindikator: Lyser, når ampStrømforsyningen modtager strøm og fungerer normalt.
- Protect Indicator: Lyser, når amplifier detects a fault (e.g., short circuit, overheating, low impedance). If this light comes on, turn off your audio system immediately and troubleshoot the issue.
6. Vedligeholdelse
The Focal FPX1.1000 amplifier requires minimal maintenance. Follow these guidelines to ensure longevity:
- Rensning: Tør regelmæssigt af ampRengør ydersiden af apparatet med en blød, tør klud. Brug ikke skrappe kemikalier eller slibende rengøringsmidler.
- Ventilation: Ensure that the cooling fins remain free of dust and debris. Use compressed air to gently clear any blockages if necessary.
- Forbindelser: Kontrollér lejlighedsvis alle ledningsforbindelser for at sikre, at de er fastgjorte og fri for korrosion.
7. Fejlfinding
Hvis du oplever problemer med din ampLifier, se følgende tabel, før du søger professionel service:
| Problem | Mulig årsag | Løsning |
|---|---|---|
| Ingen strøm / Ampkøleren tænder ikke |
|
|
| Protect light is on |
|
|
| Ingen lyd |
|
|
| Forvrænget lyd |
|
|
8. Specifikationer
| Feature | Detalje |
|---|---|
| Modelnummer | FPX1.1000 |
| Mærke | Fokal |
| CEA Power (4 Ohm) | 1×420 Wrms |
| Maximum Power (2 Ohms) | 1×700 Wrms |
| Maximum Power (1 Ohm) | 1×1000 Wrms |
| Båndbredde | 15Hz – 250Hz |
| Beskyttelser | Short Circuit, low impedance, reversal of polarity, DC, power drop, heat protection |
| Produktdimensioner | 11.81 x 11.81 x 11.81 tommer; 6 pund |
| Monteringstype | Overflademontering |
| Voltage | 10 Volts, 14.4 Volts, 5 Volts (Operating Voltage rækkevidde) |
9. Garanti og support
Focal products are designed and manufactured to high quality standards. This product is covered by a limited warranty against defects in materials and workmanship. The specific terms and duration of the warranty may vary by region and retailer. Please retain your proof of purchase for warranty claims.
For technical support, warranty service, or further assistance, please contact your authorized Focal dealer or visit the official Focal webwebsted for kontaktoplysninger.


