1. Introduktion
This manual provides essential instructions for the safe and efficient operation of your Hytera PD365LF Digital Portable Radio. Please read this manual thoroughly before using the product to ensure proper functionality and to prevent damage.
2. Pakkens indhold
Upon unpacking, please verify that all items listed below are present and in good condition. If any item is missing or damaged, contact your dealer immediately.
- Hytera PD365LF Digital Portable Radio
- Lithium-ion batteri
- Strømadapter
- Bælteclips
- Rem
- Brugervejledning (dette dokument)
3. Produktet er slutview
The Hytera PD365LF is a compact and robust digital portable radio designed for reliable communication. Familiarize yourself with the radio's components.
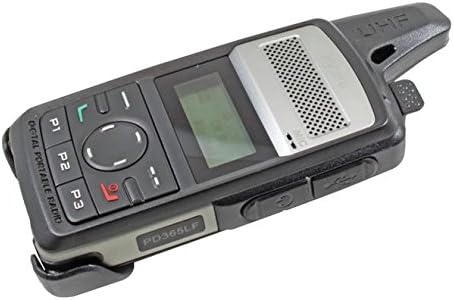
Figure 1: Hytera PD365LF Digital Portable Radio. This image displays the radio from an angled perspective, highlighting its compact form factor. Visible features include the speaker grille, LCD screen, navigation buttons (P1, P2, P3, and a central directional pad), and the UHF antenna. The model number "PD365LF" is clearly visible on the front casing.
Nøglekomponenter:
- Antenne: Til at sende og modtage signaler.
- Højttaler: Udsender lyd.
- Mikrofon: Inputs audio.
- LCD-skærm: Shows channel information, battery status, and menu options.
- Navigation Buttons (P1, P2, P3, Directional Pad): For menu navigation and quick access functions.
- Push-to-Talk (PTT)-knap: Aktiverer transmissionen.
- Strøm-/lydstyrkeknap: Tænder/slukker radioen og justerer lydstyrken.
- Tilbehørsport: For connecting audio accessories or programming cable.
4. Opsætning
4.1 Batteriinstallation
- Sørg for, at radioen er slukket.
- Juster batteriet med batterirummet på bagsiden af radioen.
- Tryk forsigtigt batteriet på plads, indtil det klikker sikkert.
- To remove, slide the battery release latch and lift the battery out.
4.2 Opladning af batteriet
Before initial use, fully charge the battery. A fully discharged battery typically takes approximately 3-4 hours to charge.
- Tilslut strømadapteren til en passende stikkontakt.
- Connect the charging cable to the radio's accessory port.
- The charging indicator on the radio will illuminate (e.g., red for charging, green for fully charged).
- Når den er fuldt opladet, skal du frakoble opladeren.
5. Betjeningsvejledning
5.1 Tænd/sluk
- For at tænde: Rotate the Power/Volume knob clockwise until a click is heard and the display illuminates.
- For at slukke: Rotate the Power/Volume knob counter-clockwise until a click is heard and the display turns off.
5.2 Justering af lydstyrke
After powering on, rotate the Power/Volume knob clockwise to increase volume or counter-clockwise to decrease volume.
5.3 Kanalvalg
Use the navigation buttons (e.g., up/down arrows on the directional pad) to scroll through available channels. The selected channel will be displayed on the LCD screen.
5.4 Afsendelse og modtagelse
- At sende: Press and hold the Push-to-Talk (PTT) button. Speak clearly into the microphone. Release the PTT button to stop transmitting.
- At modtage: Sørg for, at PTT-knappen ikke er trykket ned. Radioen vil automatisk modtage signaler på den valgte kanal.
5.5 Programmable Buttons (P1, P2, P3)
The P1, P2, and P3 buttons can be programmed for various functions (e.g., zone switch, scan, emergency call) by your dealer or through programming software. Refer to your dealer for specific configurations.
6. Vedligeholdelse
6.1 Generel pleje
- Hold radioen tør. Undgå at den udsættes for regn, fugt eller væsker.
- Udsæt ikke radioen for ekstreme temperaturer.
- Handle the radio with care. Avoid dropping or subjecting it to strong impacts.
6.2 Rengøring
Rengør radioens overflade med en blød, damp cloth. Do not use harsh chemicals, cleaning solvents, or strong detergents, as these may damage the casing eller interne komponenter.
7. Fejlfinding
| Problem | Mulig årsag | Løsning |
|---|---|---|
| Radioen tænder ikke. | Battery is discharged or improperly installed. | Oplad batteriet, eller monter det korrekt igen. |
| Kan ikke sende eller modtage. | Incorrect channel selected; out of range; antenna not properly attached. | Verify channel; move closer to other radios; ensure antenna is secure. |
| Dårlig lydkvalitet. | Low battery; obstruction between radios; volume too low/high. | Charge battery; clear obstructions; adjust volume. |
If the problem persists after attempting these solutions, please contact your authorized Hytera dealer for assistance.
8. Specifikationer
The following are general specifications for the Hytera PD365LF. Specific performance may vary based on environmental conditions and configuration.
- Model: PD365LF
- Mærke: Hytera
- Dimensioner: Approximately 19 x 13.2 x 6.8 cm (Packaging)
- Vægt: Approximately 439.99 grams (Packaging)
- Batteritype: Lithium-ion (1 påkrævet, inkluderet)
- Antal kanaler: 32
- Vandtæthed: Vandafvisende
9. Garanti og support
Your Hytera PD365LF radio is covered by a limited warranty. For detailed warranty terms and conditions, please refer to the warranty card included with your product or contact your authorized Hytera dealer. For technical support, service, or spare parts, please contact your point of purchase or visit the official Hytera webwebsted.
Bemærk: Uautoriserede reparationer eller ændringer vil ugyldiggøre produktgarantien.


