1. Introduktion
This manual provides detailed instructions for the installation, operation, and maintenance of your Avision FL-1501B document scanner. Please read this manual thoroughly before using the scanner to ensure proper and safe operation. Keep this manual for future reference.

Figure 1: Avision FL-1501B Document Scanner with its automatic document feeder (ADF) and output tray extended.
2. Sikkerhedsoplysninger
Observe the following safety precautions to prevent damage to the scanner and ensure user safety:
- Brug kun den strømadapter, der følger med scanneren.
- Udsæt ikke scanneren for vand eller for høj luftfugtighed.
- Place the scanner on a stable, level surface.
- Undgå at blokere ventilationsåbninger.
- Forsøg ikke selv at skille eller reparere scanneren. Kontakt kvalificeret servicepersonale.
- Hold scanneren væk fra direkte sollys og varmekilder.
3. Pakkens indhold
Bekræft at alle varer er til stede i pakken:
- Avision FL-1501B Scanner Unit
- Strømadapter
- USB kabel
- Hurtig startvejledning
- Software CD (or download instructions)
4. Opsætning
4.1 Udpakning og placering
- Tag forsigtigt scanneren ud af emballagen.
- Remove all protective tapes and packing materials.
- Place the scanner on a flat, stable surface with adequate space for document feeding and output.

Figure 2: The Avision FL-1501B scanner in its closed position, suitable for storage or before extending trays.
4.2 Tilslutning af scanneren
- Connect the power adapter to the scanner's power input port and then to an electrical outlet.
- Connect the USB cable to the scanner's USB port and then to an available USB port on your computer.
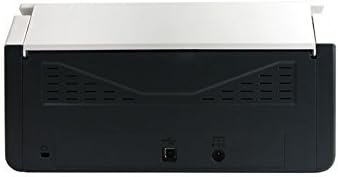
Figure 3: Rear panel of the scanner, illustrating the power input and USB connection ports.
4.3 Installation af driver og software
Before using the scanner, you must install the necessary drivers and scanning software on your computer.
- Insert the provided Software CD into your computer's optical drive, or download the latest drivers and software from the official Avision webwebsted.
- Follow the on-screen instructions to complete the installation process. It is recommended to install all bundled software for full functionality.
- Genstart din computer, hvis du bliver bedt om det.
5. Betjening
5.1 Indlæsning af dokumenter
- Extend the input tray and output tray of the scanner.
- Juster papirstyrene, så de passer til bredden på dine dokumenter.
- Place the documents face down, top edge first, into the automatic document feeder (ADF). Ensure the stack is neatly aligned. The scanner supports a maximum input sheet capacity of 100 sheets.

Figur 4: Sideprofile of the scanner, showing the fully extended input and output trays ready for document feeding.
5.2 Brug af kontrolpanelet
The scanner features a control panel for quick access to common scanning functions.

Figur 5: Detaljeret view of the scanner's control panel, featuring a digital display, function selection buttons, Cancel, Scan, and Power buttons.
- Power knap: Press to turn the scanner on or off.
- Function Buttons (Up/Down Arrows): Use these to select different scanning profiles or functions displayed on the digital screen.
- Scan knap: Initiates the scanning process based on the currently selected function.
- Annuller knap: Stops the current scanning operation.
5.3 Udførelse af en scanning
- Sørg for, at scanneren er tændt og tilsluttet din computer.
- Load your documents into the ADF as described in section 5.1.
- Open the Avision scanning software on your computer (e.g., Button Manager, Capture Tool).
- Select your desired scanning settings (e.g., color mode, resolution, destination folder, single-sided/duplex).
- Click the "Scan" button in the software or press the Scan button on the scanner's control panel to begin scanning.
- The scanned images will be processed and saved according to your software settings.
6. Vedligeholdelse
6.1 Rengøring af scanneren
Regelmæssig rengøring hjælper med at opretholde optimal scanningsydelse.
- Sluk scanneren, og tag strømkablet ud, inden rengøring.
- Brug let en blød, fnugfri klud damprengøres med vand eller et mildt, ikke-slibende rengøringsmiddel til at tørre scannerens yderside af.
- To clean the glass platen (if applicable) and rollers, open the scanner cover. Use a specialized scanner cleaning kit or a soft cloth with isopropyl alcohol.
- Allow all components to dry completely before reconnecting power.
6.2 firmwareopdateringer
Periodically check the Avision website for firmware updates. Firmware updates can improve performance, add features, or resolve issues. Follow the instructions provided with the firmware update package carefully.
7. Fejlfinding
Hvis du støder på problemer med din scanner, kan du se følgende almindelige problemer og løsninger:
| Problem | Mulig årsag | Løsning |
|---|---|---|
| Scanneren tænder ikke. | Strømkabel ikke tilsluttet; stikkontakt defekt. | Sørg for, at strømkablet er korrekt tilsluttet. Prøv en anden stikkontakt. |
| Computer does not detect scanner. | USB cable loose; drivers not installed or corrupted. | Check USB cable connection. Reinstall scanner drivers. Try a different USB port. |
| Scanned images are blurry or streaky. | Scanner glass or rollers are dirty; document misfeed. | Clean the scanner's internal components (refer to Section 6.1). Ensure documents are loaded correctly. |
| Documents jam in the ADF. | Documents are wrinkled or stapled; paper guides not adjusted. | Straighten documents. Remove staples/clips. Adjust paper guides to fit document width. |
8. Specifikationer
| Feature | Detalje |
|---|---|
| Mærke | Avision |
| Model | FL-1501B |
| Scanner type | Dokument scanner |
| Scanneropløsning | 600 dpi |
| Max input arkkapacitet | 100 ark |
| Medietype | Papir |
| Wattage | 24 watt |
| Produktdimensioner | 33 x 32.32 x 80.94 cm |
| Varens vægt | 5.67 kg |
| Dato først tilgængelig | 6. juni. 2016 |
9. Garanti og support
9.1 Garantioplysninger
Avision products are manufactured to high-quality standards. This product is covered by a limited warranty against defects in materials and workmanship. The specific terms and duration of the warranty may vary by region. Please refer to the warranty card included with your product or visit the official Avision webwebstedet for detaljerede garantioplysninger.
9.2 Teknisk support
For technical assistance, driver downloads, or further information, please visit the official Avision support website or contact your local Avision service center. Contact details can typically be found on the Avision webwebstedet eller i dit produkts dokumentation.


