1. Introduktion
This manual provides instructions for the proper installation, maintenance, and care of your Snow Joe ION16LM-RRWHEEL Rear Wheel Assembly. This replacement part is specifically designed for use with Sun Joe iON16LM and MJ402E cordless lawn mower models. Please read these instructions carefully before proceeding with installation to ensure safe and correct operation.
2. Sikkerhedsoplysninger
Always prioritize safety when performing maintenance or replacing parts on your lawn mower. Failure to follow these safety guidelines may result in injury or damage to the equipment.
- Afbryd strømmen: Before beginning any work, ensure the lawn mower is turned off and the battery pack is removed to prevent accidental startup.
- Brug beskyttelsesudstyr: Brug passende personlige værnemidler, såsom handsker og øjenbeskyttelse, under installationen.
- Stabilt arbejdsområde: Work on a flat, stable surface. If tilting the mower, ensure it is securely supported to prevent it from falling.
- Brug de rigtige værktøjer: Utilize the appropriate tools for loosening and tightening fasteners to avoid stripping or damage.
- Efterse komponenter: Before installation, inspect the new wheel assembly for any signs of damage or manufacturing defects.
3. Pakkens indhold
Bekræft at alle komponenter er til stede i pakken:
- 1 x Snow Joe ION16LM-RRWHEEL Rear Wheel Assembly
- 1 x skive
- 1 x Hex Nut
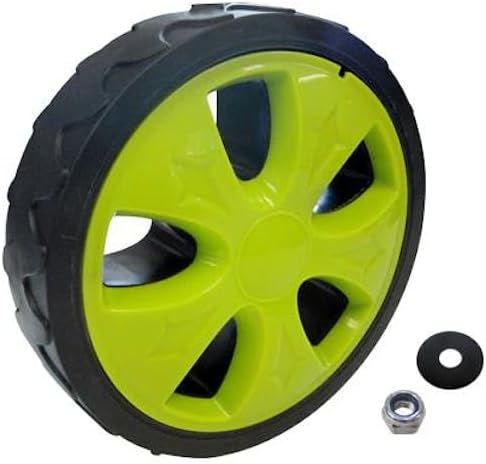
Image 1: Snow Joe ION16LM-RRWHEEL Rear Wheel Assembly. The image displays the green and black wheel, along with a black washer and a silver hex nut, which are included components.
4. Installationsvejledning
Follow these steps to replace the rear wheel assembly on your Sun Joe iON16LM or MJ402E cordless lawn mower.
- Forbered plæneklipperen: Ensure the lawn mower is turned OFF and the battery pack is removed. Place the mower on a stable, flat surface. For easier access to the rear wheels, you may carefully tilt the mower onto its side, ensuring the carburetor (if applicable) is facing upwards to prevent fuel leakage.
- Fjern det gamle hjul:
- Locate the hex nut securing the existing rear wheel to the axle.
- Using an appropriate wrench, loosen and remove the hex nut.
- Carefully remove the washer and then slide the old wheel off the axle. Retain the old nut and washer if they are in good condition, as they may be needed for reference or if the new ones are misplaced.
- Monter det nye hjul:
- Slide the new Snow Joe ION16LM-RRWHEEL assembly onto the axle, ensuring it is fully seated.
- Place the new washer onto the axle, against the wheel.
- Thread the new hex nut onto the axle and tighten it securely with a wrench. Do not overtighten, as this can damage the wheel or axle. The wheel should spin freely but without excessive wobble.
- Test installationen: Once the new wheel is installed, gently spin it by hand to ensure it rotates smoothly and without obstruction. Return the mower to its upright position.
- Sæt batteriet i igen: Reinsert the battery pack into the mower. The mower is now ready for use.

Image 2: A person operating a Sun Joe iON16LM cordless lawn mower on a green lawn. This image illustrates the type of mower this wheel assembly is designed for.
5. Operating the Mower (General Information)
This section provides general information regarding the operation of the lawn mower. For detailed operating instructions, safety precautions, and specific features of your Sun Joe iON16LM or MJ402E cordless lawn mower, please refer to the original owner's manual provided with your mower. The rear wheel assembly is a replacement part and does not alter the fundamental operation of the mower.
- Sørg for, at batteriet er fuldt opladet før brug.
- Juster klippehøjden som ønsket.
- Always maintain a firm grip on the handle during operation.
- Clear the mowing area of any debris that could be thrown by the blades.
6. Vedligeholdelse
Regular maintenance of your wheel assembly ensures longevity and optimal performance.
- Rensning: After each use, clean any grass clippings or debris from around the wheel and axle area. A damp cloth can be used. Avoid using high-pressure water sprays directly on the axle bearings.
- Inspektion: Periodically inspect the wheel for signs of wear, cracks, or damage. Check the tightness of the hex nut. If the wheel becomes loose or damaged, replace it promptly.
- Opbevaring: When storing the mower for extended periods, ensure the wheels are clean and dry.
7. Fejlfinding
Dette afsnit omhandler almindelige problemer relateret til baghjulsenheden.
| Problem | Mulig årsag | Løsning |
|---|---|---|
| Wheel is wobbly or loose | Hex nut is not tightened sufficiently. | Tighten the hex nut securely. Do not overtighten. |
| Hjulet drejer ikke frit | Debris caught in axle area; Overtightened hex nut; Damaged bearing. | Clean debris from axle. Loosen hex nut slightly. If problem persists, inspect for bearing damage and replace if necessary. |
| Unusual noise from wheel | Debris in wheel; Damaged bearing; Loose components. | Clean wheel and axle area. Inspect for damage. Ensure all components are secure. |
8. Specifikationer
Key specifications for the Snow Joe ION16LM-RRWHEEL Rear Wheel Assembly:
- Modelnummer: ION16LM-RRWHEEL
- Kompatibilitet: Sun Joe iON16LM, Sun Joe MJ402E Cordless Lawn Mowers
- Emne diameter: Approximately 16 Inches (This specification typically refers to the mower's cutting width. The actual wheel diameter is listed below.)
- Pitch Circle Diameter: 8 Inches (This is likely the actual diameter of the wheel itself.)
- Varens vægt: 1.48 pund
- UPC: 810829025821
Bemærk: Specifikationerne kan ændres uden varsel.
9. Garanti og kundesupport
For warranty information or if you require assistance with your Snow Joe ION16LM-RRWHEEL Rear Wheel Assembly, please contact Snow Joe customer support. Refer to the original product packaging or the Snow Joe webwebstedet for de seneste kontaktoplysninger og garantivilkår.
Webwebsted: www.snowjoe.com


