1. Vigtige sikkerhedsoplysninger
Read all instructions carefully before assembling or operating your Martin Portable Propane Gas Grill. Failure to follow these instructions could result in fire, explosion, or serious injury.
- Kun til udendørs brug. Må ikke anvendes indendørs eller i et lukket område.
- Hold altid børn og kæledyr væk fra grillen.
- Always operate the grill on a level, stable, non-combustible surface.
- Ensure adequate ventilation. Do not block airflow to the grill.
- Efterlad aldrig en tændt grill uden opsyn.
- Keep the grill area clear and free from combustible materials, gasoline, and other flammable vapors and liquids.
- Opbevar ikke en ekstra gasflaske under eller i nærheden af grillen.
- Kontrollér altid for gaslækager før hver brug.
- Lad grillen køle helt af, før den flyttes eller rengøres.
2. Produktet er slutview
The Martin Portable Propane Gas Grill (Model GR14) is designed for convenient outdoor cooking. It features a durable stainless steel lid, a porcelain-enameled cooking grate, and folding support legs for portability.
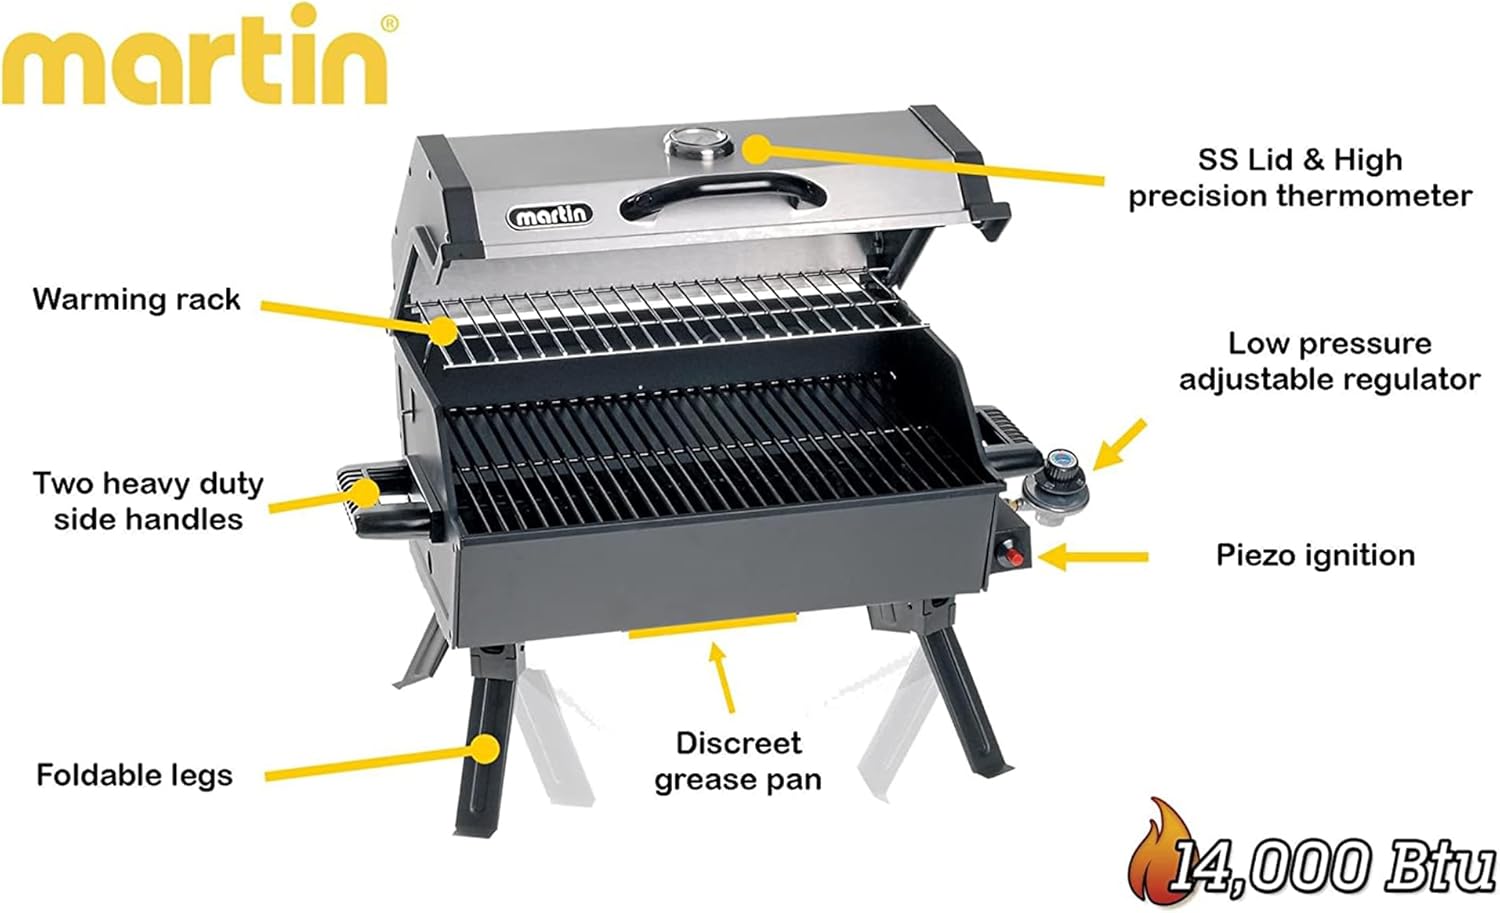
Figur 2.1: Overview of the Martin Portable Propane Gas Grill with key components labeled, including the stainless steel lid, warming rack, side handles, low-pressure adjustable regulator, Piezo ignition, discreet grease pan, and foldable legs. The grill provides 14,000 BTU of heat.
Nøglefunktioner:
- 14,000 BTU U-shaped Stainless Steel Burner: Provides powerful and even heat distribution over a 237 square inch cooking area.
- Porcelain-Enameled Cooking Grate: Durable and easy to clean, designed for optimal heat retention.
- Built-in Thermometer: Allows for easy monitoring of internal cooking temperature.
- Retractable Warming Rack: Offers additional space for keeping food warm or indirect cooking.
- Folding Support Legs: Enhances portability and compact storage.
- Piezo Ignition System: For hurtig og pålidelig opstart.
- Easy-to-Remove Grease Pan: Forenkler rengøring og vedligeholdelse.
3. Reservedelsliste
Before assembly, ensure all parts are present and undamaged. Refer to the diagram in Section 2 for visual identification.
| Punkt | Beskrivelse | Mængde |
|---|---|---|
| A | Grilllegemesamling | 1 |
| B | Stainless Steel Lid with Thermometer | 1 |
| C | Porcelain Cooking Grate | 1 |
| D | Retractable Warming Rack | 1 |
| E | Smørepande | 1 |
| F | Grease Container | 1 |
| G | Folding Support Legs (pre-attached) | 4 |
| H | LP Gas Regulator Assembly | 1 |
| I | Hardware Pack (screws, washers, etc.) | 1 |
4. Opsætning og montering
Samling er påkrævet. Følg disse trin omhyggeligt. Det anbefales at få en anden person til at hjælpe med samlingen.
- Udpakning: Fjern forsigtigt alle komponenter fra emballagen. Gem emballagen til senere opbevaring eller transport.
- Leg Deployment: Unfold the support legs until they lock securely into place. Ensure the grill is stable on a flat surface.

Figur 4.1: Illustration of the folding support legs mechanism.
- Grease Pan Installation: Slide the grease pan into its designated slot beneath the grill body. Attach the grease container to the grease pan.
- Cooking Grate and Warming Rack: Place the porcelain cooking grate onto the main cooking area supports. Install the retractable warming rack onto its designated hooks inside the lid.

Figur 4.2: Nærbillede view of the retractable warming rack in position.
- LP Gas Cylinder Connection: Ensure the grill's control knob is in the "OFF" position. Screw the LP gas regulator assembly onto the grill's gas inlet. Then, attach a 1 lb. propane cylinder (not included) to the regulator by screwing it clockwise until hand-tight. Do not overtighten.

Figur 4.3: Proper connection of a 1 lb. propane cylinder to the grill's regulator.
- Lækagetest: Before first use and after every cylinder change, perform a leak test.
- Bland en opløsning af lige dele flydende opvaskemiddel og vand.
- Ensure the grill control knob is OFF.
- Open the propane cylinder valve.
- Apply the soap solution to all gas connections (regulator to cylinder, regulator to grill inlet).
- If bubbles appear, there is a leak. Close the cylinder valve immediately and tighten connections. Repeat the test. If leaks persist, do not use the grill and contact customer support.
- After testing, close the cylinder valve and rinse off any soap solution.
5. Betjeningsvejledning
5.1 Tænding af grillen
- Ensure the grill lid is OPEN.
- Confirm the propane cylinder is securely connected and its valve is fully open.
- Push in and slowly turn the control knob to the HIGH position.
- Immediately press and hold the Piezo ignition button until the burner ignites. You should hear a click and see a flame.
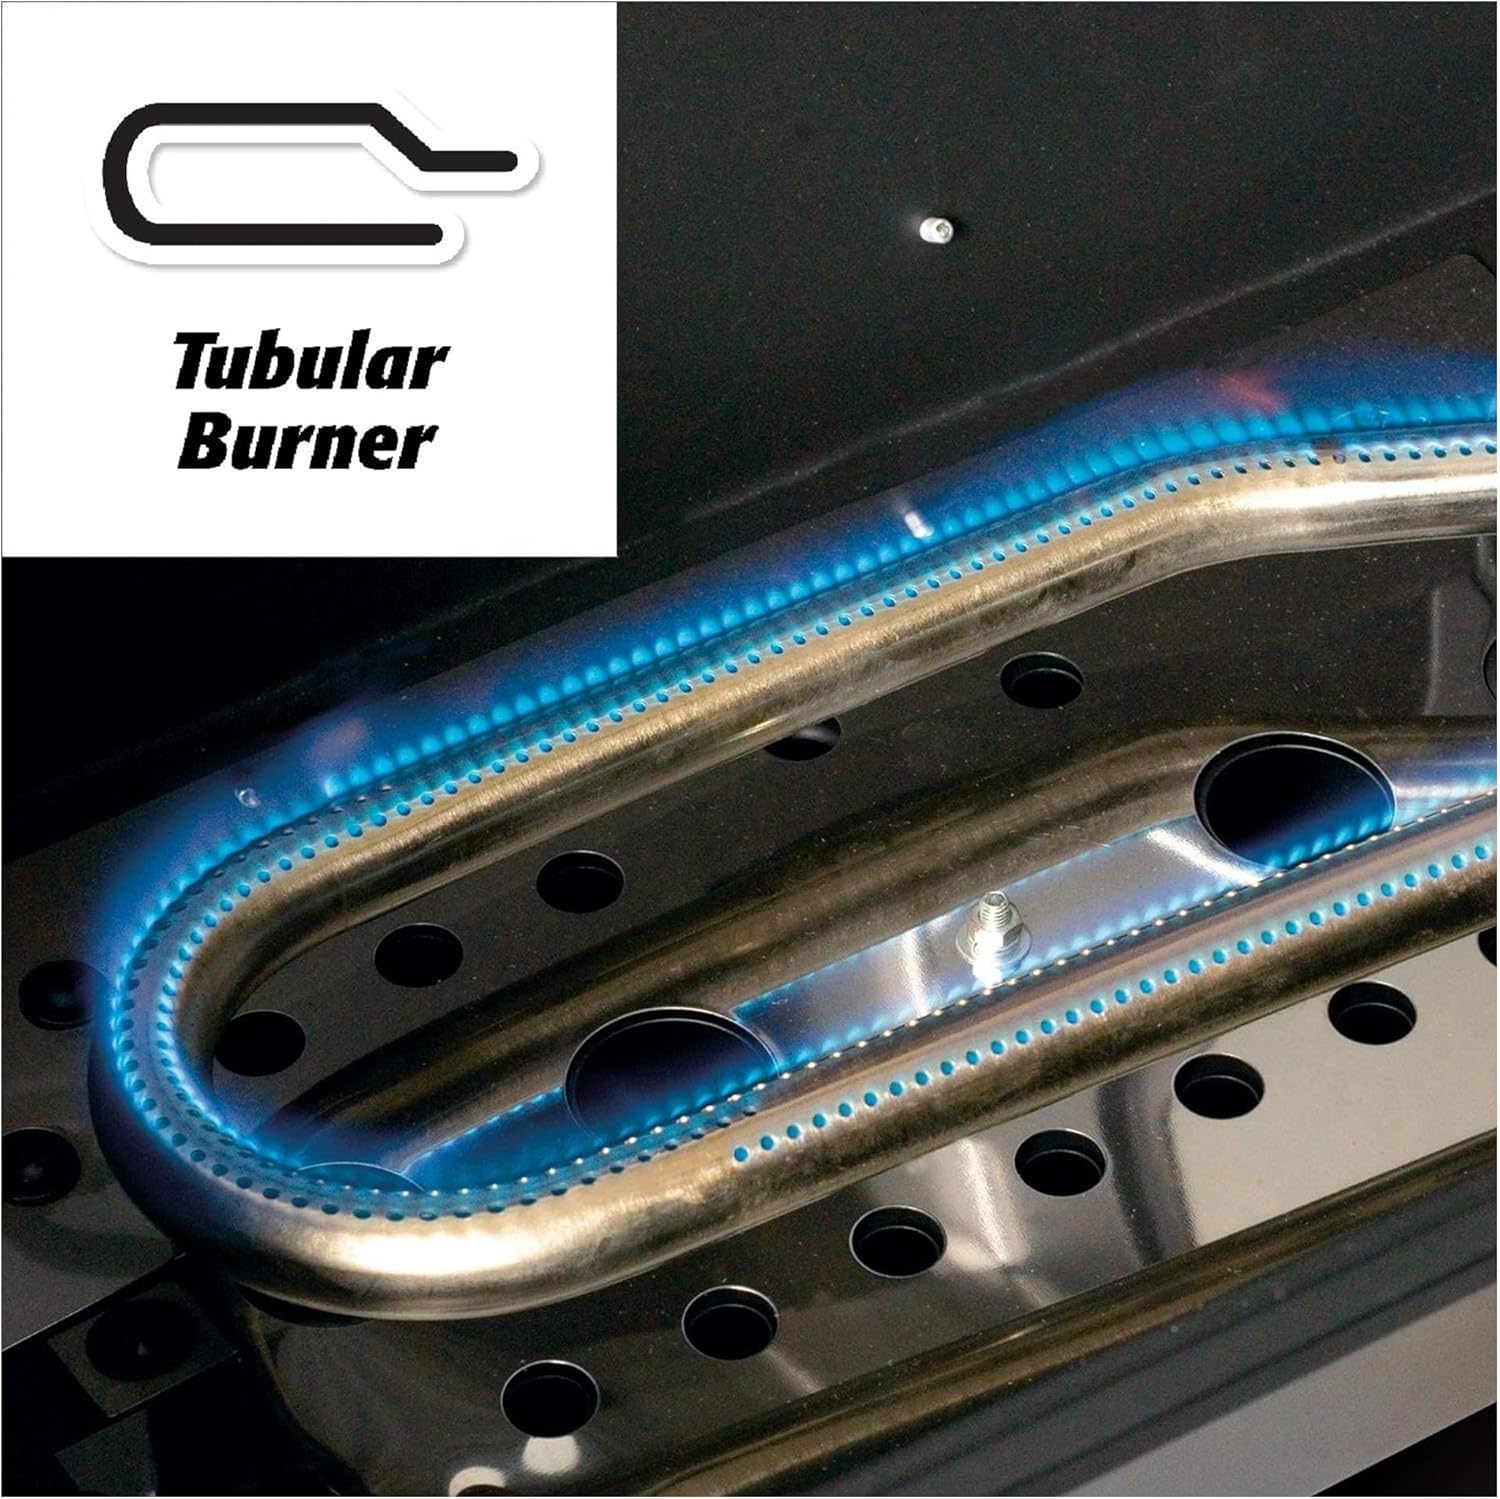
Figur 5.1: The U-shaped tubular burner ignited, showing even blue flames.
- Hvis brænderen ikke tændes inden for 5 sekunder, skal du dreje kontrolknappen til OFF, vente 5 minutter, indtil gassen forsvinder, og gentage tændingsproceduren.
5.2 Madlavning
Once lit, close the lid to preheat the grill for 5-10 minutes. The built-in thermometer will indicate the internal temperature. Adjust the control knob to achieve your desired cooking temperature (HIGH, MEDIUM, LOW). The grill's 14,000 BTU burner provides ample heat for various cooking needs.

Figur 5.2: The Martin Portable Propane Gas Grill with its lid open, showcasing the cooking grate and warming rack, ready for use.
5.3 Slukning af grillen
- Drej kontrolknappen til positionen OFF.
- Luk ventilen på propangasflasken.
- Lad grillen køle helt af før rengøring eller opbevaring.
6. Vedligeholdelse og rengøring
Regelmæssig rengøring og vedligeholdelse vil forlænge grillens levetid og sikre sikker drift.
- Efter hver brug:
- Once the grill has cooled, remove the cooking grate and warming rack. Clean them with a grill brush and warm, soapy water. Rinse thoroughly and dry.
- Remove and empty the grease pan and grease container. Wash with warm, soapy water.
- Wipe down the interior and exterior surfaces of the grill body and lid with a damp cloth. For stubborn stains, use a mild degreaser.
- Vedligeholdelse af brænder: Periodically inspect the burner ports for blockages (e.g., spider webs, food debris). Use a wire brush or pipe cleaner to clear any obstructions.
- Opbevaring: When not in use, disconnect the propane cylinder. Store the grill in a dry, protected area. The folding legs allow for compact storage.
7. Fejlfinding
Hvis du støder på problemer med din grill, kan du se følgende almindelige problemer og løsninger:
| Problem | Mulig årsag | Løsning |
|---|---|---|
| Brænderen tændes ikke med tændingsanordningen. |
|
|
| Lav flamme eller ujævn varme. |
|
|
| Gaslugt. |
|
|
If troubleshooting steps do not resolve the issue, contact Martin customer support.
8. Specifikationer
| Attribut | Detalje |
|---|---|
| Modelnummer | GR14 |
| Varmeoutput | 14,000 BTU/time |
| Madlavning Område | 237 kvadrattommer |
| Brændstoftype | Propane Gas (1 lb. cylinders) |
| Dimensioner (L x B x H) | 60.96 x 36.83 x 41.91 cm (24 x 14.5 x 16.5 tommer) |
| Vægt | 9.07 kg (20 lbs) |
| Materiale | Stainless Steel (Lid), Steel (Body), Porcelain (Grate) |
| Tændingsanlæg | Piezo tænding |
| Inkluderede komponenter | Stainless Steel Lid, Large Porcelain Cooking Grid, Grease Pan, Grease Container, Folding Support Legs |
9. Garanti og support
Martin products are manufactured by Bismar, a company with over forty years of experience in gas appliance manufacturing and servicing. While specific warranty terms are not detailed here, Martin is committed to providing quality and reliable appliances.
For product support, technical assistance, or warranty inquiries, please contact Bismar Inc., the manufacturer of Martin products. Refer to the contact information provided with your purchase or visit the official Martin brand store online for further details.
Fabrikant: Bismar Inc.
Mærke: Martin
Online butik: Martin Store on Amazon.ca


