1. Produktet er slutview
The Sunricher SR-1009EA is a high-performance 4-channel constant voltage RF receiver designed for controlling various LED lighting applications. It functions as an LED controller, capable of managing single color, dual color, RGB, and RGBW LED strips or fixtures. This receiver operates within a 12-36V DC input range and provides a maximum output of 8 Amps per channel, totaling 32 Amps. It is compatible with a wide range of Sunricher remote controls and wall-mounted controllers, offering flexible control options for multi-zone lighting systems.
Nøglefunktioner omfatter:
- 4-channel, 8A per channel constant voltage RF receiver.
- Bred input voltage område: 12-36V DC.
- Compatibility with various single color, dual color, RGB, and RGBW RF remote controls.
- Supports multi-zone control, allowing separate or synchronized operation of multiple receivers.
- Each receiver can be paired with up to 8 different remote controls.
- Ability to adjust brightness for individual R, G, B, and W channels to create a vast spectrum of colors.
- Can be controlled via iOS or Android mobile applications when paired with a compatible WiFi-RF converter (e.g., Sunricher SR-2818 WiTr).
2. Product Diagram and Connections
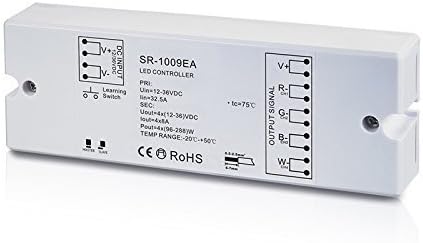
Figur 1: Sunricher SR-1009EA LED Controller showing DC input, output signal terminals (V+, R-, G-, B-, W-), and a learning switch. The diagram also indicates electrical specifications and operating temperature range.
The diagram above illustrates the physical layout and connection points of the SR-1009EA receiver. It features clearly labeled terminals for power input and LED output, along with a learning switch for pairing with remote controls.
3. Opsætning og installation
Before installation, ensure all power is disconnected to prevent electrical shock. This device is designed for indoor use unless an IP67 rated version is specifically used.
3.1 Ledningsforbindelser
- DC-indgang: Connect your 12-36V DC power supply to the "DC INPUT" terminals. Ensure correct polarity: connect the positive (+) wire of the power supply to the V+ terminal and the negative (-) wire to the V- terminal.
- LED udgang: Connect your LED lighting (single color, dual color, RGB, or RGBW) to the "OUTPUT SIGNAL" terminals.
- For single color LEDs: Connect the positive (+) wire of the LED to V+ and the negative (-) wire to any of R-, G-, B-, or W- (typically W- for white).
- For dual color LEDs: Connect the common positive (+) wire of the LED to V+ and the individual negative (-) wires for warm white and cool white to two of the R-, G-, B-, W- terminals.
- For RGB LEDs: Connect the common positive (+) wire of the LED to V+ and the R, G, B negative (-) wires to the R-, G-, B- terminals respectively.
- For RGBW LEDs: Connect the common positive (+) wire of the LED to V+ and the R, G, B, W negative (-) wires to the R-, G-, B-, W- terminals respectively.
Note: Ensure the total current draw of your connected LEDs does not exceed 8A per channel or 32.5A total for the receiver.
- Jording: If applicable, connect the ground wire to the designated ground terminal.
3.2 Pairing with Remote Controls
The SR-1009EA receiver can be paired with compatible Sunricher RF remote controls or wall controllers. Follow the specific pairing instructions provided with your Sunricher remote control. Generally, this involves pressing the "Learning Switch" button on the receiver and then initiating the pairing sequence on the remote control within a short timeframe.
Each receiver can be controlled by up to 8 different remote controls, offering flexibility for multi-user or multi-location control.
3.3 Opsætning af appstyring (valgfrit)
To control the SR-1009EA via a mobile application, a Sunricher WiFi-RF converter (e.g., SR-2818 WiTr) is required. Connect the WiFi-RF converter to your home network and pair it with the SR-1009EA receiver according to the converter's instructions. Download the appropriate Sunricher app from your mobile device's app store (iOS or Android) and follow the in-app instructions to add and control your lighting system.
4. Betjeningsvejledning
Once the SR-1009EA receiver is properly installed and paired with a remote control or WiFi-RF converter, you can begin operating your LED lighting system.
- Tænd/sluk: Use the designated power button on your paired remote control or within the mobile app to turn the connected LEDs on or off.
- Justering af lysstyrke: Adjust the overall brightness of the LEDs using the dimmer controls on your remote or app. For RGB/RGBW LEDs, individual R, G, B, and W channel brightness can be fine-tuned to create millions of color variations.
- Color Selection (RGB/RGBW): Select desired colors from a color wheel or preset color buttons on your remote/app.
- Dynamiske tilstande: Activate built-in dynamic changing patterns (e.g., fading, jumping, flashing) if supported by your remote control. Some remotes allow customization of these patterns.
- Zonekontrol: If you have multiple SR-1009EA receivers configured into different zones, use the zone selection features on your remote or app to control each zone independently or synchronize them for unified control.
5. Vedligeholdelse og pleje
To ensure the longevity and optimal performance of your Sunricher SR-1009EA receiver, follow these maintenance guidelines:
- Rensning: Gently wipe the device with a soft, dry cloth. Do not use abrasive cleaners, solvents, or harsh chemicals.
- Miljø: Operate the receiver within its specified temperature range of -20℃ to +50℃. Avoid exposing the device to extreme temperatures, high humidity, or direct sunlight.
- Ventilation: Ensure adequate airflow around the device, especially if installed in an enclosed space, to prevent overheating.
- Forbindelser: Kontrollér regelmæssigt alle ledningsforbindelser for at sikre, at de er fastgjorte og fri for korrosion.
6. Fejlfinding
If you encounter issues with your SR-1009EA receiver, refer to the following common troubleshooting steps:
- LED'er reagerer ikke:
- Check if the power supply is connected correctly and providing the correct voltage (12-36V DC).
- Verify all wiring connections between the power supply, receiver, and LEDs are secure and have correct polarity.
- Ensure the remote control is paired correctly with the receiver. Re-pair if necessary.
- Check the batteries in your remote control.
- Confirm the total load of the LEDs does not exceed the receiver's maximum output (8A per channel, 32.5A total).
- Intermitterende drift:
- Tjek for løse forbindelser.
- Ensure the receiver is not exposed to excessive heat or moisture.
- Minimize interference from other RF devices.
- Incorrect Color Output (RGB/RGBW):
- Verify that the R, G, B, W wires from the LED strip are connected to the corresponding R-, G-, B-, W- terminals on the receiver.
- Ensure the LED strip type (e.g., common anode) matches the receiver's output configuration.
If the problem persists after following these steps, contact Sunricher customer support or your product supplier for further assistance.
7. Specifikationer
| Parameter | Værdi |
|---|---|
| Modelnummer | SR-1009EA |
| Fabrikant | Sunricher |
| Input bindtage (PRI) | 12-36V DC |
| Max Input Current (PRI) | 32.5A |
| Udgang Voltage (SEC) | 4 x (12-36V DC) |
| Output Current (SEC) | 4 x 8A |
| Output Power (SEC) | 4 x (96-288 W) |
| Driftstemperaturområde | -20℃ til +50℃ |
| Vægt | 150 gram |
| Overholdelse | CE, RoHS |
8. Garanti og support
Garantioplysninger: Specific warranty terms for the Sunricher SR-1009EA receiver are typically provided by the retailer or manufacturer at the time of purchase. Please retain your proof of purchase for warranty claims. For detailed warranty policies, refer to the documentation included with your product or visit the official Sunricher webwebsted.
Kundesupport: For technical assistance, troubleshooting beyond this manual, or warranty inquiries, please contact your product supplier or the official Sunricher customer support. Contact information can usually be found on the manufacturer's website or on your purchase invoice.


