Indledning
The TFA Dostmann Timeline Max Radio-Controlled Clock (Model 60.4512.01) features a large, exceptionally clear display, making it easily readable from a distance. This makes it ideal for various settings such as entrance areas, reception desks, waiting rooms, and offices. Its clear structure simplifies time orientation, and with the displayed day of the week and full date, it serves as a valuable daily aid, particularly for seniors and individuals with cognitive impairments.
The clock automatically receives time signals via the DCF 77 signal, ensuring precise, second-accurate time and date display without manual adjustment. It also automatically switches between summer and winter time. Its simple and clear design allows it to seamlessly integrate into any environment, whether mounted on a wall or placed on a surface.
Pakkens indhold
Kontroller venligst pakkens indhold ved udpakning for at sikre, at alle varer er til stede:
- TFA Dostmann Timeline Max Radio-Controlled Clock
- Instruktionsmanual
Note: 4 x 1.5 V AA batteries are required for operation and are not included in the package.
Vigtige sikkerhedsoplysninger
- Læs alle instruktioner omhyggeligt før brug.
- Gem denne vejledning til fremtidig reference.
- Udsæt ikke enheden for ekstreme temperaturer, direkte sollys eller høj luftfugtighed.
- Undgå at tabe eller udsætte enheden for kraftige stød.
- Forsøg ikke selv at skille enheden ad eller reparere den. Overlad al service til kvalificeret personale.
- Bortskaf batterier i henhold til lokale regler. Bland ikke gamle og nye batterier eller forskellige typer batterier.
- Opbevar batterier utilgængeligt for børn.
Opsætning
1. Batteriinstallation
The clock requires 4 x 1.5 V AA batteries (not included).
- Find batterirummet på bagsiden af uret.
- Åbn batterirummets dæksel.
- Insert 4 new AA batteries, ensuring correct polarity (+ and -) as indicated inside the compartment.
- Luk batterirummets dæksel forsvarligt.

Figur 1: Bagside view of the clock with battery compartment and control buttons.
2. Initial Time Synchronization (Radio-Controlled)
After inserting the batteries, the clock will automatically begin searching for the DCF 77 radio signal. This process may take several minutes. During synchronization, the radio signal icon (often a tower or wave symbol) will typically flash on the display.
- Place the clock near a window or in an open area for better signal reception.
- Undgå at placere den i nærheden af elektroniske enheder, der kan forårsage interferens.
- Once the signal is received, the time and date will automatically set, and the radio signal icon will become solid.

Figure 2: Front display showing synchronized time and date.
3. Placeringsmuligheder
The Timeline Max clock is designed for both wall mounting and freestanding placement.
- Til vægmontering: Use the integrated hanging hole on the back of the clock. Ensure the wall fixture is secure enough to support the clock's weight (approx. 520g).
- For Freestanding: Extend the integrated stand on the back of the clock to place it on a desk, shelf, or table.

Figur 3: Side view demonstrating the clock's integrated stand.
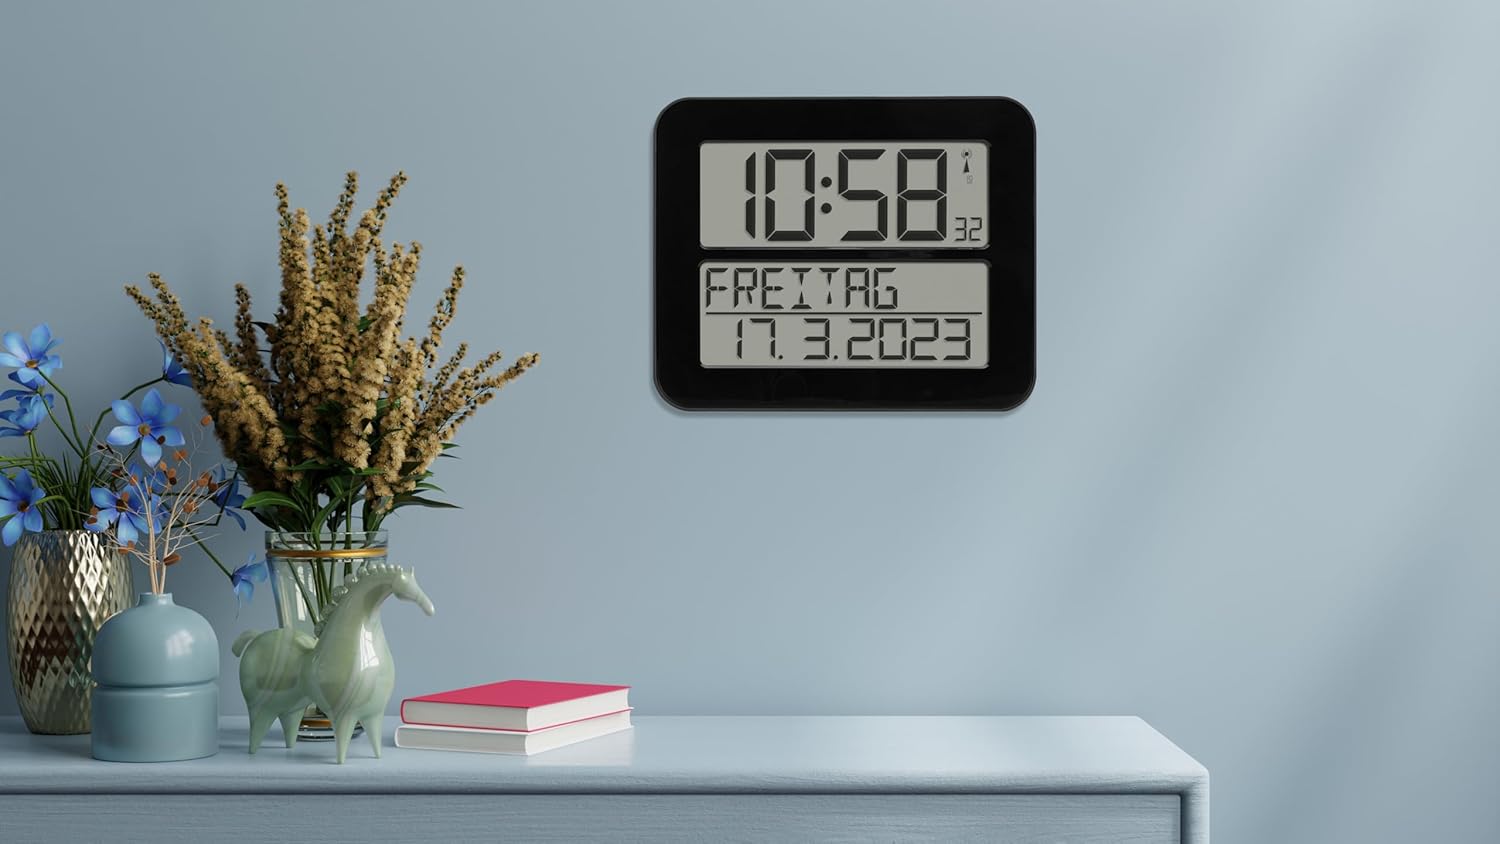
Figure 4: The clock in a typical freestanding setup.
Betjeningsvejledning
Vis information
The large display shows the following information:
- Topskærm: Current time (hours and minutes), seconds (small digits), and radio signal indicator.
- Bottom Display: Day of the week (in selected language) and full date (day, month, year).

Figure 5: Clear display of time, day, and date.
Alarm funktion
The clock includes an alarm function. Refer to the buttons on the back of the clock (SET, ALARM, UP, DOWN, WAVE, SNOOZE) for setting the alarm.
- Tryk på ALARM knappen for at gå ind i alarmindstillingstilstand.
- Brug UP og NED buttons to adjust the alarm time.
- Trykke ALARM again to confirm and move to the next setting (e.g., alarm on/off).
- Trykke SÆT to exit alarm setting mode.
- Tryk på, når alarmen lyder SLUM for a temporary pause, or any other button to turn off the alarm for the day.
Manuel tidsindstilling (hvis radiosignalet ikke er tilgængeligt)
In areas with poor radio signal reception, you can manually set the time and date.
- Tryk og hold på SÆT button for a few seconds until the display flashes.
- Brug UP og NED buttons to adjust the flashing digit (e.g., hour, minute, year, month, day).
- Trykke SÆT to confirm the current setting and move to the next.
- Continue until all settings are adjusted. The clock will exit manual setting mode automatically after a period of inactivity or by pressing SÆT repeatedly until the normal display returns.
Day of Week Language Setting
The day of the week can be displayed in 7 different languages.
- Consult the full instruction manual (included in the box) for specific steps on changing the language setting, as this often involves a combination of button presses.
Opretholdelse
Rensning
To clean the clock, use a soft, dry, or slightly damp cloth. Do not use abrasive cleaners, solvents, or chemical agents, as these may damage the display or casing.
Udskiftning af batteri
When the display dims or the clock stops functioning correctly, it's time to replace the batteries. Follow the "Battery Installation" steps in the Setup section. Always replace all 4 batteries at once with new, high-quality AA batteries.
Fejlfinding
| Problem | Mulig årsag | Løsning |
|---|---|---|
| Uret viser ingenting, eller displayet er svagt. | Batterierne er døde eller isat forkert. | Udskift batterierne med nye, og sørg for korrekt polaritet. |
| Clock does not synchronize with radio signal. | Poor signal reception due to location or interference. | Move the clock to a different location, preferably near a window and away from electronic devices. Allow sufficient time for synchronization (up to 24 hours). |
| Tidspunktet er forkert efter synkronisering. | Temporary signal disruption or incorrect time zone setting (if applicable). | Initiate a manual signal search (refer to full manual) or perform a manual time setting. Ensure the clock is in the correct time zone for your region (if this feature is available, consult the full manual). |
| Alarmen lyder ikke. | Alarmen er ikke aktiveret eller indstillet forkert. | Verify that the alarm time is set correctly and the alarm function is enabled. |
Specifikationer
| Model | 60.4512.01 |
| Urtype | Radio-Controlled (DCF 77 signal) |
| Materiale | Plast |
| Monteringsmuligheder | For hanging or standing |
| Strømforsyning | 4 x 1.5 V AA-batterier (medfølger ikke) |
| Dimensioner (L x B x H) | 258 x 30 (120 with stand) x 212 mm |
| Vægt | 520 g |
| Display Type | Digital |
| Særlige funktioner | Alarm, Calendar Display, Day of week in 7 languages |
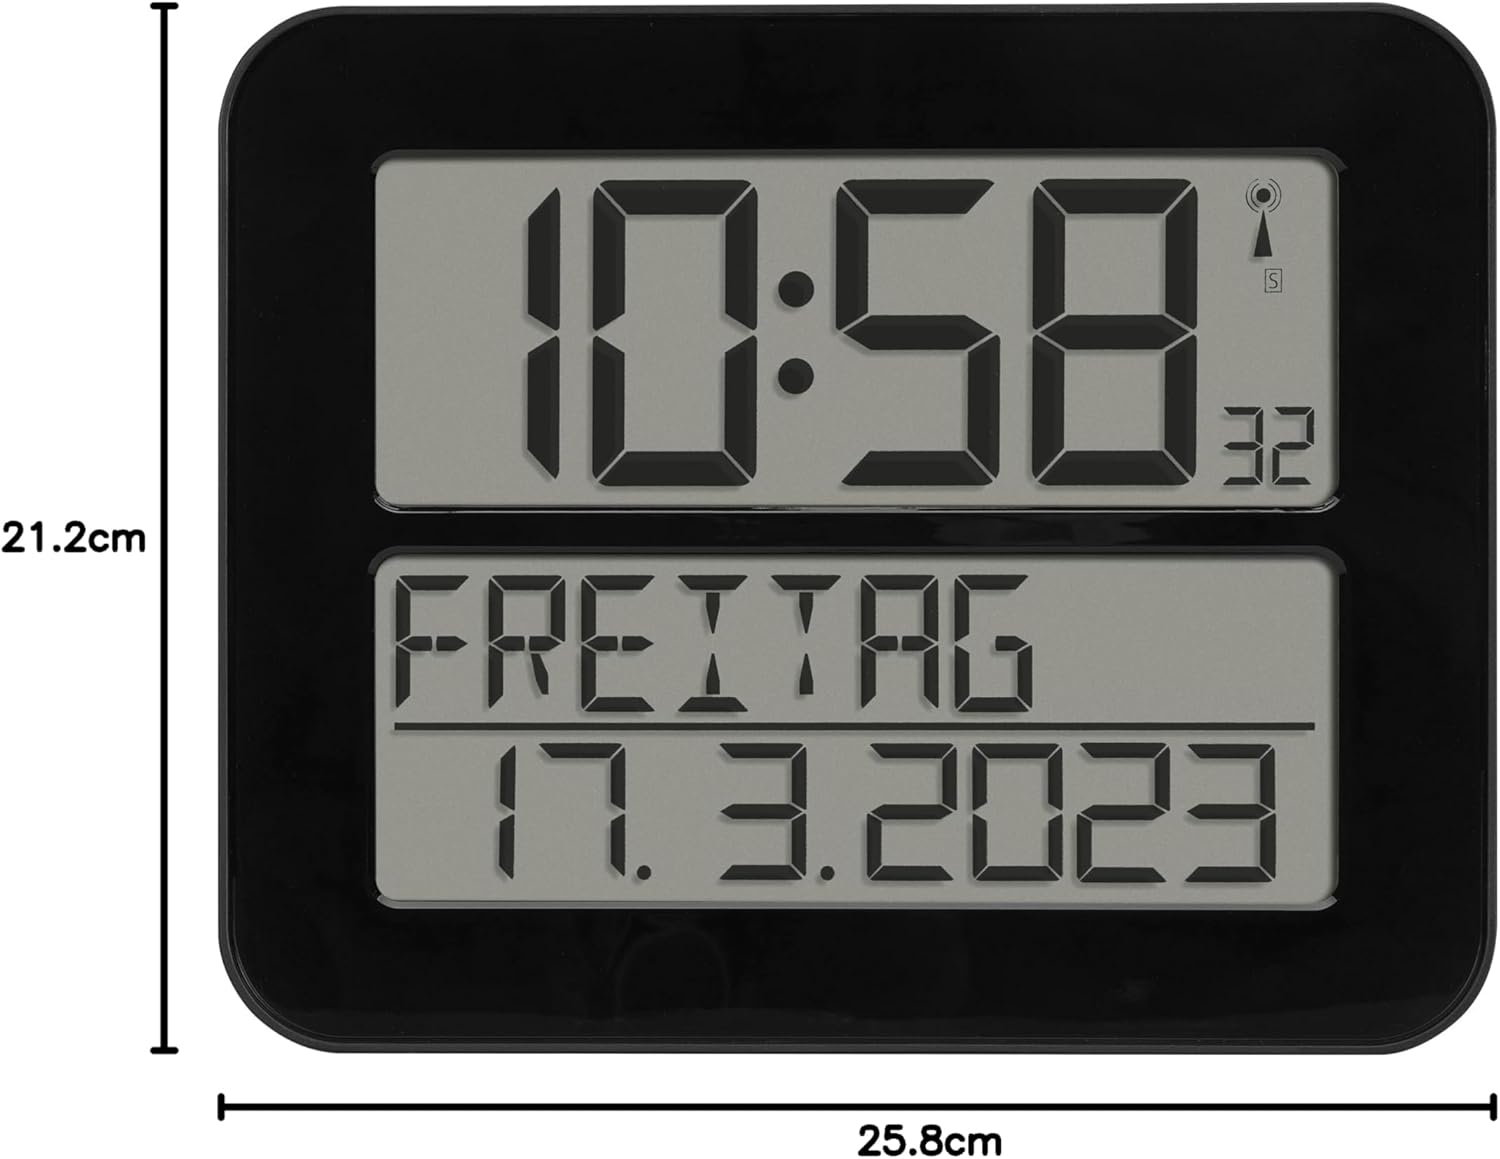
Figur 6: Produktdimensioner.
Garanti og support
TFA Dostmann products are manufactured with high quality standards. For information regarding warranty coverage, please refer to the warranty card included with your product or visit the official TFA Dostmann website. For technical support or inquiries, please contact TFA Dostmann customer service.
Manufacturer: TFA Dostmann GmbH, Zum Ottersberg 12, D-97877 Wertheim am Main, Germany.
Webwebsted: www.tfa-dostmann.de


