1. Introduktion
This user manual provides detailed instructions for the installation, operation, and maintenance of your JOOAN 3MP IP67 Weatherproof Security Camera System. Please read this manual thoroughly before using the product to ensure proper setup and functionality. This system is designed for both indoor and outdoor surveillance, offering high-definition video recording and advanced security features.
2. Pakkens indhold
Bekræft, at alle nedenstående varer er til stede i din pakke. Hvis der mangler eller er beskadigede varer, bedes du kontakte kundesupport.

Image: Components of the JOOAN Security Camera System. This includes the NVR unit, four wireless cameras, power adapters for the NVR and each camera, a USB mouse, an Ethernet cable, mounting screws, and a warning sticker.
- 1 x 10-Channel NVR (Network Video Recorder)
- 4 x 3MP trådløse IP-kameraer
- 1 x NVR-strømadapter
- 4 x Camera Power Adapters
- 1 x USB-mus
- 1 x Ethernet-kabel
- Mounting Screw Kits
- 1 x advarselsmærkat
- 1 x Brugermanual (dette dokument)
3. Produktet er slutview
The JOOAN Security Camera System consists of a Network Video Recorder (NVR) and multiple wireless IP cameras. The NVR acts as the central hub for recording, managing, and accessing video footage, while the cameras capture high-definition video and audio.

Image: The JOOAN 3MP Security Camera System, showing the main NVR unit and four wireless cameras with antennas, illustrating the complete system setup.
3.1 NVR-funktioner
- 10-Channel support for up to 10 cameras.
- H.265+ Video Compression for efficient storage.
- Supports up to 6TB HDD (not included).
- Built-in WiFi module for automatic camera connection.
- Multiple alarm options: APP, Email, NVR buzzer.
3.2 Kamerafunktioner
- 3.0MP (2304*1296) HD resolution.
- IP67 Weatherproof rating for indoor/outdoor use.
- One-way audio capability.
- 4pcs Array Infrared LEDs for up to 100ft night vision.
- AI Human Shape Detection to reduce false alarms.
- Camera Cascaded Technology for extended wireless signal.
4. Opsætningsvejledning
Follow these steps to set up your JOOAN Security Camera System.
4.1 Første opstart og tilslutning
- Tilslut NVR'en til en skærm ved hjælp af et HDMI- eller VGA-kabel.
- Connect the USB mouse to the NVR's USB port.
- Plug the NVR power adapter into the NVR and then into a power outlet.
- Plug each camera's power adapter into the camera and then into a power outlet.
- The cameras will automatically connect to the NVR within a few minutes. Images should appear on the connected monitor.

Image: Illustration of the simple plug-and-play setup, showing a camera connected to power and the NVR connected to a monitor, displaying live feeds from multiple cameras.
4.2 Installation af harddisk (valgfrit)
While the system can function for live viewing without a hard drive, an HDD is required for recording and playback. The system supports up to 6TB HDD.
- Unplug the NVR from power.
- Åbn NVR'en casing (refer to the NVR's specific diagram for screw locations).
- Connect the SATA power and data cables from the NVR to the HDD.
- Secure the HDD inside the NVR using the provided screws.
- Luk NVR'en casing and reconnect power.
- Upon startup, right-click on the NVR interface, go to 'System Setup' > 'HDD Setup' to format the newly installed HDD.
4.3 Network Connection for Remote Access
To access your system remotely via smartphone or PC, connect the NVR to your router.
- Connect one end of the Ethernet cable to the NVR's LAN port and the other end to an available LAN port on your router.
- Ensure your router has internet access.
- On the NVR interface, right-click and navigate to 'Network Setup' to confirm the NVR has obtained an IP address.
- Download the free 'Eseecloud' APP from your smartphone's app store (iOS/Android) or the PC client from the JOOAN webwebsted.
- Register an account and add your NVR device by scanning the QR code displayed on the NVR's monitor (found in 'System Setup' > 'Version' or 'Cloud ID').

Billede: En bruger viewing live camera feeds on a smartphone and laptop via the Eseecloud app, demonstrating remote access capabilities.
5. Betjeningsvejledning
Learn how to operate your security camera system for effective surveillance.
5.1 Live View
After successful setup, the NVR will display live feeds from all connected cameras on the monitor. You can switch between single-camera view and multi-camera view using the NVR interface.
5.2 Optagelsestilstande
The system supports various recording modes:
- 24/7 kontinuerlig optagelse: Records continuously, overwriting oldest footage når harddisken er fuld.
- Optagelse af bevægelsesdetektering: Optager kun, når der registreres bevægelse.
- Planlagt optagelse: Records during specific times of the day.
To configure recording settings, right-click on the NVR interface, go to 'Record Setup'.
5.3 Afspilning
Til review optaget footage:
- Right-click on the NVR interface and select 'Playback'.
- Select the camera(s) and date you wish to review.
- Use the timeline to navigate through recorded events.
5.4 Two-Way Audio (One-Way Audio for this model)
This system supports one-way audio, allowing you to hear audio from the camera's location. For models with two-way audio, you can also speak through the camera.
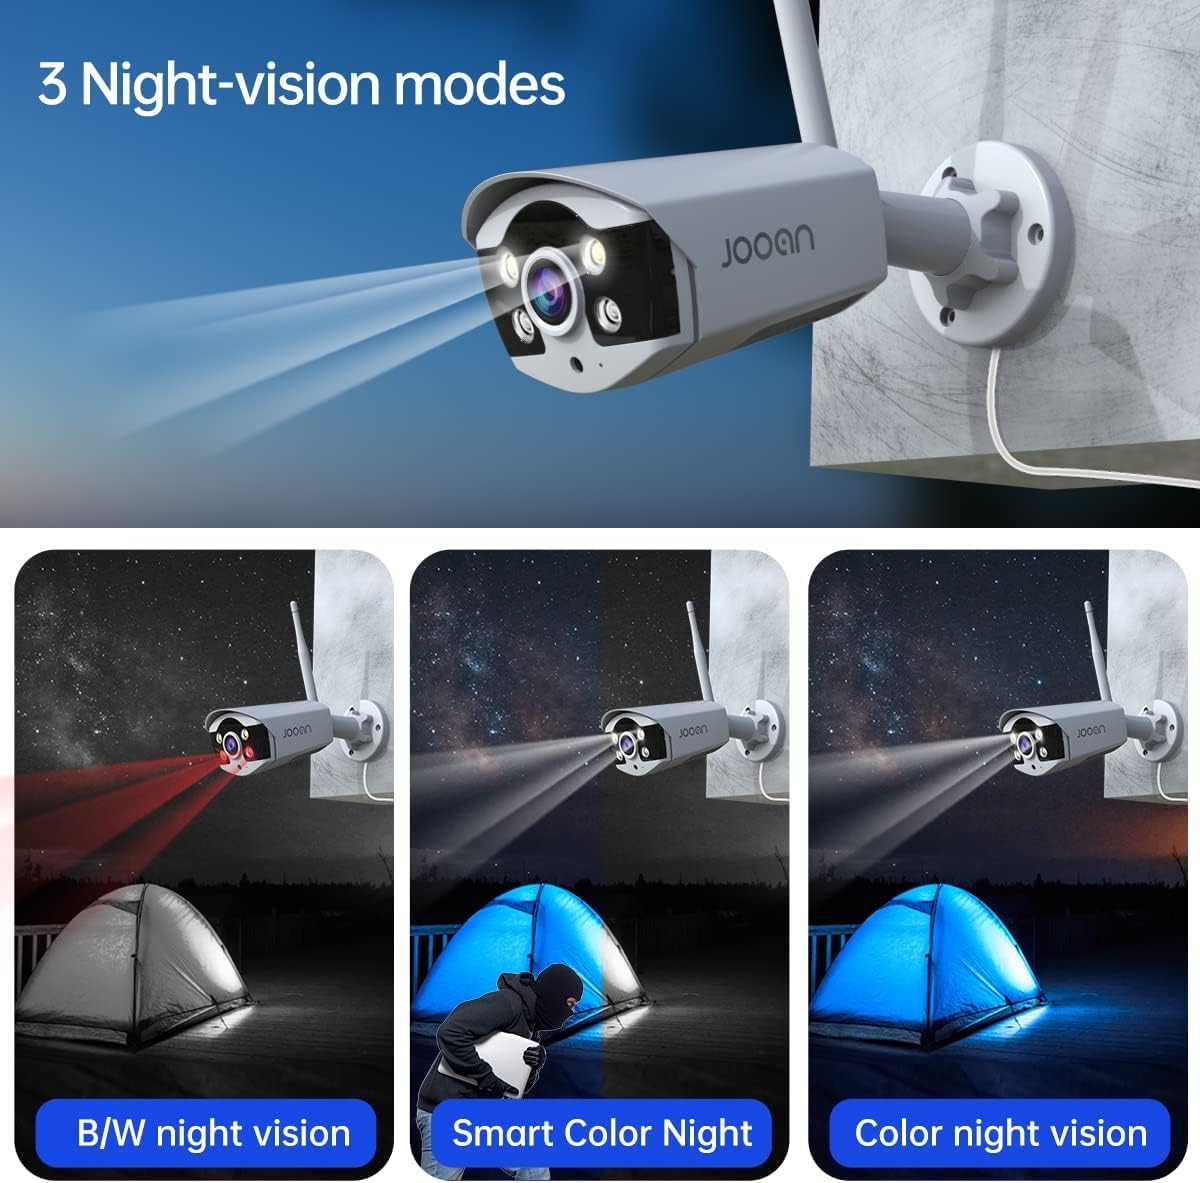
Image: A delivery person at a door, with a speech bubble indicating they are speaking, and a camera mounted above. This illustrates the one-way audio feature where you can hear what's happening at the camera's location.
5.5 Nattesynstilstande
The cameras offer enhanced night vision capabilities:
- Infrared Mode (B/W Night Vision): Standard black and white night vision using IR LEDs.
- Smart farve nattesyn: Automatically switches to color night vision when motion is detected in low-light conditions.
- Fuld farve nattesyn: Provides full-color images in low light using built-in spotlights (if equipped).

Image: Comparison of three night vision modes: traditional black and white infrared, smart color night vision (activates color upon motion), and full-color night vision (constant color in low light).
5.6 AI Human Shape Detection
This feature distinguishes human shapes from other moving objects, significantly reducing false alarms triggered by animals, leaves, or vehicles. When a human shape is detected, the system can trigger various alarms (APP, Email, NVR buzzer) and begin recording.

Image: A person walking near a building at night, with an overlay highlighting human detection and an alarm notification from the Eseecloud app, demonstrating the AI human shape detection feature.
6. Vedligeholdelse
Regelmæssig vedligeholdelse sikrer dit sikkerhedssystems levetid og optimale ydeevne.
- Rensning: Regularly clean camera lenses with a soft, dry cloth to prevent dust and smudges from affecting image quality. Ensure the NVR is free from dust buildup, especially around ventilation areas.
- Firmwareopdateringer: Check the JOOAN official website periodically for firmware updates for your NVR and cameras. Updates can improve performance, add features, and enhance security. Follow the provided instructions carefully during updates.
- Lagerstyring: Monitor your HDD storage capacity. If using continuous recording, older footage will be overwritten. For important events, back up footage to an external device (e.g., USB drive) before it is overwritten.
- Kontrol af strømforsyning: Ensure all power adapters are securely connected and not damaged. Unstable power can affect system performance.
7. Fejlfinding
Dette afsnit omhandler almindelige problemer, du kan støde på.
7.1 Intet billede på skærmen
- Kontroller, om NVR'en og skærmen er tændt.
- Verify the HDMI/VGA cable connection between the NVR and monitor.
- Sørg for, at den korrekte inputkilde er valgt på din skærm.
7.2 Kameraer viser ikke
- Ensure cameras are powered on and their power adapters are working.
- Check the distance between cameras and NVR. Walls and obstacles can weaken the signal.
- If a camera was moved, it might need to be re-paired. Right-click on the NVR interface, go to 'Video Manage' and follow instructions to add/re-pair cameras.
- Utilize the Camera Cascaded Technology to extend wireless signal range if needed.
7.3 No Recording or Playback
- Verify that an HDD is installed and formatted correctly (refer to Section 4.2).
- Check recording schedules and motion detection settings in 'Record Setup'.
- Ensure the HDD is not full.
7.4 Problemer med fjernadgang
- Ensure the NVR is connected to your router via Ethernet cable and has internet access.
- Verify your smartphone/PC has a stable internet connection.
- Double-check the Cloud ID/QR code entered in the Eseecloud app.
- Ensure router firewall settings are not blocking the NVR's connection.
7.5 Falske alarmer
- Adjust the sensitivity of motion detection in the NVR settings.
- Utilize the AI Human Shape Detection feature to filter out non-human movements.
- Define specific detection zones to exclude areas with frequent irrelevant motion (e.g., busy roads, swaying trees).
8. Specifikationer
Detailed technical specifications for the JOOAN 3MP Security Camera System.
| Feature | Specifikation |
|---|---|
| Mærke | JOOAN |
| Modelnummer | ZG2321M |
| Forbindelsesteknologi | Trådløs |
| Videooptagelsesopløsning | 3 MP (2304*1296) |
| Videokomprimering | H.265 + |
| Antal kanaler | 8 (Expandable to 10) |
| Hukommelseslagringskapacitet | Supports up to 4 TB (HDD not included) |
| Farve | Sort og hvid |
| Strømkilde | AC/DC |
| Varedimensioner (L x B x H) | 33.8 x 32.4 x 17.8 cm |
| Varens vægt | 3.5 kg |
| Operativsystemsupport | Android, iOS |
| Særlige funktioner | Local monitoring, Remote Access, AI Human Motion Detection, IP67 Waterproof, Audio |
| Driftstemperaturområde | -35°C til 60°C (-31°F til 140°F) |
9. Garanti og support
JOOAN products come with a standard manufacturer's warranty. For specific warranty terms and conditions, please refer to the warranty card included in your package or visit the official JOOAN webwebsted.
9.1 Kundesupport
If you encounter any issues or have questions not covered in this manual, please contact JOOAN customer support. Provide your product model number (ZG2321M) and a detailed description of the issue for faster assistance.
For the latest support information and resources, please visit the JOOAN store on Amazon or their official webwebsted.


