Indledning
Thank you for choosing the Ferplast Favola Hamster Cage. This manual provides detailed instructions for the proper setup, operation, maintenance, and troubleshooting of your new hamster habitat. Please read this manual thoroughly before assembly and use to ensure the safety and well-being of your pet.
1. Opsætning og montering
The Ferplast Favola Hamster Cage is designed for easy assembly. Follow these steps to set up your cage and its accessories.
1.1 Unpacking Components
- Fjern forsigtigt alle komponenter fra emballagen.
- Verify that all parts are present: deep plastic base, wire top, plastic ramp, exercise wheel, food dish, water bottle, and hamster hide-out.
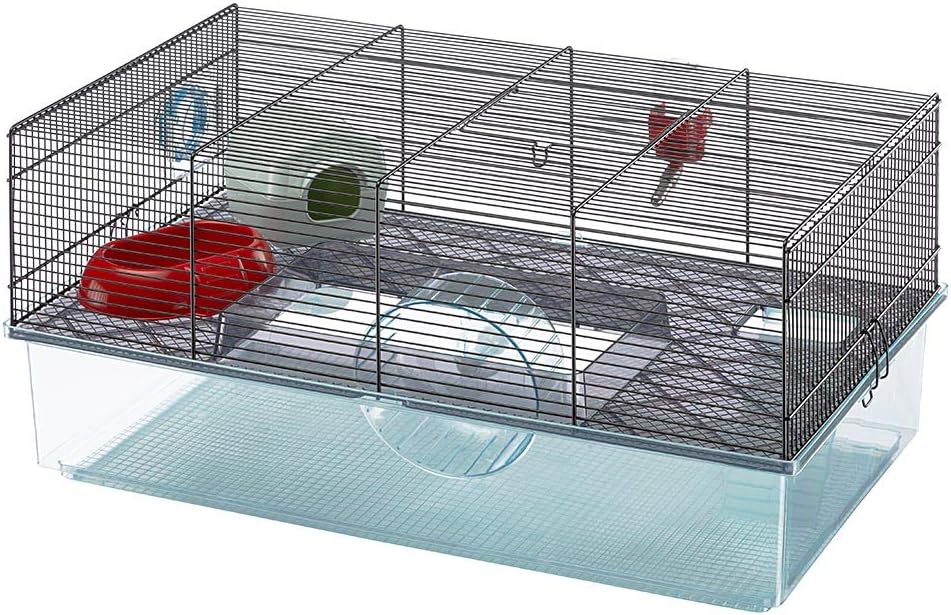
Figure 1: Fully assembled Ferplast Favola Hamster Cage.
1.2 Assembling the Cage Structure
- Place the deep plastic base on a flat, stable surface.
- Align the wire top portion with the edges of the plastic base.
- Secure the wire top to the base using the metal clips located on the sides. Ensure all clips are firmly latched to prevent escapes.

Figure 2: Detail of the cage clips for secure assembly.
1.3 Installation af tilbehør
- Ramp: Position the plastic ramp to connect the deep base level to the upper plastic platform. The ramp is designed to provide easy access for your hamster.
- Træningshjul: The 5.5-inch exercise wheel is designed to fit between the two floors. Secure it in its designated slot.
- Food Dish: Place the red food dish on the upper plastic platform.
- Vandflaske: Attach the water bottle to the wire mesh on the side of the cage, ensuring the spout is accessible to your hamster and does not drip.
- Hamster Hide-Out: Place the hide-out on the upper plastic platform, providing a secure and private space for your pet.

Figure 3: The plastic ramp connecting the two levels.

Figure 4: Water bottle installation on the cage exterior.

Figure 5: Hamster hide-out provides a secure space.
The cage also features a connecting port for play tubes, allowing you to expand the habitat with additional Ferplast accessories (sold separately).

Figur 6: Eksample of connecting external play tubes (tubes not included).
2. Operating the Cage
Once assembled, the Favola Hamster Cage provides a comfortable and stimulating environment for your pet.
2.1 Placing Your Hamster
Gently introduce your hamster into the cage. The deep base allows for ample bedding, catering to your hamster's natural burrowing instincts.

Figure 7: Hamster exploring the deep base with bedding.
2.2 Access and Interaction
The cage features a top panel access door for easy interaction with your hamster and for routine tasks like feeding and refilling water.

Figure 8: The top access door provides convenient entry.
2.3 Brug af tilbehør
- Food Dish: Fill with appropriate hamster food daily.
- Vandflaske: Ensure the water bottle is always full of fresh, clean water. Check daily for proper flow.
- Træningshjul: The wheel provides essential exercise. Ensure it spins freely.
- Hide-Out: Your hamster will use this for sleeping and feeling secure.

Figure 9: Hamster actively using the exercise wheel.

Figure 10: Hamster feeding from the provided food dish.
3. Vedligeholdelse og rengøring
Regular cleaning is crucial for your hamster's health and hygiene. The Favola cage is designed for easy maintenance.
3.1 Daglig pleje
- Fjern al uspist frisk mad.
- Fyld vandflasken op med frisk vand.
- Rengør snavset sengetøj.
3.2 Weekly Deep Cleaning
- Secure your hamster in a safe, temporary enclosure.
- Disconnect the wire portion and middle plastic section from the transparent base by unlatching the side clips.
- Dump all old bedding from the deep base.
- Clean the plastic base and all plastic accessories (ramp, wheel, food dish, hide-out) with a damp towel and mild, pet-safe detergent. Rinse thoroughly to remove all soap residue.
- Wipe down the wire top portion with a damp klæde.
- Lad alle dele lufttørre helt, før de monteres igen.
- Add fresh, clean bedding to the deep base.
- Reassemble the cage and return your hamster.
Vedligeholdelsesinstruktioner: Secure your Hamster in a safe place, dump bedding regularly and clean with a damp towel and mild detergent. Wipe down other living areas of the cage, food dish and always provide clean drinking water.
4. Fejlfinding
This section addresses common issues you might encounter with your Ferplast Favola Hamster Cage.
| Problem | Mulig årsag | Løsning |
|---|---|---|
| Exercise wheel is stiff or not spinning. | Bedding caught in mechanism; wheel needs cleaning; wheel is too small for hamster. | Clear any bedding from around the wheel's axle. Clean the wheel thoroughly. Consider upgrading to a larger, more suitable wheel if your hamster struggles to use it. |
| Water bottle is dripping. | Air bubble in spout; faulty seal; bottle not properly seated. | Tap the bottle to release air bubbles. Ensure the rubber stopper is correctly inserted and the bottle is securely attached to the cage. If dripping persists, the bottle may need replacement. |
| Bedding is scattering outside the cage. | Hamster is actively digging near the top edge; excessive bedding. | The deep base is designed to minimize scattering. Ensure bedding level is appropriate and not overfilled. |
| Hamster attempting to escape. | Cage not securely latched; bar spacing too wide for very small hamsters. | Double-check that all side clips are firmly latched. The wire mesh has a safe 1/4 inch bar space. If your hamster is exceptionally small, monitor closely. |
5. Specifikationer
Key specifications for the Ferplast Favola Hamster Cage:
| Feature | Detalje |
|---|---|
| Modelnavn | Favola Hamster Cage |
| Modelnummer | 57901470US1 |
| Dimensioner (L x B x H) | 60 cm x 36.5 cm x 30 cm (23.6" x 14.4" x 11.8") |
| Deep Base Height | 4.75 inches (approx. 340 sq. inches of base space) |
| Wire Bar Spacing | 1/4 tomme (0.635 cm) |
| Exercise Wheel Diameter | 5.5 tommer (14 cm) |
| Materiale | Plastic, Metal Wire |
| Vægt | 7.7 pund (3.5 kg) |
| Inkluderet tilbehør | Food dish, water bottle, hide-out, 5.5-inch exercise wheel, plastic ramp |
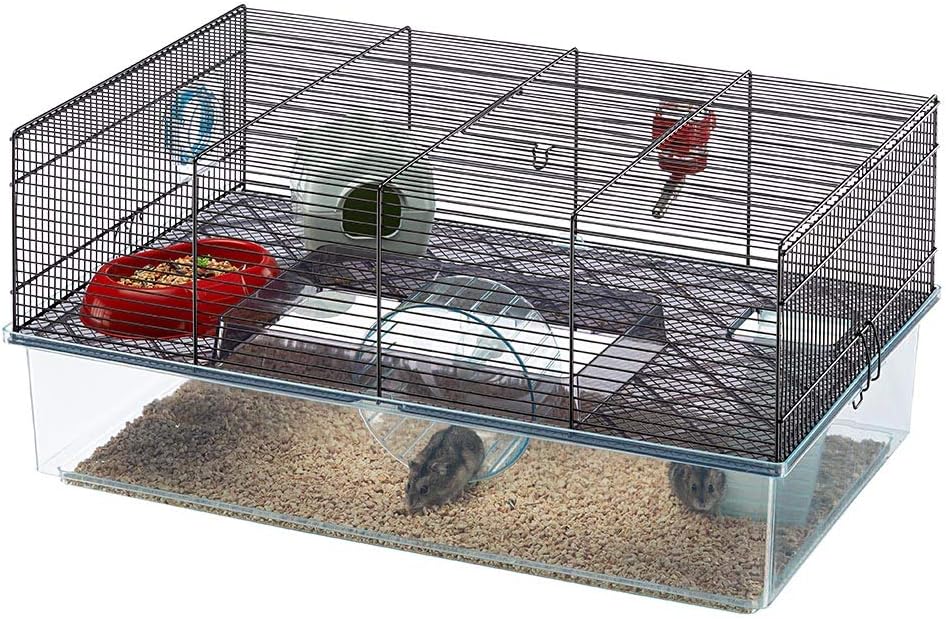
Figure 11: Cage dimensions overview.
6. Garantioplysninger
The Ferplast Favola Hamster Cage includes a 1 års producentgaranti on all parts. This warranty covers defects in materials and workmanship under normal use. Please retain your proof of purchase for warranty claims.
7. Support og kontakt
For further assistance, questions, or to inquire about replacement parts, please contact Ferplast customer support or visit the official Ferplast store online.
Visit the official Ferplast Store: Ferplast-butik på Amazon


