1. Introduktion
Tak for købetasing the EONON A0119J Backup Camera. This device is designed to enhance safety and convenience when reversing your vehicle by providing a clear view of the area behind your car. This manual provides essential information for proper installation, operation, and maintenance of your backup camera. Please read it thoroughly before use and retain it for future reference.

Image 1.1: The EONON A0119J Backup Camera unit. This compact camera is designed for discreet installation on your vehicle.
2. Sikkerhedsoplysninger
Overhold følgende sikkerhedsforanstaltninger for at forhindre skader på produktet eller personskade på dig selv eller andre:
- This product is designed for 12V vehicle electrical systems only. Do not connect to other voltage systemer.
- Installation should be performed by a qualified professional if you are unfamiliar with automotive electrical systems.
- Ensure the vehicle's power is off before beginning installation to prevent electrical shock or damage.
- Always use caution when reversing, even with the backup camera. The camera is an aid and does not replace direct observation.
- Keep cables away from hot surfaces, moving parts, and sharp edges.
- Do not attempt to disassemble or modify the camera unit. This will void the warranty.
3. Pakkens indhold
Bekræft at alle varer er til stede i pakken:
- EONON A0119J Backup Camera Unit
- Strømkabel (1 m)
- Video Cable (6m)
- Monteringsskruer (2 stk.)
- Instruction Manual (Japanese, refer to this document for English)

Image 3.1: Illustration of the package contents and a basic wiring diagram for the EONON A0119J Backup Camera.
4. Opsætning og installation
The EONON A0119J backup camera is designed for easy installation. However, professional installation is recommended if you are not experienced with car electronics.
4.1. Montering af kameraet
- Choose a suitable location on the rear of your vehicle, typically above the license plate or near the trunk handle, ensuring a clear view.
- Secure the camera unit using the provided mounting screws. The camera's small size (20mm x 18mm x 24mm) allows for discreet placement.

Image 4.1: The compact size of the EONON A0119J camera, shown next to a coin for scale, facilitating discreet installation.
4.2. Ledningsforbindelser
Refer to the wiring diagram (Image 3.1) and the following steps:
- Strømtilslutning:
- Tilslut red wire (ACC cable) of the power cable to the positive (+) terminal of your car's reverse light.
- Tilslut black wire (Ground) to a suitable ground point on the vehicle chassis.
- Video Signal Connection:
- Tilslut yellow RCA output terminal of the camera to the video input terminal of your car navigation system or monitor.
- If your monitor has a reverse trigger input, connect the red trigger wire from the video cable to this input. If your monitor does not have a reverse trigger input, this wire can be left unconnected.
- Kabelføring: Route all cables securely, avoiding sharp edges, moving parts, and heat sources. The video cable is approximately 6 meters long. If additional length is required, a backup camera extension cable must be purchased separately. Secure any unused cables to prevent interference.
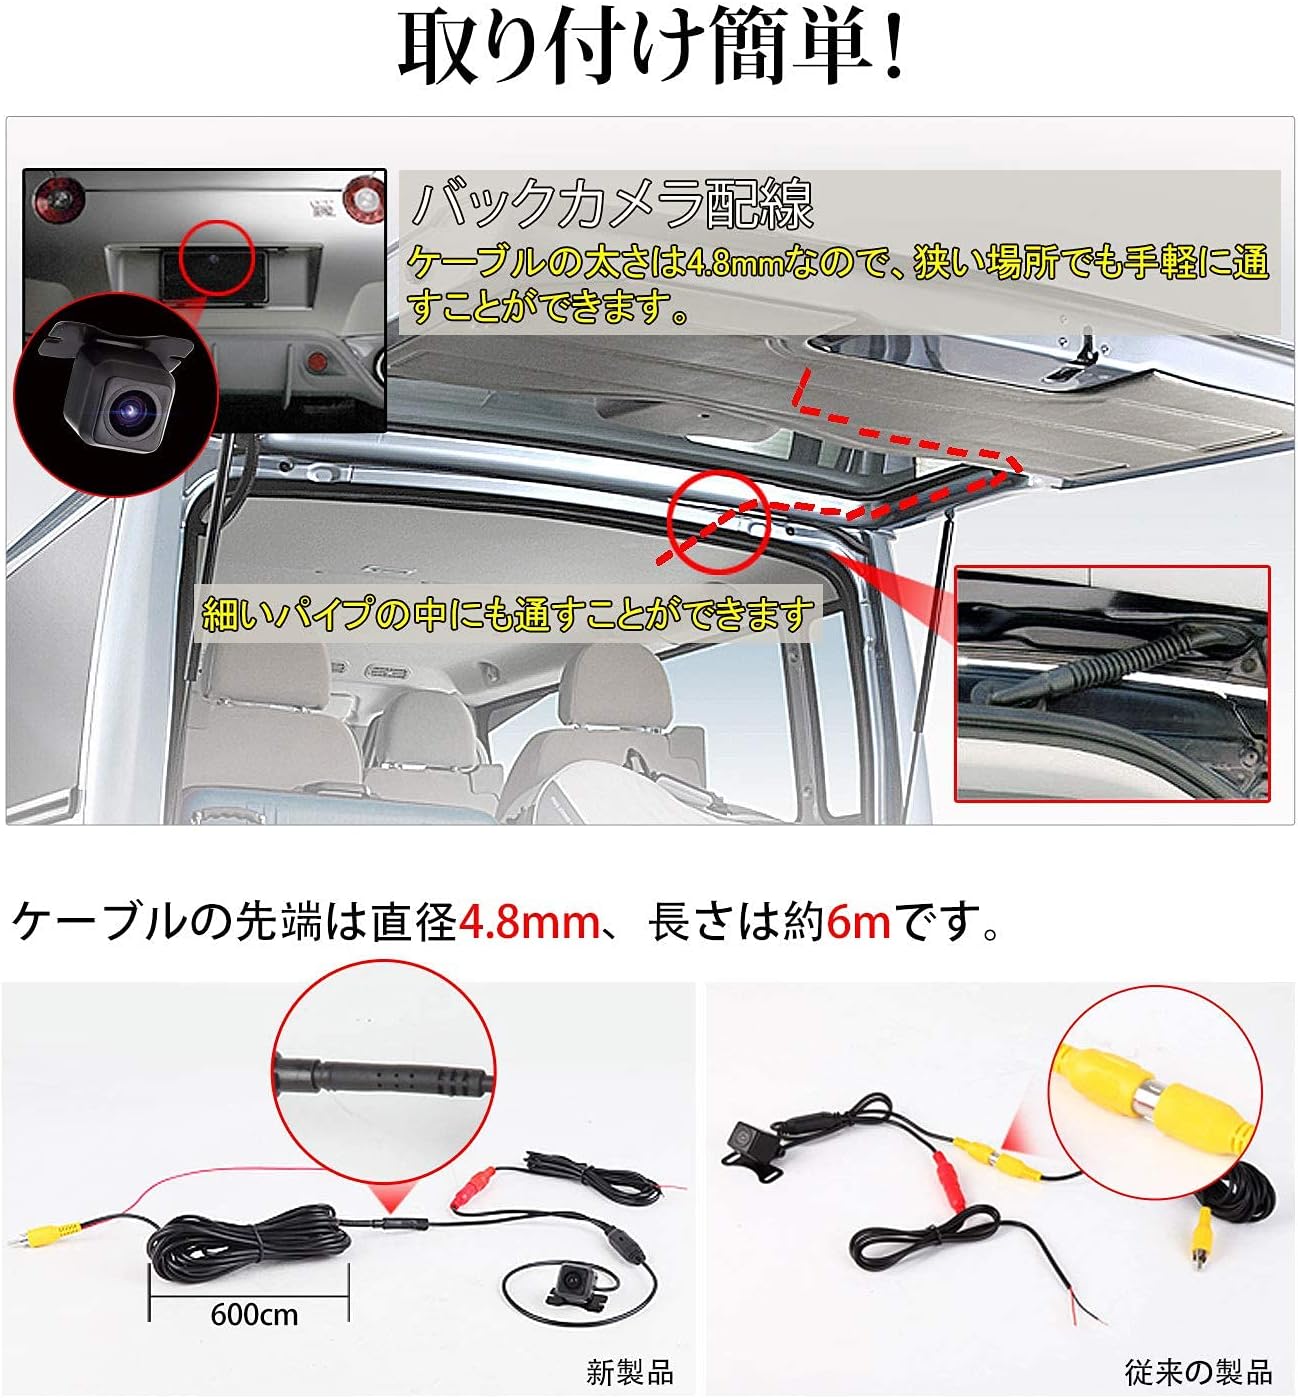
Billede 4.2: Eks.ample of routing the camera cable through the vehicle. The slim cable (4.8mm diameter) allows for passage through narrow spaces.
5. Betjeningsvejledning
The EONON A0119J Backup Camera operates automatically when the vehicle is put into reverse gear, provided it is correctly installed.
5.1. Automatic Activation
When you shift your vehicle into reverse, the camera will automatically power on and transmit video to your connected monitor or car navigation system.
5.2. Guideline Display
The camera features an integrated guideline display on the video feed to assist with parking and judging distance. These guidelines are fixed and cannot be disabled.

Image 5.1: The camera's guideline display function, showing colored lines to assist with parking maneuvers.
5.3. Mirror Image Function
The camera outputs a mirror image by default, which is standard for rear-view applications. Depending on your car navigation system or monitor, it may be possible to switch to a normal (non-mirror) image if desired.
5.4. Wide Angle View
Kameraet giver vidvinkel view (120° horizontal, 170° wide angle) to minimize blind spots behind the vehicle, helping to prevent collisions with objects or structures.

Image 5.2: An illustration demonstrating the wide 170-degree viewing angle of the camera, significantly reducing rear blind spots.
6. Vedligeholdelse
To ensure optimal performance and longevity of your EONON A0119J Backup Camera, follow these maintenance guidelines:
- Rensning: Rengør kameralinsen regelmæssigt med en blød kludamp klud til at fjerne snavs, støv eller vandpletter, der kan blokere viewUndgå slibende rengøringsmidler eller opløsningsmidler.
- Inspektion: Periodically check the camera's mounting and wiring connections to ensure they are secure and free from damage.
- Vandtæt/støvtæt: The camera is rated IP68 for dust and water resistance, meaning it is protected against dust ingress and can withstand immersion in water up to 1.5 meters for 30 minutes. However, avoid high-pressure washing directly on the camera.

Image 6.1: The EONON A0119J camera demonstrating its IP68 waterproof and dustproof capabilities, ensuring durability in various weather conditions.
7. Fejlfinding
If you encounter issues with your EONON A0119J Backup Camera, refer to the following common problems and solutions:
| Problem | Mulig årsag | Løsning |
|---|---|---|
| No image on monitor when reversing. |
|
|
| Billedet er sløret eller uklart. |
|
|
| Image is reversed (not mirror image). | Monitor setting or specific car navigation system behavior. | The camera outputs a mirror image by default. Check your monitor or car navigation system settings for an option to flip the image if a normal view er ønsket. |
| Guidelines are not displayed. | The camera's guidelines are fixed and always displayed. If not visible, check video connection or camera functionality. | Ensure the video signal is correctly transmitted. If the guidelines are still absent, the camera unit may be faulty. |
| Cable length is insufficient. | Vehicle size requires longer cables. | Purchase a separate backup camera extension cable. The included video cable is 6 meters. |
8. Specifikationer
| Feature | Specifikation |
|---|---|
| Modelnummer | A0119J |
| Mærke | EONON |
| Farve | Sort |
| Kompatible enheder | Car navigation systems |
| Installationstype | Backup kamera |
| Voltage | 12 volt |
| Optisk sensorteknologi | CMD |
| Antal pixel | 360,000 pixels |
| Minimum belysning | 0.1 lux |
| Linsetype | Vidvinkel |
| Actual Angle of View | 120° (Horizontal), 170° (Wide Angle) |
| Optisk sensorstørrelse | 1/3 tomme |
| Product Dimensions (Camera Unit) | 24 mm (L) x 20 mm (B) x 18 mm (H) |
| Vandtæt/støvtæt vurdering | IP68 |
| Mirror Image Output | Supported (Default) |
| Guideline Display | Supported (Fixed, cannot be disabled) |
9. Garanti og support
9.1. Garantioplysninger
The EONON A0119J Backup Camera typically comes with a 1-year manufacturer's warranty from the date of purchase. Please retain your proof of purchase for warranty claims. The warranty covers defects in materials and workmanship under normal use. It does not cover damage caused by improper installation, misuse, accidents, modifications, or unauthorized repairs.
9.2. Kundesupport
For technical assistance, troubleshooting not covered in this manual, or warranty inquiries, please contact EONON customer support through the retailer where you purchased the product or visit the official EONON webwebsted for kontaktoplysninger.


