1. Introduktion
The TASCAM DR-70D is a compact, high-quality 4-channel audio recorder designed for videographers and filmmakers. It integrates seamlessly with DSLR cameras, providing professional audio recording capabilities with multiple input options and flexible control.

Image 1.1: The TASCAM DR-70D 4-Channel Audio Recorder, designed for DSLR cameras.
This manual provides detailed instructions for setting up, operating, and maintaining your DR-70D recorder to ensure optimal performance and longevity.
2. Nøglefunktioner
- Four XLR/TRS Combo Inputs: Equipped with high-quality HDDA mic preamps, offering 64dB of gain and phantom power (24V/48V) for professional microphones.
- Two Internal Omnidirectional Microphones: Built-in stereo microphones for capturing ambient sound or quick recordings without external mics.
- Flere optagetilstande: Supports MONO/DUAL MONO, STEREO/DUAL STEREO, and 2MIX/DUAL 2MIX for versatile recording scenarios.
- Dual Recording Function: Records a safety track at a lower level to prevent clipping and distortion.
- Kompakt og robust design: Designed to mount between a tripod and camera, or on top via a hot shoe mount (with optional adapter). Features durable construction.
- Built-in Mixer: Allows individual recording of each input for post-production, while sending a stereo mix to headphones and the camera.
- Slate Tone Generator: Provides reference slate tones for easy audio/video synchronization.
- Camera Input/Output: Dedicated jacks for monitoring camera audio and sending a stereo mix to the camera for simplified editing.
- SD-kort optagelse: Records to SD, SDHC, or SDXC cards up to 128GB.
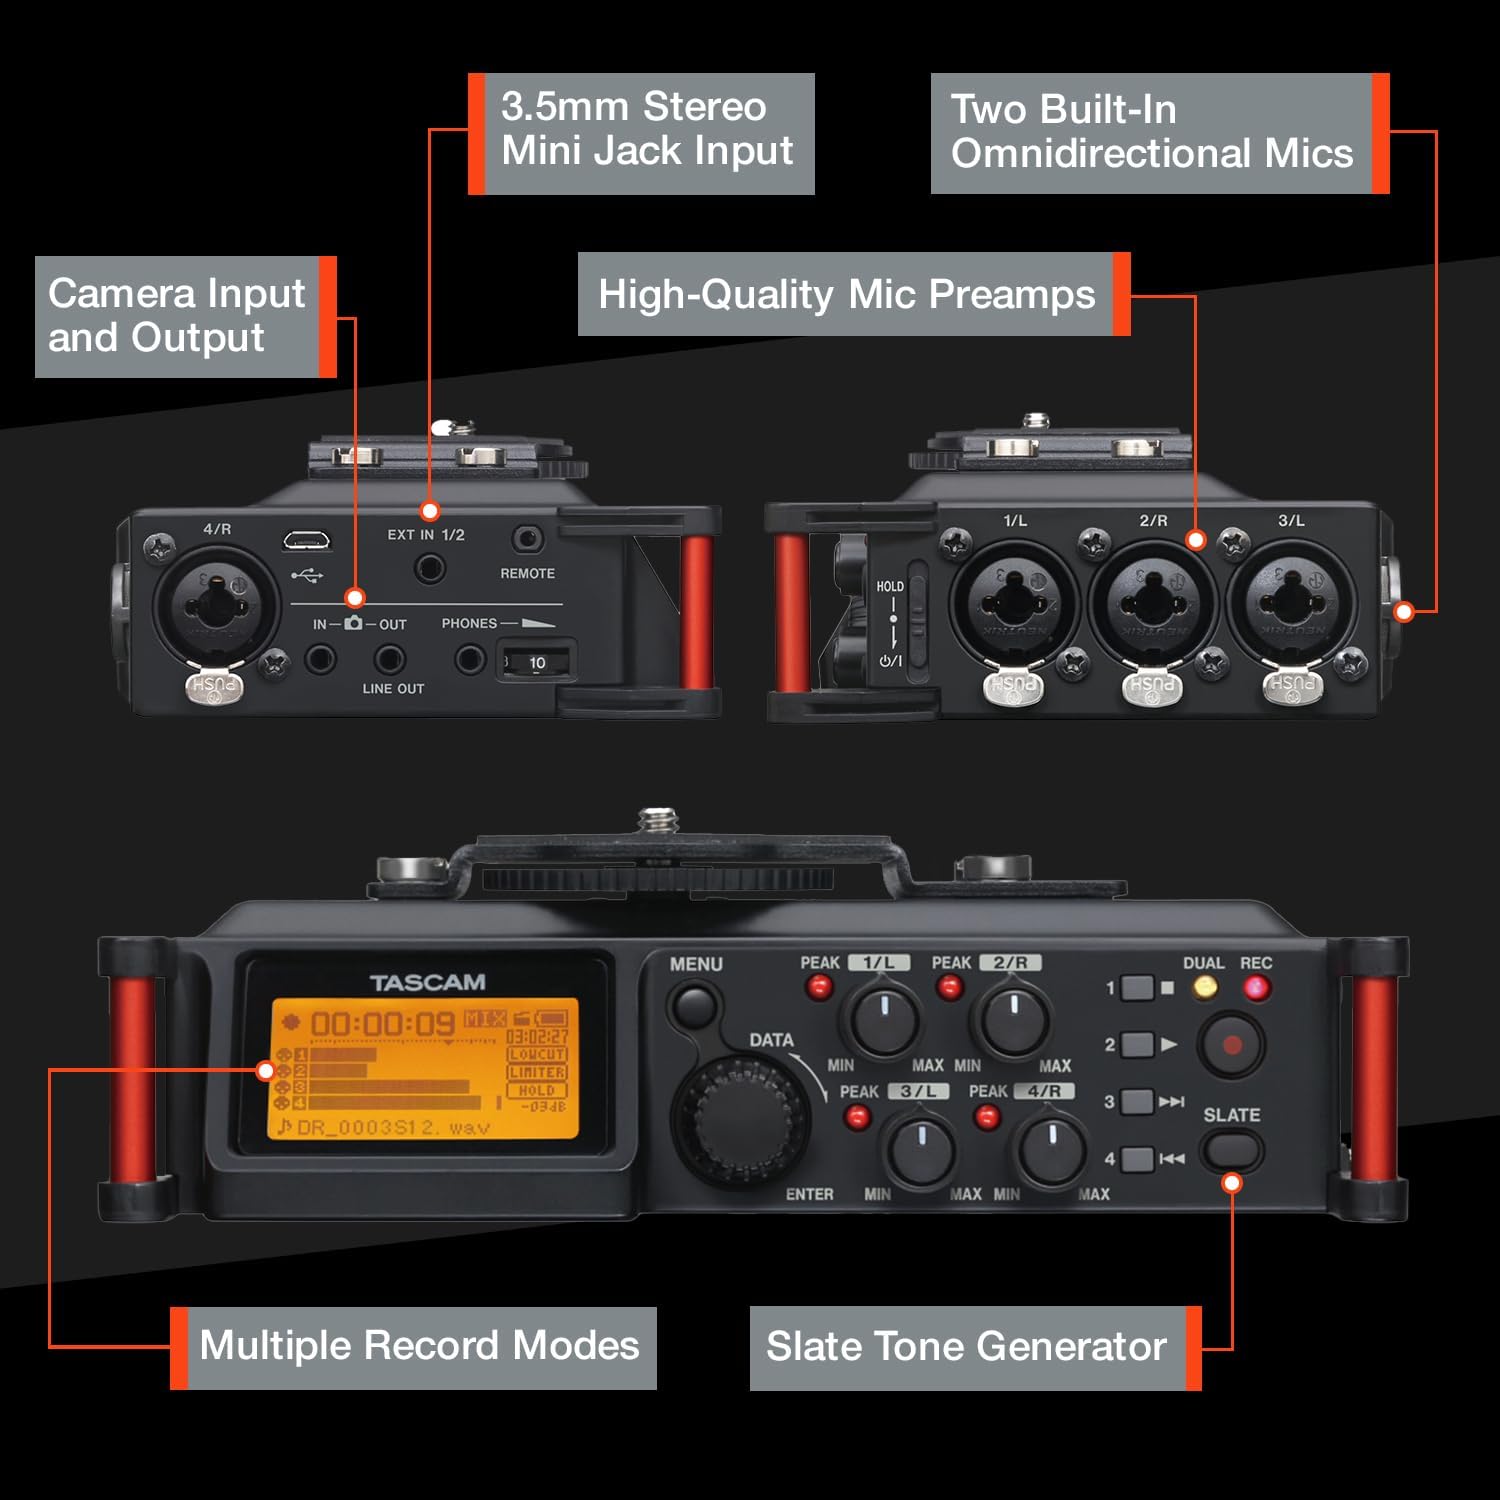
Billede 2.1: Overview of the TASCAM DR-70D's inputs, outputs, and controls.
3. Opsætning
3.1. Batteriinstallation
- Sørg for, at enheden er slukket.
- Find batterirummet på undersiden af enheden.
- Åbn dækslet til rummet.
- Insert four (4) AA batteries, observing the correct polarity (+/-) as indicated inside the compartment.
- Luk batterirummets dæksel forsvarligt.
Note: The DR-70D can also be powered via a USB power adapter (sold separately) or a dedicated AC adapter (sold separately).
3.2. Installation af SD-kort
- Sørg for, at enheden er slukket.
- Locate the SD card slot on the side of the unit.
- Insert an SD, SDHC, or SDXC card (up to 128GB) into the slot until it clicks into place.
- To remove, push the card gently until it ejects, then pull it out.
Note: It is recommended to format the SD card using the DR-70D's menu system before first use and periodically thereafter.
3.3. Mounting the DR-70D
The DR-70D offers versatile mounting options for integration with camera rigs:
- Between Camera and Tripod: The unit features tripod threads on the bottom and a camera mounting plate on top, allowing it to be placed directly between your camera and tripod.
- On Camera Hot Shoe: An optional AK-DR70C adapter (sold separately) can be used to mount the DR-70D onto a camera's hot shoe.
- On Follow-Focus Cages: The tripod threads also allow mounting on various camera cages.

Image 3.1: The DR-70D's compact and tough design allows for various mounting configurations.
4. Betjeningsvejledning
4.1. Tænd/sluk
- For at tænde skal du trykke på og holde tænd/sluk-knappen nede, indtil displayet lyser.
- To power off, press and hold the power button until the unit shuts down.
4.2. Connecting Microphones and Line Sources
The DR-70D features four combo XLR/TRS inputs (1-4) and a 3.5mm stereo mini-jack input (EXT IN 1/2).
- XLR/TRS Inputs (1-4): Connect professional microphones or line-level devices using XLR or 1/4-inch TRS cables. Activate phantom power (24V or 48V) via the menu for condenser microphones.
- 3.5mm Stereo Mini-Jack Input (EXT IN 1/2): Connect consumer-level microphones or line-level devices. This input supports plug-in power.

Image 4.1: The 3.5mm stereo mini jack input for connecting external microphones or line sources.
4.3. Setting Recording Levels
- Use the individual gain knobs for each input (1-4) to adjust the input level.
- Monitor the level meters on the display to ensure signals are strong but do not peak into the red, which indicates clipping.
- The built-in limiter can be activated via the menu to prevent sudden loud sounds from distorting the recording.
- High-Pass Filter (HPF) can be applied to reduce unwanted low-frequency noise.
4.4. Optagelsestilstande
The DR-70D offers several recording modes to suit different production needs:
- MONO/DUAL MONO: Ideal for recording a single performer or sound source, with an option to record a safety track.
- STEREO/DUAL STEREO: Best for recording with the built-in microphones or an external stereo microphone setup, with an option for a safety track.
- 2MIX/DUAL 2MIX: Creates stereo files from two or more mixed inputs. Dual Recording creates a backup track at up to 12dB lower levels to prevent distortion.

Image 4.2: Illustration of MONO/DUAL MONO recording mode.

Image 4.3: Illustration of STEREO/DUAL STEREO recording mode.

Image 4.4: Illustration of 2MIX/DUAL 2MIX recording mode.
4.5. Overvågning af lyd
- Connect headphones to the 3.5mm PHONES jack for real-time audio monitoring.
- The DR-70D's built-in mixer allows you to monitor the individual inputs or the stereo mix.
- Use the CAMERA IN jack to monitor audio from your camera, allowing you to evaluate the camera's audio signal alongside the DR-70D's output.
4.6. Using the Slate Tone Generator
The slate tone generator helps synchronize audio and video files in post-production.
- Tryk på SKIFFER button to generate a reference tone.
- Slate tones can be added automatically at the start and/or end of a recording, or manually at any time.

Image 4.5: The SLATE button for generating reference tones.
4.7. Camera Integration
- Kamera input: Connect your camera's audio output to the DR-70D's IN-O jack to monitor camera audio.
- Kameraoutput: Send a stereo mix from the DR-70D to your camera's audio input via the LINJE UD jack. This simplifies synchronization in editing software.

Image 4.6: The camera input jack for monitoring camera audio.

Image 4.7: The camera output jack for sending audio to your camera.
5. Vedligeholdelse
- Rensning: Brug en blød, tør klud til at rengøre enhedens yderside. Undgå slibende rengøringsmidler eller opløsningsmidler.
- Opbevaring: Store the DR-70D in a cool, dry place away from direct sunlight and extreme temperatures. Remove batteries if storing for extended periods.
- Firmwareopdateringer: Check the Tascam webwebstedet regelmæssigt for firmwareopdateringer for at sikre optimal ydeevne og adgang til nye funktioner.
6. Fejlfinding
| Problem | Mulig årsag | Løsning |
|---|---|---|
| Enheden tænder ikke. | Dead or incorrectly inserted batteries; no external power. | Replace batteries, check polarity, or connect to a power adapter. |
| Ingen lyd optaget. | Incorrect input selection; low gain; faulty microphone/cable; SD card issue. | Verify input settings, increase gain, test microphone/cable, ensure SD card is inserted and formatted. |
| Forvrænget lyd. | Input levels too high; limiter not active. | Reduce input gain, activate the limiter, check microphone placement. |
| Ingen lyd fra hovedtelefoner. | Headphone volume too low; incorrect monitoring settings; faulty headphones. | Increase headphone volume, check monitoring mix settings, test with different headphones. |
| SD-kort fejl. | Card not formatted; incompatible card; card full. | Format the SD card in the DR-70D, use a compatible card (SD/SDHC/SDXC), delete old files. |
7. Specifikationer
| Feature | Detalje |
|---|---|
| Produktdimensioner | 6.25 x 4.5 x 2.25 tommer |
| Varens vægt | 1.16 pund |
| Varemodelnummer | DR-70D |
| Batterier | 4 AA batterier (medfølger) |
| Hardware-interface | USB |
| Mikrofon formfaktor | Indbygget |
| Lydformat | WAV |
| Hovedtelefonstik | 3.5 millimeter |
| Hukommelseslagringskapacitet | Supports SD, SDHC, SDXC up to 128 GB (card not included) |
| Fabrikant | Tascam |
8. Garanti og support
For garantioplysninger og teknisk support henvises til den officielle Tascam-side. website or contact your local Tascam distributor. Keep your proof of purchase for warranty claims.
Official Tascam Webwebsted: www.tascam.com


