1. Introduktion
Thank you for choosing the WiMiUS Q1 4K WiFi Waterproof Action Camera. This manual provides essential information for setting up, operating, and maintaining your device. Please read it carefully before use to ensure optimal performance and longevity of your camera.

Image 1.1: WiMiUS Q1 4K WiFi Waterproof Action Camera. This image displays the camera in its retail packaging, highlighting its 4K Full HD capabilities, 40m waterproof rating, WiFi connectivity, 170-degree wide angle, and 2.0-inch LCD screen.
2. Pakkens indhold
Kontroller venligst, at alle nedenstående varer er inkluderet i din pakke:
- 1 x WiMiUS Q1 4K Action Camera
- 2 x 900mAh genopladelige batterier
- 1 x batterioplader
- Various mounting accessories (e.g., waterproof case, helmet mounts, bicycle mount, adhesive mounts, clips, bandages, tethers, USB cable, cleaning cloth)
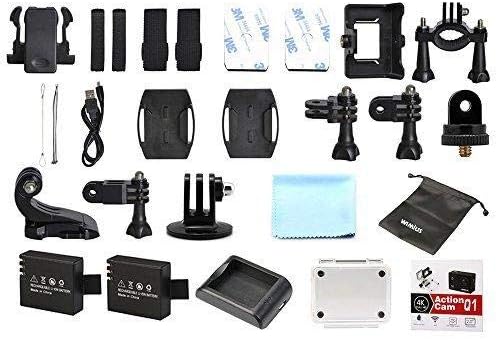
Image 2.1: WiMiUS Q1 Action Camera Accessories. This image shows the comprehensive set of accessories included with the camera, such as various mounts, straps, a charging dock, two batteries, a USB cable, and a cleaning cloth.
3. Kamera overview
Gør dig bekendt med kameraets knapper og porte:

Image 3.1: WiMiUS Q1 Camera Labeled Parts. This diagram illustrates the various components of the camera, including the Power/Mode button, OK button, UP/WiFi button, Down button, Speaker, Microphone, Micro SD card slot, USB port, HDMI port, Charging Indicator, Operation Indicator, and WiFi Indicator.
- Tænd/sluk-knap: Tryk og hold nede for at tænde/slukke. Tryk kort for at skifte tilstand.
- OK knap: Confirm selection, start/stop recording, or take a photo.
- UP/WiFi Button: Navigate up in menus. Press and hold to activate/deactivate WiFi.
- Ned-knap: Naviger ned i menuerne.
- Højttaler: Lydudgang.
- Mikrofon: Audio input for recording.
- Micro SD-slot: Insert Micro SD card (up to 64GB, not included).
- USB-port: Til opladning og dataoverførsel.
- HDMI-port: Til tilslutning til en ekstern skærm.
- Opladningsindikator: Viser opladningsstatus.
- Driftsindikator: Viser kameraets driftsstatus.
- WiFi-indikator: Shows WiFi connection status.
4. Opsætning
4.1. Batteriinstallation
- Åbn batteridækslet i bunden af kameraet.
- Insert a fully charged 900mAh battery, ensuring the correct orientation.
- Luk batterirummets dæksel forsvarligt.
4.2. Installation af micro SD-kort
A Micro SD card (not included) is required for storing photos and videos. The camera supports cards up to 64GB.
- Find Micro SD-kortstikket på siden af kameraet.
- Insert the Micro SD card with the contacts facing the camera's front until it clicks into place.
- For at fjerne det skal du forsigtigt skubbe kortet, indtil det springer ud.
4.3. Opladning af batteriet
Use the provided charging dock and USB cable to charge the batteries. A full charge takes approximately 3 hours.
- Indsæt batteriet i ladestationen.
- Connect the charging dock to a USB power source (5V 1A) using the USB cable.
- The charging indicator on the dock will show the charging status.
4.4. Brug af det vandtætte etui
The waterproof case allows the camera to be used underwater up to 40 meters. Ensure the case is properly sealed before submerging.
- Place the camera inside the waterproof case.
- Luk låsen godt for at sikre en vandtæt forsegling.
- Before first use, test the empty waterproof case in water to confirm no leaks.
5. Betjeningsvejledning
5.1. Tænd/sluk
- Tænd: Tryk og hold på Strøm/tilstand knappen i 3 sekunder.
- Sluk: Tryk og hold på Strøm/tilstand knappen i 3 sekunder.
5.2. Skift af tilstand
Tryk kort på Strøm/tilstand button to cycle through different modes: Video Recording, Photo Shooting, Playback, and Settings.
5.3. Videooptagelse
- Skift til videooptagelsestilstand.
- Tryk på OK button to start recording. The operation indicator will flash.
- Tryk på OK button again to stop recording. The operation indicator will stop flashing.
Videoopløsninger: 4K@30FPS, 2.7K@30FPS, 1080P@60FPS, 720P@120FPS.
Special Video Modes:
- Timelapse: Intervals of 0.5S, 1S, 2S, 5S, 10S, 30S, 60S.
- Loop-optagelse: 2min, 3min, 5min segments.
- Slowmotion: 1080P@60FPS, 720P@120FPS.
5.4. Fotografering
- Switch to Photo Shooting mode.
- Tryk på OK knappen for at tage et billede.
Photo Resolutions: 16M, 14M, 12M, 8M, 5M.
Fototilstande: Single, Self-Timer (3S/5S/10S), Continuous Shot (3P/S, 5P/S, 10P/S, 20P/S).
5.5. Wi-Fi-forbindelse
Connect your camera to a smartphone or tablet via Wi-Fi for remote control and file overførsel.
- Download the official WiMiUS app from your device's app store.
- On the camera, press and hold the UP/WiFi button to activate Wi-Fi. The Wi-Fi indicator will light up.
- On your smartphone/tablet, go to Wi-Fi settings and connect to the camera's Wi-Fi network (SSID usually starts with 'WiMiUS' or similar).
- Open the WiMiUS app to control the camera remotely.
5.6. Afspilning
Til review dine optagede videoer og fotos:
- Switch to Playback mode using the Strøm/tilstand knap.
- Brug UP og Ned buttons to navigate through your files.
- Tryk på OK knap til view en udvalgt file.
6. Vedligeholdelse
6.1. Rensning
- Use a soft, lint-free cloth to clean the camera lens and LCD screen.
- For genstridige pletter, tør letampSkyl kluden med vand. Undgå skrappe kemikalier.
- Sørg for, at kameraet er tørt, før du lukker porte eller rum.
6.2. Opbevaring
- Opbevar kameraet et køligt og tørt sted, væk fra direkte sollys og ekstreme temperaturer.
- Fjern batterierne, hvis kameraet ikke skal bruges i en længere periode.
7. Fejlfinding
- Kamera tænder ikke: Sørg for, at batteriet er fuldt opladet og korrekt isat. Prøv at bruge det andet batteri.
- SD-kortfejl: Ensure the Micro SD card is correctly inserted and formatted (FAT32 recommended). Try a different compatible Micro SD card.
- Dårlig video-/fotokvalitet: Check lens for smudges. Ensure adequate lighting. Verify resolution settings.
- Problemer med Wi-Fi-forbindelse: Ensure Wi-Fi is enabled on the camera and your mobile device. Restart both devices. Check for app updates.
- Kamera fryser: Fjern og sæt batteriet i igen for at nulstille kameraet.
8. Specifikationer
| Model | WiMiUS Q1 |
| LCD skærm | 2.0'' LTPS |
| Linse | 170-degree A+ High Resolution Wide Angle |
| Video opløsning | 4K@30FPS, 2.7K@30FPS, 1080P@60FPS, 720P@120FPS |
| Videoformat | MOV (H.264) |
| Foto opløsning | 16M/14M/12M/8M/5M |
| Opbevaring | Micro SD Card, up to 64GB (Class 10 or higher recommended) |
| Batteri | 2 x 900mAh Rechargeable Li-ion |
| Opladningstid | Cirka 3 timer |
| Forbindelse | USB 2.0, Wi-Fi |
| Systemkompatibilitet | Windows XP/Vista/Win7 or above, Mac OS |
| Særlige funktioner | Time Lapse, Loop Recording, Slow Motion, Waterproof (with case) |
| Optisk zoom | 10x |
| Sensortype | CMOS |
9. Garanti og support
For warranty information and technical support, please refer to the documentation provided with your purchase or visit the official WiMiUS webwebsted. Gem din købsbevis til garantikrav.


