1. Introduktion
The Intermatic SW30MWK 30-Minute Spring Wound Timer is a mechanical in-wall timer designed to provide energy-saving control for various electrical loads, including lights, fans, motors, and heaters. This timer operates without electricity, offering a reliable and cost-effective solution for automatically turning off devices after a preset time. This manual provides essential information for the safe installation, operation, and maintenance of your SW30MWK timer.
2. Produktet er slutview
The SW30MWK timer features a simple, intuitive design for ease of use and installation. It is compatible with modern energy-efficient lighting options such as LED and CFL lights.
Nøglefunktioner:
- 30-Minute Off Control: Automatically limits the ON time of connected loads.
- No Electricity Required: Operates mechanically, providing energy savings and reducing utility costs.
- Nem udskiftning: Designed to fit any standard wall switch, single or multi-gang.
- Alsidig brug: Ideal for controlling fans, lights, motors, heaters, and other appliances.
- LED and CFL Compatible: Works with modern energy-efficient lighting.

Figur 1: Forside view of the Intermatic SW30MWK 30-Minute Spring Wound Timer.
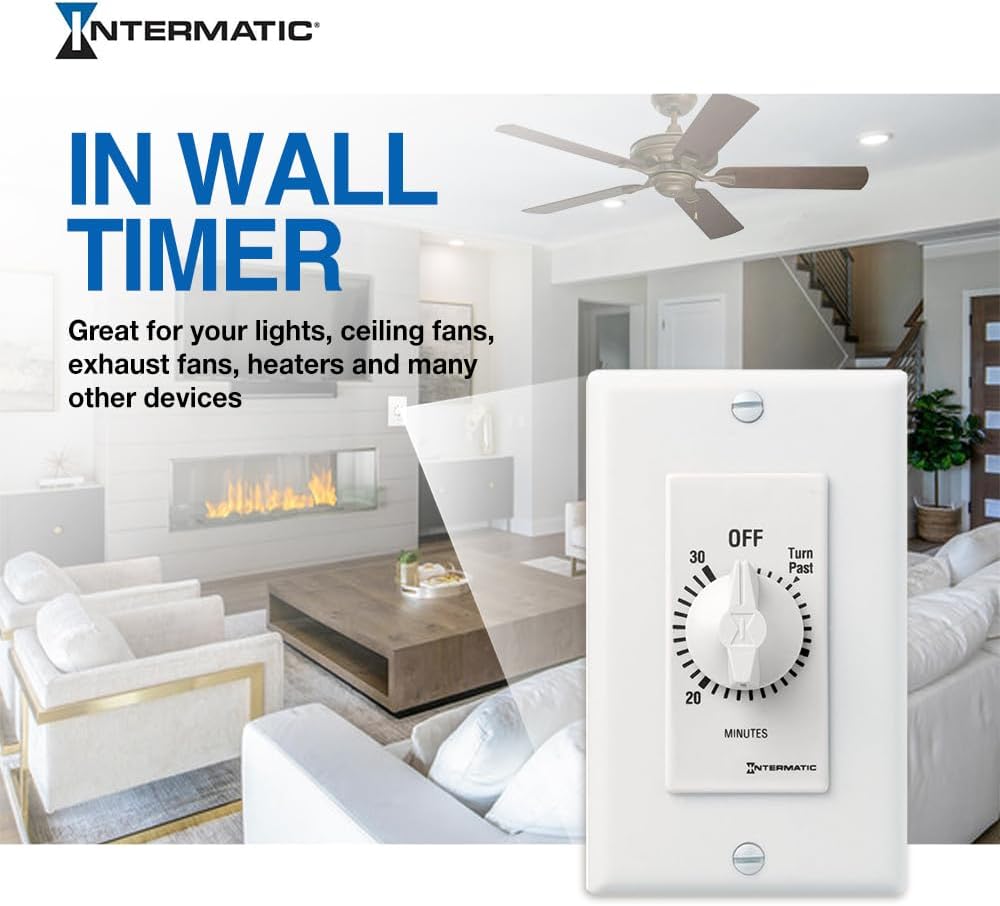
Figure 2: The SW30MWK timer seamlessly integrated into a living room wall.

Figure 3: Close-up highlighting the timer's energy-saving features and compatibility.
3. Sikkerhedsoplysninger
WARNING: Risk of Electric Shock. May result in serious injury or death. Turn power OFF at the circuit breaker or fuse and test that power is OFF before wiring!
- Always disconnect power at the circuit breaker before installing or servicing the timer.
- This device must be installed by a qualified electrician in accordance with all national and local electrical codes.
- Do not use this timer with loads exceeding its specified ratings.
- Sørg for, at alle ledningsforbindelser er sikre og korrekt isolerede.
- Keep children away from electrical wiring.
4. Opsætning og installation
The Intermatic SW30MWK timer is designed for easy installation as a replacement for a standard wall switch. Follow these steps carefully:
- Sluk for strømmen: Locate the circuit breaker or fuse that controls the power to the switch you are replacing. Turn it OFF. Verify that the power is off using a voltage tester.
- Fjern den gamle switch: Carefully remove the wall plate and unscrew the existing switch from the wall box. Disconnect the wires from the old switch, noting which wire was connected to which terminal.
- Identificér ledninger: Typically, you will find two wires connected to a standard single-pole switch: a hot wire (incoming power) and a load wire (going to the light/appliance). The SW30MWK timer has two black wires for connection.
- Connect Timer Wires: Connect one black wire from the SW30MWK timer to the hot wire from the wall box. Connect the other black wire from the timer to the load wire from the wall box. Use appropriate wire connectors (wire nuts) to secure these connections.
- Grounding (if applicable): If your wall box has a ground wire (bare copper or green), connect it to the green ground screw on the timer (if present) or to the ground wire in the box.
- Mount Timer: Carefully push the wired timer into the wall box. Secure it with the provided mounting screws.
- Installer vægplade: Attach the wall plate over the timer.
- Gendan strøm: Tænd for strømmen igen ved afbryderen.

Figure 4: Simplified wiring diagram for the SW30MWK timer.
5. Betjeningsvejledning
The SW30MWK timer is simple to operate:
- To Turn ON and Set Time: Rotate the knob clockwise past the 'OFF' position to the desired ON time (up to 30 minutes). The timer will begin counting down immediately.
- Automatisk slukning: Once the set time has elapsed, the timer will automatically return to the 'OFF' position, turning off the connected device.
- Manuel slukning: To turn off the device before the set time has elapsed, simply rotate the knob counter-clockwise back to the 'OFF' position.
Video 1: Demonstration of a spring-wound timer operation. This video shows how to turn the knob past the 'OFF' position to set the desired countdown time, and how it automatically returns to 'OFF'.
6. Vedligeholdelse
The Intermatic SW30MWK timer requires minimal maintenance. It is a mechanical device with no user-serviceable parts inside.
- Rensning: Periodically wipe the surface of the timer and wall plate with a soft, damp klæde. Brug ikke slibende rengøringsmidler eller opløsningsmidler.
- Inspektion: Occasionally check the timer and wall plate for any signs of damage, loose connections, or excessive wear. If any issues are found, disconnect power and consult a qualified electrician.
7. Fejlfinding
| Problem | Mulig årsag | Løsning |
|---|---|---|
| Timer does not turn ON. | Ingen strøm til kredsløbet. Forkert ledningsføring. | Tjek afbryder eller sikring. Kontroller ledningsforbindelserne (se afsnit 4). |
| Timer does not turn OFF. | Timer mechanism is stuck or damaged. | Ensure the knob can rotate freely. If the mechanism is damaged, the unit may need replacement. |
| Connected device does not operate. | Enheden er defekt. Timer is not set correctly. Overbelaste. | Test the device with a different power source. Ensure the timer is wound past 'OFF' to the desired time. Verify the load does not exceed the timer's rating. |
8. Specifikationer
| Attribut | Værdi |
|---|---|
| Modelnummer | SW30MWK |
| Mærke | Intermatic |
| Farve | Hvid |
| Skift stil | 30 Minute Spring Wound |
| Monteringstype | Vægmontering |
| Materiale | Wolfram |
| Produktdimensioner | 1.97" D x 2.76" B x 5.51" H |
| Varens vægt | 2.4 ounce |
| Antal indstillinger | 1 |
| Certificering | CSA |
| Batterier påkrævet | Ingen |
| UPC | 078275143487 |
9. Garantioplysninger
Intermatic products are designed for durability and reliability. This product comes with a standard manufacturer's warranty. For specific details regarding the warranty period and terms, please refer to the warranty documentation included with your purchase or visit the official Intermatic webwebsted. Gem din købsbevis til garantikrav.
10. Support
If you have any questions, require technical assistance, or need to report an issue with your Intermatic SW30MWK timer, please contact Intermatic customer support:
- Webwebsted: Visit the official Intermatic webwebsted med ofte stillede spørgsmål, produktdokumentation og kontaktoplysninger.
- Telefon: Refer to the contact details provided on the product packaging or the Intermatic webhjemmeside for kundeservice telefonnumre.
Please have your model number (SW30MWK) and date of purchase ready when contacting support.


