1. Introduktion
Thank you for choosing the GreenBlue GB104 DIN Rail Digital Timer. This electronic timer is designed for advanced weekly programming, offering precise control over electrical devices. Please read this manual carefully before installation and operation to ensure safe and efficient use of the product.
2. Sikkerhedsinstruktioner
Overhold altid følgende sikkerhedsforanstaltninger:
- Installationen bør kun udføres af en kvalificeret elektriker.
- Sørg for, at strømforsyningen er afbrudt før installations- eller vedligeholdelsesarbejde.
- Udsæt ikke enheden for fugt eller ekstreme temperaturer.
- Do not exceed the maximum load capacity of 16A 250VAC.
- Denne enhed er kun designet til indendørs brug.
3. Produktfunktioner
The GreenBlue GB104 Digital Timer offers a range of features for versatile control:
- DIN rail mounting for easy integration into electrical panels.
- Advanced weekly programming with up to 16 ON/OFF settings.
- Digital electronic switching programs for daily and weekly cycles.
- Minute-level precision for scheduling.
- LCD display showing real-time hours/minutes and ON/AUTO/OFF status.
- Built-in battery backup for program retention during power outages (over 15 days).

Figur 3.1: Forside view of the GreenBlue GB104 Digital Timer, showing the LCD screen and programming buttons.
4. Tekniske specifikationer
| Parameter | Værdi |
|---|---|
| Mærke | GrønBlå |
| Modelnummer | GB104 |
| Voltage | AC180V-264V (50/60Hz) |
| Kontakttype | 1 Inverter (SPDT) |
| ON/OFF Programs | Up to 16 ON and 16 OFF |
| Strømforbrug | 4.5W (maks.) |
| Tidsinterval | 1 minut - 168 timer |
| Batteri backup | > 15 dage |
| Minimum Delay | 1 minut |
| Max belastningskapacitet | 16A 250VAC |
| Fugtighed | 35% til 85% RH |
| Driftstemperatur | -10°C til 55°C |
| Vægt | 125g (product only) / 140g (with packaging) |
| Dimensioner (L x B x H) | 9 x 4 x 4 cm |
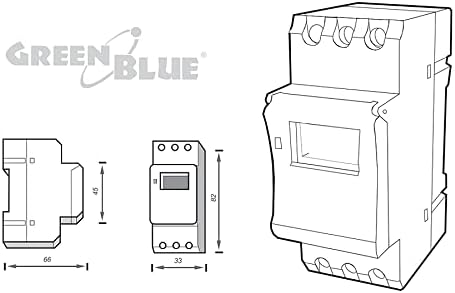
Figur 4.1: Produktmål til installationsplanlægning.
5. Pakkens indhold
Pakken skal indeholde følgende varer:
- 1 x GreenBlue GB104 DIN Rail Digital Timer
- 1 x Brugermanual (dette dokument)

Figure 5.1: The GreenBlue GB104 timer as packaged for retail.
6. Installation
The GB104 timer is designed for DIN rail mounting. Follow these steps for proper installation:
- Strømafbrydelse: Before starting any electrical work, ensure the main power supply to the circuit is completely disconnected at the circuit breaker.
- Montering: Snap the timer onto a standard 35mm DIN rail in your electrical distribution box.
- Ledningsføring: Refer to the wiring diagram below for correct connections. The timer has terminals for Line (L), Neutral (N), and switched output (Common, Normally Open, Normally Closed).
- Sikre forbindelser: Ensure all wire connections are tight and secure to prevent loose contacts and potential hazards.
- Strømgendannelse: Når installationen er færdig og verificeret, skal strømmen til kredsløbet genoprettes.
6.1 Ledningsdiagram
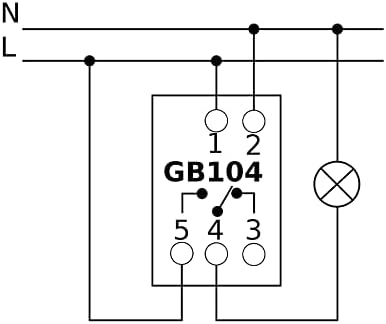
Figure 6.1: Wiring diagram for the GB104 timer. Connect L and N for power input. Terminals 3, 4, 5 are for the switched output (Common, Normally Open, Normally Closed).
Note: The diagram on the device itself might be simplified. Always refer to this manual's diagram for accurate wiring. Terminals are typically: 1 (L-input), 2 (N-input), 3 (Normally Closed), 4 (Common), 5 (Normally Open).
7. Indledende opsætning
After installation and power-up, perform the initial setup:
- Nulstil: Tryk på NULSTIL button (usually a small recessed button requiring a pointed object like a pen) to clear all previous settings and initialize the timer. The LCD display will show "00:00" and all segments will flash.
- Indstil aktuel tid:
- Tryk på D+ button to set the current day of the week (1=Monday, 2=Tuesday, etc.).
- Tryk på H+ knappen for at indstille den aktuelle time.
- Tryk på M+ knappen for at indstille det aktuelle minut.
- Bekræfte: Tiden gemmes automatisk efter et par sekunders inaktivitet.
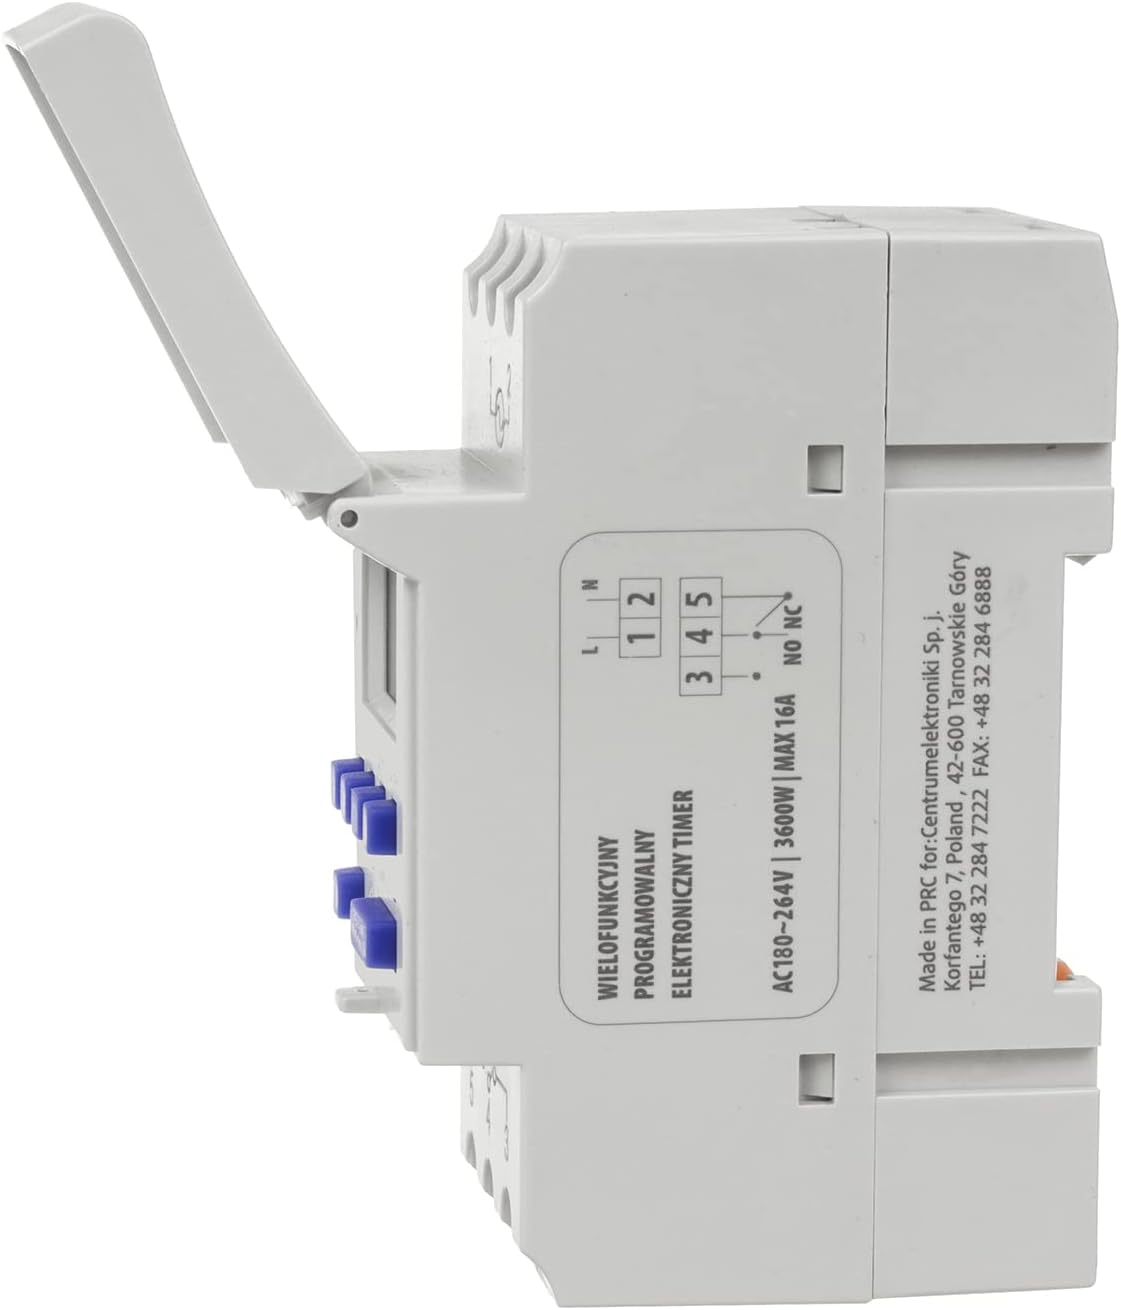
Figure 7.1: Control panel showing the D+, H+, M+, RESET, and MANUAL buttons.
8. Operating Instructions: Programming ON/OFF Cycles
The GB104 allows for up to 16 ON/OFF programs. Follow these steps to set your desired schedules:
- Tryk på P button once. The display will show "1 ON" and the first program setting.
- Bruge D+ to select the day(s) for this "ON" event. You can choose individual days, weekdays, weekends, or all days.
- Bruge H+ og M+ to set the desired hour and minute for the "ON" event.
- Trykke P igen. Displayet vil vise "1 OFF".
- Bruge D+, H+, og M+ to set the day(s), hour, and minute for the corresponding "OFF" event.
- Repeat steps 1-5 for additional ON/OFF programs (up to 16 pairs). Each press of P will cycle through "2 ON", "2 OFF", and so on.
- For at afslutte programmeringstilstanden og vende tilbage til visningen af det aktuelle klokkeslæt skal du trykke på UR button (often indicated by a clock icon, or the same button as P if it's a multi-function button).
8.1 Manuel tilsidesættelse
De MANUEL button allows you to override the programmed settings temporarily:
- Trykke MANUEL gentagne gange for at skifte mellem tilstande:
- PÅ: Udgangen er konstant tændt og ignorerer programmer.
- BIL: The timer operates according to the programmed ON/OFF cycles.
- OFF: Udgangen er konstant OFF og ignorerer programmer.
- Sørg for, at timeren er indstillet til AUTO til programmeret drift.
9. Vedligeholdelse
The GreenBlue GB104 Digital Timer requires minimal maintenance:
- Hold enheden ren og fri for støv. Brug en blød, tør klud til rengøring.
- Brug ikke slibende rengøringsmidler eller opløsningsmidler.
- Kontroller regelmæssigt ledningsforbindelserne for tæthed, især efter den første installation.
- The internal battery is designed for long life and typically does not require replacement.
10. Fejlfinding
| Problem | Mulig årsag | Løsning |
|---|---|---|
| Displayet er tomt. | No power supply; Internal battery depleted. | Check power connections. If power is present, allow the unit to charge for a few minutes. If still blank, the unit may be faulty. |
| Timeren tænder/slukker ikke på programmerede tidspunkter. | Timer is in MANUAL ON or MANUAL OFF mode; Incorrect programming; Time not set correctly. | Trykke MANUEL indtil "AUTO" vises.view and correct programming settings. Ensure current time is accurate. |
| Programmer går tabt efter strømafbrydelsetage. | Det interne batteri holder ikke på ladningen. | The battery may be at the end of its life. While not user-replaceable, ensure the unit is powered for a few hours to fully charge the battery. If the issue persists, contact support. |
| Knapperne reagerer ikke. | Midlertidig softwarefejl. | Tryk på NULSTIL button. Re-enter current time and programs. |
11. Garanti og support
GreenBlue products are manufactured to high-quality standards. In the unlikely event of a defect, please contact your retailer or the manufacturer's customer support for assistance.
Please retain your proof of purchase for warranty claims. Warranty terms and conditions may vary by region and retailer.
For further support or technical inquiries, please visit the official GreenBlue webwebsted eller kontakt deres kundeserviceafdeling.