1. Introduktion
This manual provides essential information for the safe and effective use of your Yamaha MG16 16-Input 6-Bus Mixer. Please read this manual thoroughly before using the product to ensure proper operation and to prevent damage to the unit or injury to yourself or others. Keep this manual in a safe place for future reference.
The Yamaha MG16 is a versatile 16-channel analog mixing console designed for both portable setups and permanent installations. It features high-quality D-PRE preamps, intuitive one-knob compressors, and a robust metal chassis, ensuring transparent sound reproduction and reliable performance.
2. Nøglefunktioner
- 16-Channel Standalone Mixer: Offers 16 input channels and 6 buses for flexible audio routing.
- D-PRE Diskret Klasse-A Mikrofonforstærkeramps: Features studio-grade preamps with an inverted Darlington circuit, delivering natural-sounding bass and smooth highs.
- En-knap kompressorer: Provides easy-to-use dynamics control for livelier guitars, punchier bass lines, tighter snare drums, and cleaner vocals.
- 3-bånds EQ og højpasfiltre: Allows for precise sound-shaping and effective elimination of unwanted low-frequency noise.
- Robust metalchassis: Constructed with an impact-resistant, powder-coated metal chassis for enhanced durability.
- High Quality Op-Amp: Ensures transparent sound reproduction across all channels.

Figure 2.1: D-PRE discrete Class-A mic preamp kredsløbsdiagram.

Figure 2.2: The custom-designed MG01 op-amp chip.
3. Opsætning
3.1 Udpakning og inspektion
Carefully remove the mixer from its packaging. Inspect the unit for any signs of damage that may have occurred during shipping. Retain the original packaging for future transport or storage.
3.2 Strømtilslutning
Connect the supplied AC adaptor to the AC ADAPTOR IN terminal on the rear panel of the mixer. Plug the other end of the AC adaptor into a suitable power outlet. Ensure the power switch is in the OFF position before connecting or disconnecting the power cable.

Figure 3.2.1: Rear panel of the Yamaha MG16 mixer, highlighting the AC adaptor input.
3.3 Indgangsforbindelser
The MG16 features 16 input channels. Channels 1-8 are equipped with XLR/TRS combo jacks for microphones or line-level instruments, while channels 9-16 offer TRS or RCA pin jacks for line-level sources. Connect your microphones, instruments, and other audio sources to the appropriate input jacks.
- Mikrofoner: Use XLR cables for condenser or dynamic microphones. Channels 1-8 provide switchable +48V phantom power for condenser microphones.
- Line-Level Instruments: Use TRS or TS cables for instruments like keyboards or drum machines.
- Stereo Sources: Channels 9/10, 11/12, 13/14, and 15/16 are configured as stereo pairs.
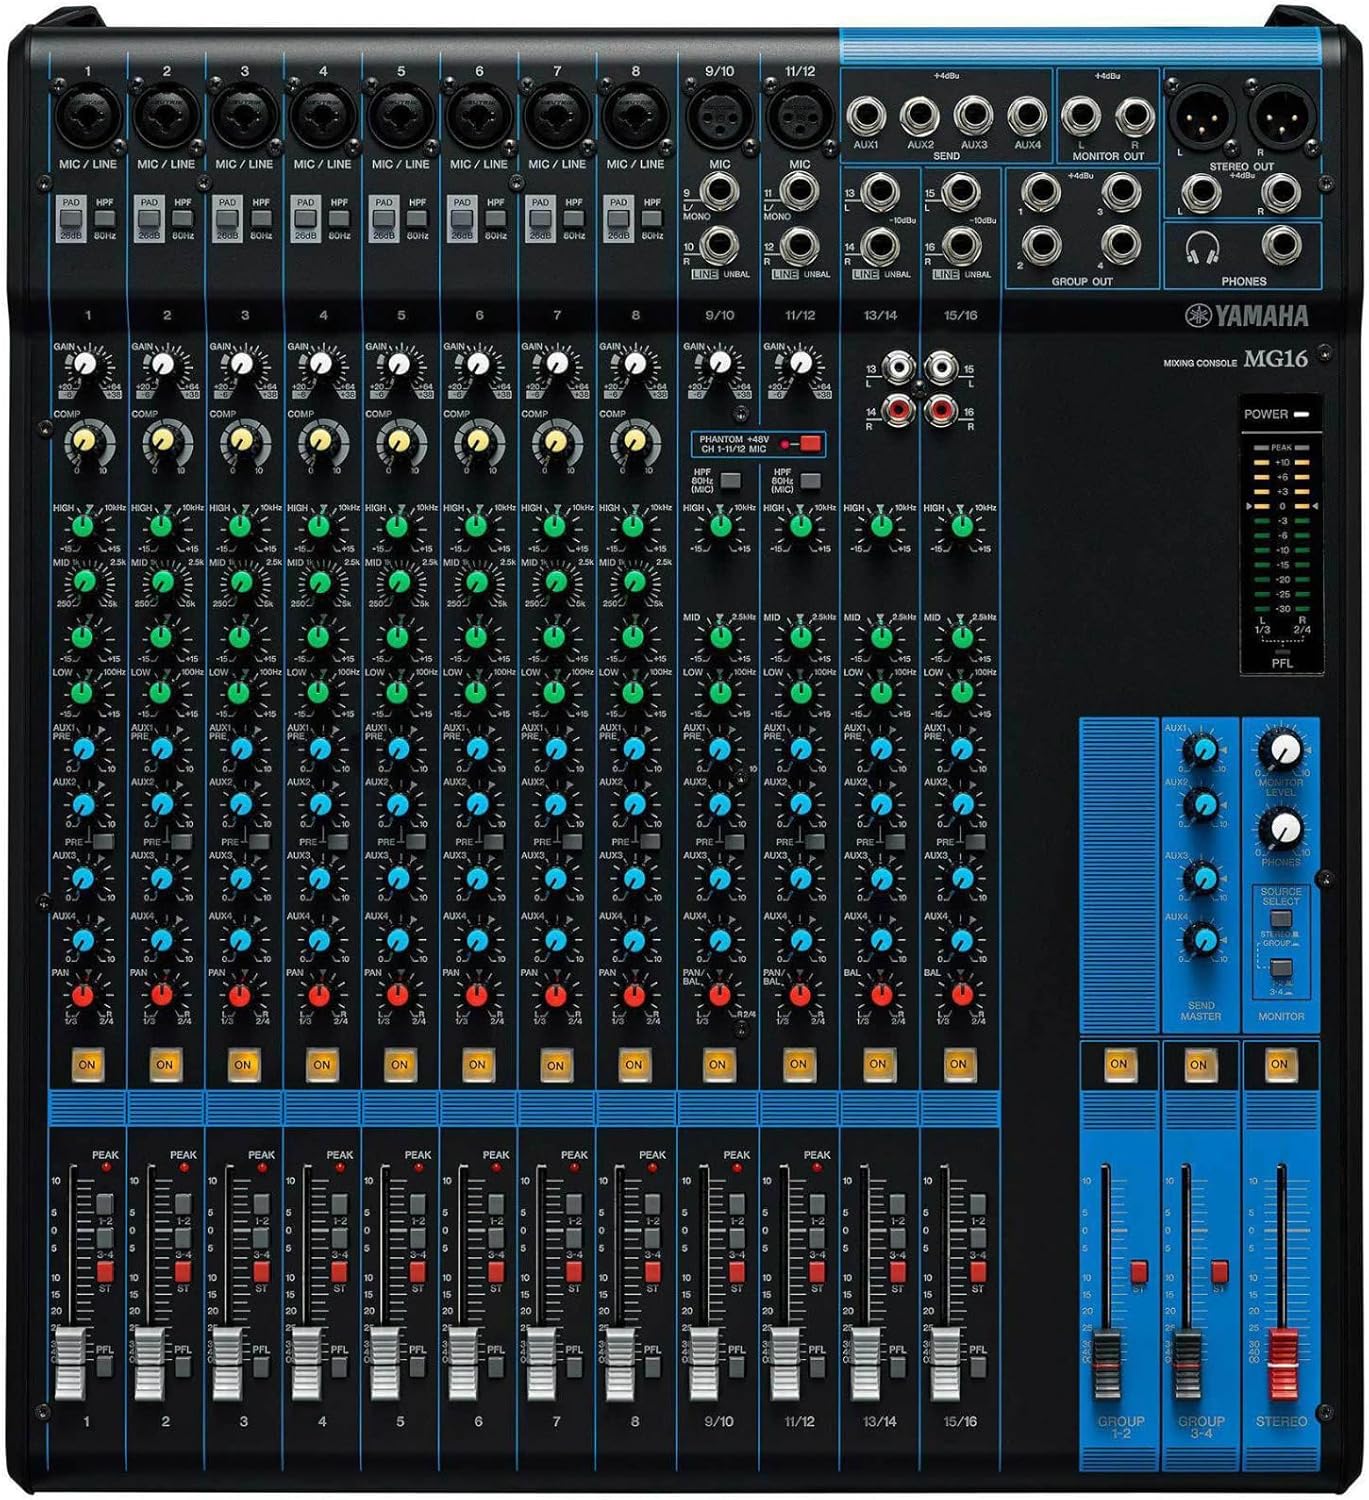
Figur 3.3.1: Overview of the Yamaha MG16 mixer's input section.
3.4 Udgangsforbindelser
Connect your main speakers, monitors, or recording devices to the mixer's output jacks. The MG16 offers XLR and TRS main stereo outputs, as well as Group Out, AUX Send, and Monitor Out jacks.
- Main Stereo Out: Connect to your main PA system or recording interface using XLR or TRS cables.
- Group Out: Use these outputs to send grouped channels to external processors or additional speakers.
- AUX Send: For connecting to monitor speakers or external effects processors.
- Overvåg ud: For connecting to studio monitors or headphones.
- Telefoner: Tilslut hovedtelefoner til overvågning.
4. Betjeningsvejledning
4.1 Tænd/sluk
After all connections are made, turn on the mixer by pressing the POWER switch. Always turn on the mixer before turning on any connected power amplifiers or powered speakers. When powering off, reverse the order: turn off power amplifiers/powered speakers first, then the mixer.
4.2 Channel Controls Overview
Each input channel on the MG16 features a set of controls to adjust the sound. These include Gain, PAD switch, HPF (High-Pass Filter), COMP (Compressor), 3-band EQ (HIGH, MID, LOW), AUX sends, PAN/BAL, and Channel ON switch.
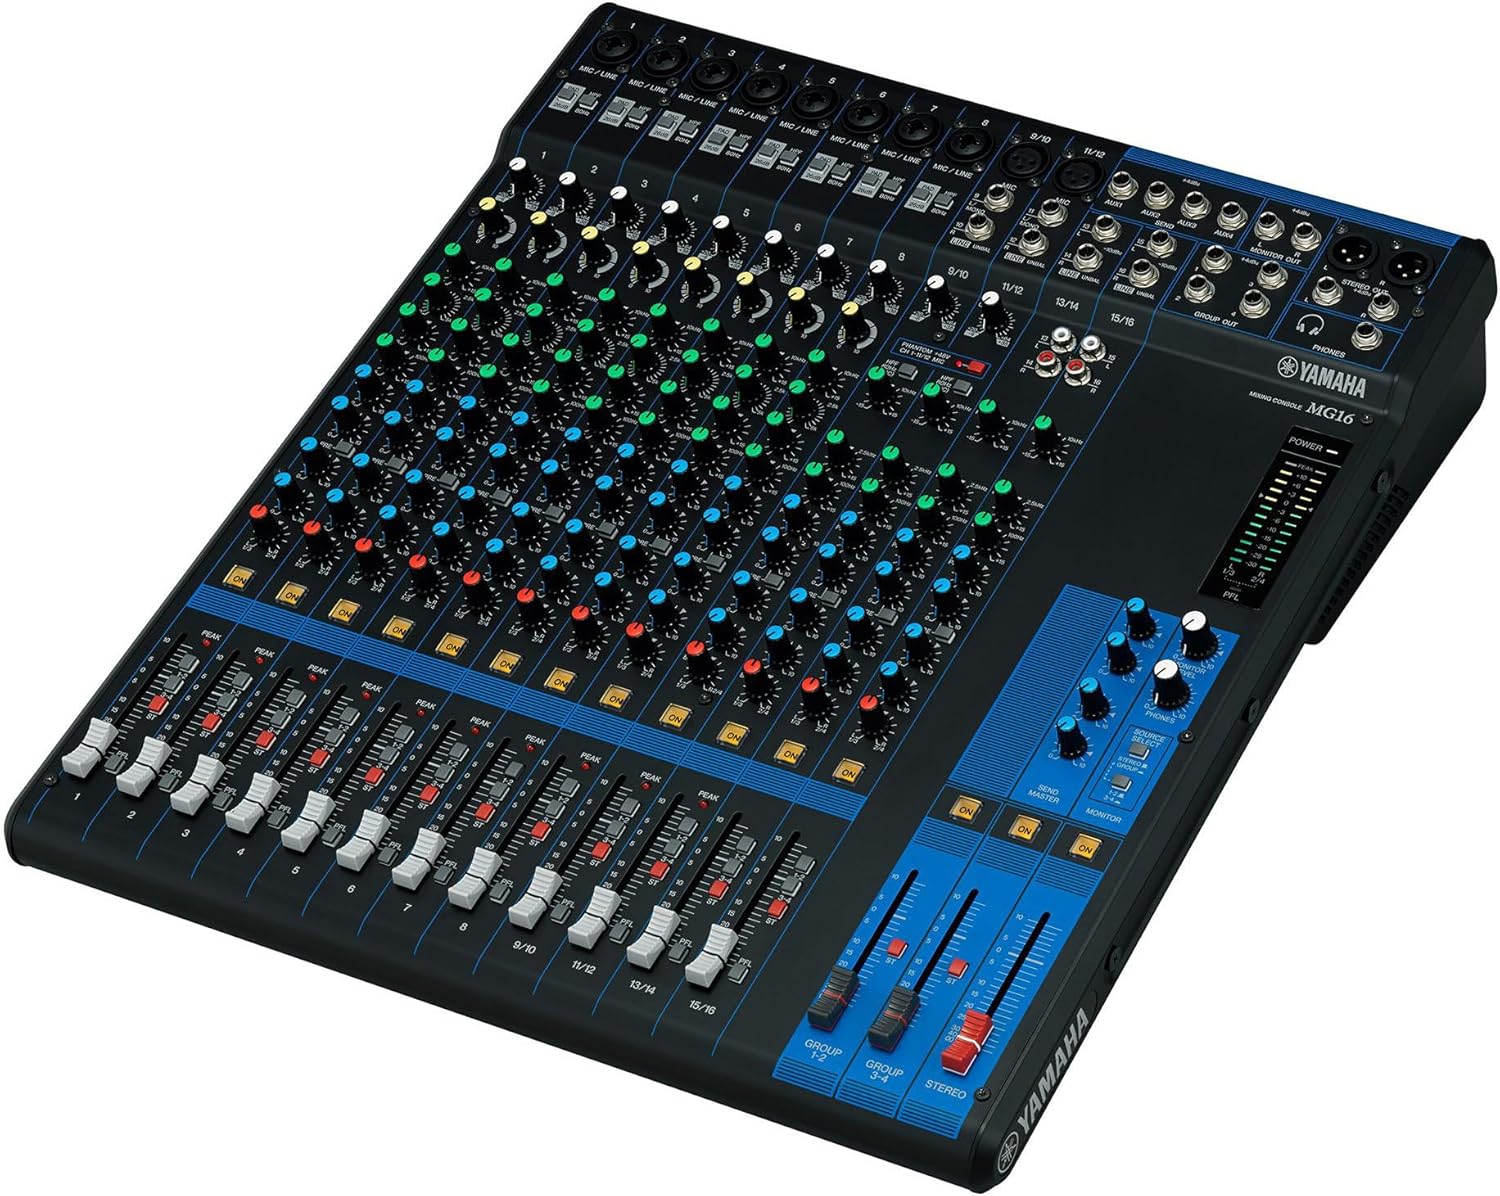
Figur 4.2.1: Vinklet view of the Yamaha MG16 mixer, illustrating the layout of channel controls.
4.3 Forstærkningsjustering
Use the GAIN knob to adjust the input sensitivity for each channel. Set the GAIN so that the PEAK indicator lights only occasionally and briefly. If the input signal is too hot, engage the PAD switch to attenuate it by 26dB.
4.4 High-Pass Filter (HPF)
Engage the HPF switch (80Hz) to cut unwanted low-frequency noise, such as stage rumble or wind noise from microphones. This helps to achieve a cleaner mix.
4.5 One-Knob Compressor (COMP)
The MG16 features one-knob compressors on channels 1-8. Turn the COMP knob clockwise to increase the compression amount. This can add punch to drums, smooth out vocals, and make instruments sit better in the mix.

Figure 4.5.1: Detail of the one-knob compressor for dynamic control.
4.6 Udligning (EQ)
Each channel has a 3-band equalizer (HIGH, MID, LOW) to shape the tone of the input signal. Adjust these knobs to enhance or cut specific frequency ranges. The MID band is sweepable on channels 1-8, allowing for precise frequency selection.

Figure 4.6.1: Close-up of the 3-band EQ controls.
4.7 AUX Sends
The AUX SEND knobs control the level of the signal sent from each channel to the AUX output jacks. These are commonly used for monitor mixes or external effects processing.
4.8 Pan/Balance
The PAN (Panoram) knob adjusts the stereo position of mono signals. For stereo channels, the BAL (Balance) knob adjusts the balance between the left and right signals.
4.9 Channel Faders and Master Controls
Use the channel faders to adjust the individual volume of each input. The main STEREO fader controls the overall output level of the mix. Group faders (GROUP 1-2, GROUP 3-4) control the output level of grouped channels.
5. Vedligeholdelse
5.1 Rengøring
Regularly clean the mixer's surface with a soft, dry cloth. Avoid using abrasive cleaners, solvents, or waxes, as these can damage the finish. For stubborn dirt, a slightly damp en klud med mild sæbe kan bruges, efterfulgt af en tør klud.
5.2 Opbevaring
When not in use, store the mixer in a cool, dry place away from direct sunlight, extreme temperatures, and high humidity. If storing for an extended period, it is recommended to cover the unit to protect it from dust.
5.3 Kabelstyring
Ensure all cables are neatly organized and not under tension. Avoid bending cables sharply or placing heavy objects on them, as this can lead to damage and signal loss.
6. Fejlfinding
- Ingen lyd:
- Check all power connections and ensure the mixer and connected devices are powered on.
- Verify that input and output cables are correctly connected.
- Ensure channel GAIN, faders, and master faders are not set to minimum.
- Check that the Channel ON switch is engaged for active channels.
- If using condenser microphones, ensure +48V phantom power is activated.
- Forvrænget lyd:
- Reduce the GAIN for the affected channel.
- Engage the PAD switch if the input signal is too strong.
- Check the PEAK indicators; if they are constantly lit, the signal is too high.
- Ensure connected devices are not sending an overly hot signal.
- Brummen eller støj:
- Check all cable connections for proper seating and damage.
- Ensure balanced cables (XLR, TRS) are used where appropriate.
- Try engaging the HPF (High-Pass Filter) on microphone channels.
- Ensure power cables are not running parallel to audio cables.
7. Specifikationer
| Feature | Specifikation |
|---|---|
| Varens vægt | 14.55 pund (6600 gram) |
| Produktdimensioner | 20.59 x 8.39 x 22.01 tommer |
| Varemodelnummer | MG16 |
| Strømkilde | Elektrisk med ledning |
| Voltage | 48 volt |
| Wattage | 30 watt |
| Mærke | Yamaha |
| Antal kanaler | 16 |
| Første ledige dato | 15. maj 2014 |
8. Garanti og support
For information regarding the product warranty, please refer to the warranty card included with your purchase or visit the official Yamaha website. For technical support, service, or additional inquiries, please contact Yamaha customer service or your authorized dealer.
Du kan finde flere oplysninger og supportressourcer på Yamaha-butik på Amazon.


