Eurotime LCD digital vækkeur model 23708-00 brugermanual
Model: 23708-00
Indledning
This manual provides instructions for the setup, operation, and maintenance of your Eurotime LCD Digital Alarm Clock, Model 23708-00. Please read this manual thoroughly before using the product to ensure proper function and longevity.
The Eurotime LCD Digital Alarm Clock features an LCD display, 7-color changing LED lighting, multiple natural alarm tones, and displays time, date, day of the week, and indoor temperature. It also includes a snooze function and a countdown feature.
Sikkerhedsoplysninger
- Hold enheden væk fra vand og høj luftfugtighed.
- Udsæt ikke enheden for direkte sollys eller ekstreme temperaturer.
- Use only the specified battery type (3 x 1.5V AAA batteries).
- Bland ikke gamle og nye batterier eller forskellige typer batterier.
- Bortskaf brugte batterier ansvarligt i henhold til lokale regler.
- Forsøg ikke selv at skille enheden ad eller reparere den. Kontakt kvalificeret personale for service.
Pakkens indhold
- Eurotime LCD Digital Alarm Clock (Model 23708-00)
- 3 x 1.5V AAA batterier
- Brugervejledning (dette dokument)
Produkt overview
Gør dig bekendt med komponenterne og betjeningselementerne på dit vækkeur.
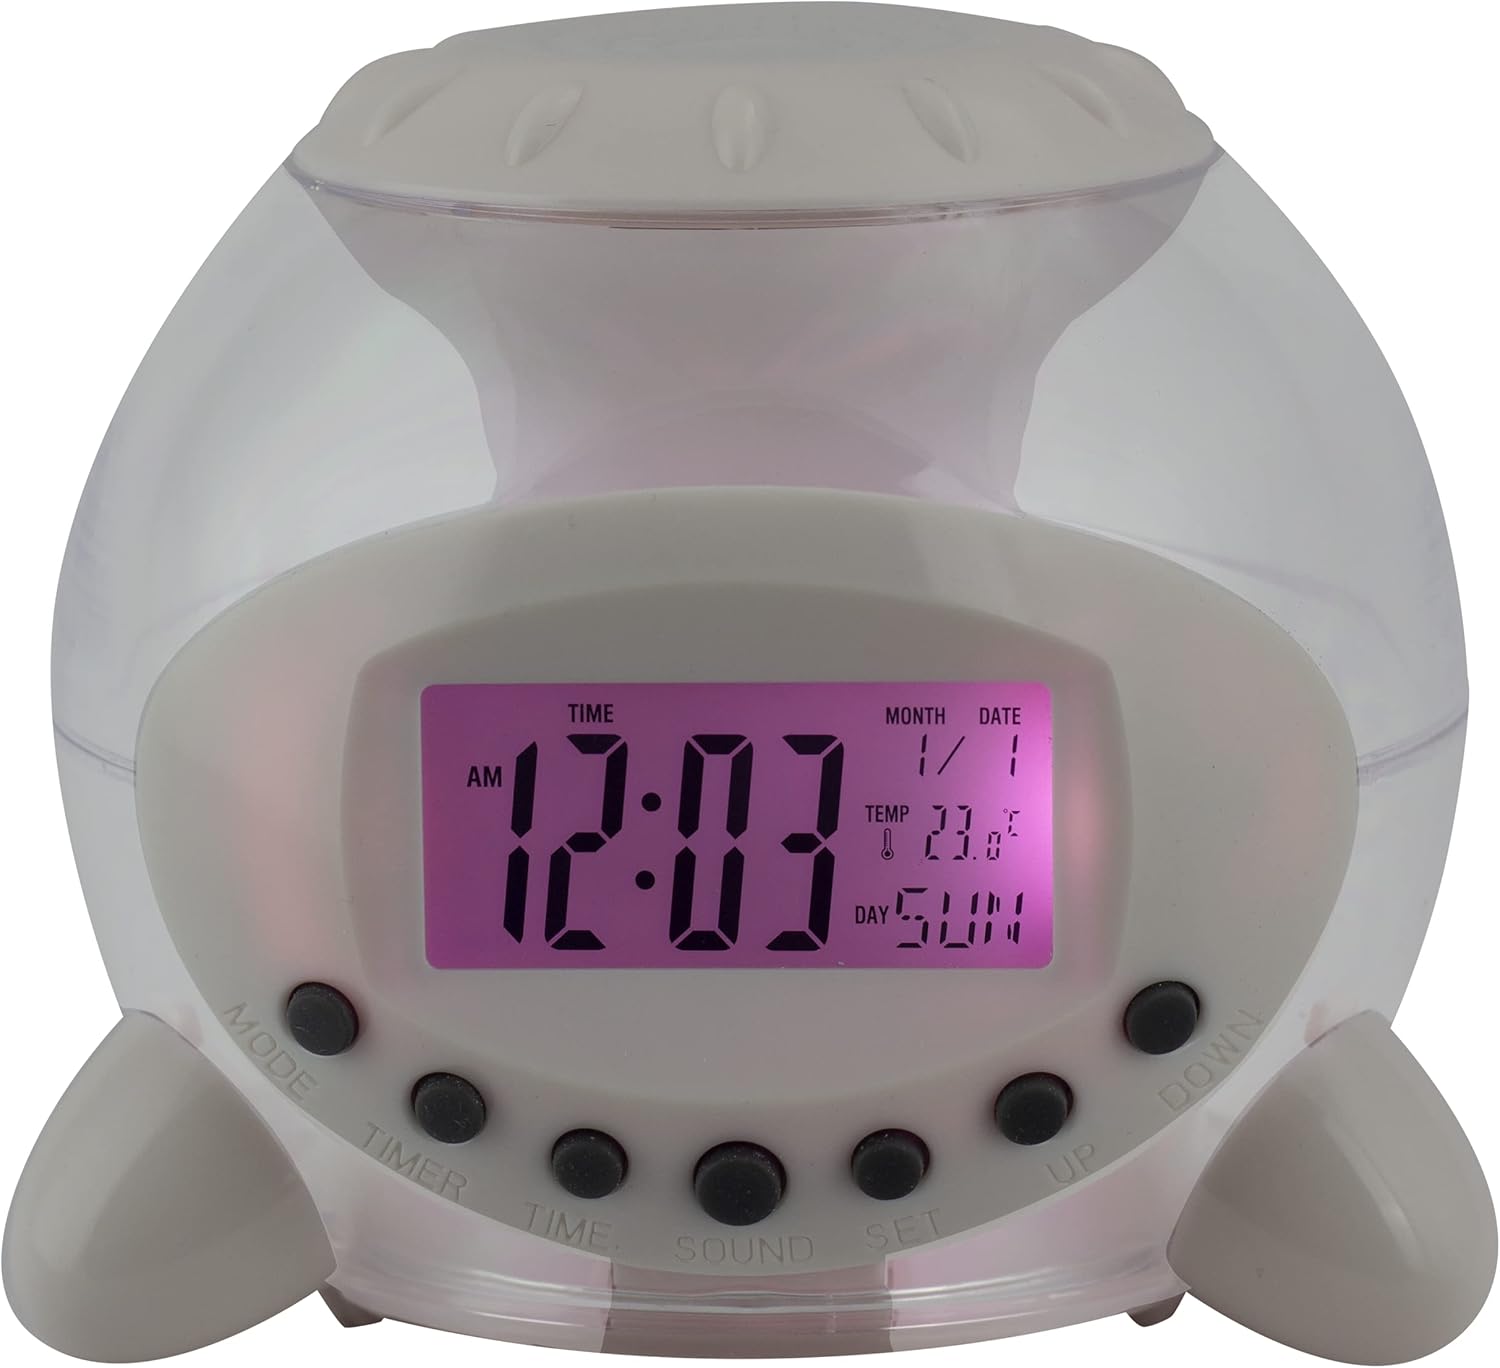
Figur 1: Forside View of the Alarm Clock. This image displays the front of the Eurotime LCD Digital Alarm Clock, highlighting its transparent plastic housing and the central LCD screen. The screen shows the time (12:03 AM), month (1), date (1), temperature (23.8°C), and day (SUN). Below the screen are control buttons labeled MODE, TIMER, TIME, SOUND, and SET, along with UP and DOWN buttons.

Figur 2: Side View with Control Buttons. This image shows a side perspective of the alarm clock, emphasizing the array of control buttons located on the front-bottom edge. The transparent housing allows a glimpse of the internal structure and the LED lighting effect. The buttons are clearly visible for user interaction.

Figur 3: Side View with Internal Lighting. This image provides another side view, illustrating the transparent housing and the internal LED lighting. The light emanates from the base, creating a soft glow within the clock's structure, demonstrating its color-changing feature.
Kontrolknapper:
- KØRSELSVEJLEDNING: Switches between time display, alarm setting, and countdown timer.
- TIMER: Activates and sets the countdown timer.
- TID: Used to set the current time and date.
- SUND: Selects alarm tones or natural sounds.
- SÆT: Confirms settings or enters setting mode.
- OP NED: Adjusts values during setting modes.
Opsætning
1. Batteriinstallation
- Find batterirummet i bunden af vækkeuret.
- Åbn batterirummets dæksel.
- Isæt tre (3) 1.5V AAA-batterier, og sørg for korrekt polaritet (+/-).
- Luk batterirummets dæksel forsvarligt.
Note: The clock will automatically power on after battery installation. The display may flash, indicating it's ready for time setting.
Betjeningsvejledning
1. Indstilling af tid og dato
- I normal tidsvisningstilstand skal du trykke på TID én gang. Timecifrene blinker.
- Brug UP or NED knapper for at justere timen.
- Trykke TID again to move to minute setting. Adjust with UP or NED.
- Fortsæt med at trykke TID to cycle through year, month, and date settings, adjusting each with UP or NED.
- Når du har indstillet datoen, skal du trykke på TID one last time or wait a few seconds for the settings to be saved and return to normal display.
2. Indstilling af alarmen
- Tryk på MODE button until "ALARM" appears on the display (or an alarm icon).
- Tryk på SÆT knappen. Alarmtimecifrene blinker.
- Brug UP or NED knapper for at justere alarmtiden.
- Trykke SÆT again to move to minute setting. Adjust with UP or NED.
- Trykke SÆT one last time to confirm the alarm time.
- For at aktivere/deaktivere alarmen skal du trykke på UP button in alarm display mode. An alarm icon will appear/disappear.
3. Snooze-funktion
Når alarmen lyder, skal du trykke på en hvilken som helst knap (undtagen SÆT or MODE) to activate the snooze function. The alarm will pause and sound again after a few minutes (duration is adjustable, refer to advanced settings if available).
For at slukke alarmen helt, tryk på SÆT knappen, når den lyder.
4. Color Changing LED Lighting
The alarm clock features a 7-color changing LED light. This function typically activates automatically when the alarm sounds or can be manually toggled. Refer to the MODE or SÆT button for specific controls related to the lighting, if available.
5. Natural Alarm Tones
To select an alarm tone:
- In alarm setting mode (after pressing MODE to display alarm time), press the SUND knap.
- Brug UP or NED buttons to cycle through the available natural alarm tones.
- Trykke SÆT for at bekræfte dit valg.
6. Countdown Feature
Sådan bruger du nedtællingstimeren:
- Tryk på MODE button until "TIMER" appears on the display.
- Tryk på TIMER knap. Timecifrene vil blinke.
- Bruge UP or NED to set the desired countdown hour.
- Trykke TIMER again to set minutes, then seconds.
- Trykke SÆT for at starte nedtællingen.
- To pause or resume, press SÆT. Tryk på for at nulstille MODE.
Opretholdelse
Rensning
- Tør uret af med en blød, tør klud.
- Do not use abrasive cleaners or solvents, as they may damage the plastic housing or display.
Udskiftning af batteri
When the display dims or functions become erratic, it is time to replace the batteries. Follow the "Battery Installation" steps in the Setup section.
Fejlfinding
| Problem | Mulig årsag | Løsning |
|---|---|---|
| Skærmen er tom eller svag. | Lave eller afladede batterier. Forkert batteriinstallation. | Udskift batterierne med nye 1.5V AAA-batterier. Sørg for korrekt polaritet. |
| Alarmen lyder ikke. | Alarm is not activated. Alarm volume is too low (if adjustable). | Ensure the alarm icon is displayed. Check alarm settings. |
| Tid/dato er forkert. | Ikke indstillet korrekt efter batteriinstallation eller strømafbrydelse. | Follow "Setting Time and Date" instructions to reset. |
| Color changing light not working. | Feature not activated or malfunction. | Check operating instructions for light activation. If problem persists, contact support. |
Specifikationer
- Mærke: Eurotid
- Modelnummer: 23708-00
- Produktdimensioner: 8.99 x 8.99 x 8 cm
- Vægt: 120 g
- Materiale: Plast
- Skærmtype: Digital LCD
- Særlige funktioner: Calendar display, Snooze, Alarm, 7-Color Changing LED, Natural Alarm Tones, Countdown Feature, Indoor Temperature Display
- Strømkilde: 3 x 1.5V AAA-batterier (inkluderet)
Garanti og support
For warranty information or technical support, please refer to the retailer where the product was purchased or visit the official Eurotime webwebstedet. Behold din købskvittering som købsbevis.


