Indledning
This instruction manual provides detailed guidance for the safe installation, operation, and maintenance of your new Progress Lighting Outdoor Wall Lantern. Please read all instructions carefully before beginning installation and retain this manual for future reference. Proper installation and care will ensure optimal performance and longevity of your lighting fixture.

Billede: Forside view of the 1-Light Clear Flat Glass Traditional Outdoor Wall Lantern Light in Antique Bronze finish.
Sikkerhedsoplysninger
- ADVARSEL: Risiko for elektrisk stød. Afbryd strømmen ved afbryderen eller sikringsboksen før installation eller service.
- All electrical connections must be in accordance with local codes, ordinances, or the National Electric Code (NEC). Contact a qualified electrician if you are unfamiliar with proper electrical wiring installations.
- Brug kun UL/cUL-godkendte ledningsforbindelser.
- This fixture is designed for outdoor use and is suitable for wet locations.
- Overskrid ikke det maksimale wattage specificeret for pæren.
- Brug sikkerhedsbriller og handsker under installationen.
Pakkens indhold
Bekræft, at alle nedenstående dele er inkluderet i din pakke:
- A. Fixture Body (1)
- B. Mounting Plate (1)
- C. Mounting Screws (2)
- D. Wire Connectors (3)
- E. Decorative Nuts (2)
- F. Glass Panels (4, pre-installed)
Specifikationer
| Feature | Detalje |
|---|---|
| Modelnummer | P5607-20 |
| Dimensioner (B x H) | 4-1/2 inches x 8 inches |
| Slutte | Antik bronze |
| Type glas | Clear Flat Glass |
| Pære type | Medium base (E26) |
| Max Wattage | 100 Watts (Incandescent equivalent) |
| Placeringsvurdering | Våd placering opført |
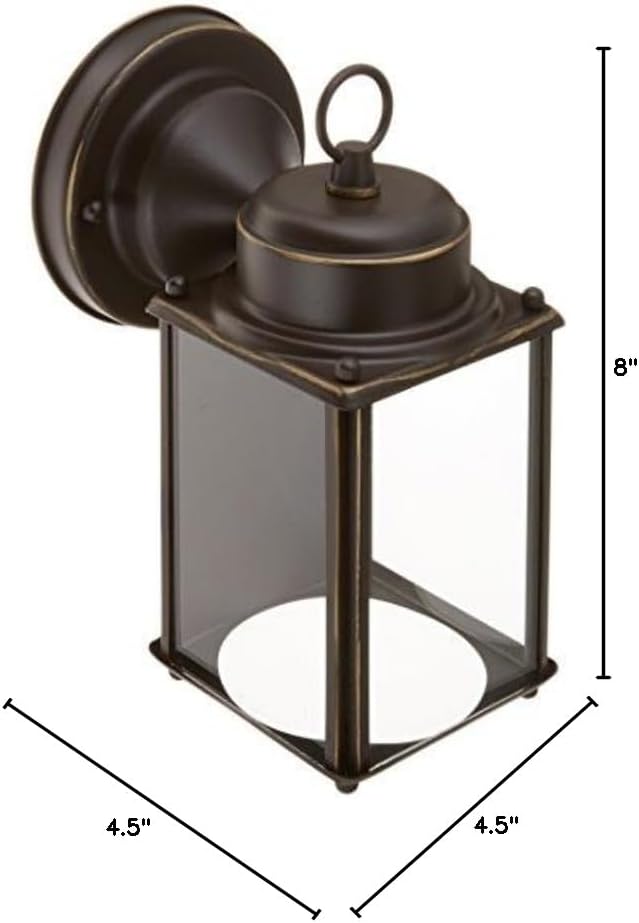
Image: Diagram showing the width (4.5 inches) and height (8 inches) of the wall lantern.
Installationsvejledning
Follow these steps for proper installation of your outdoor wall lantern. It is recommended to watch the accompanying video for visual guidance on sizing and placement.
Nødvendige værktøjer:
- Phillips hovedskruetrækker
- Flad skruetrækker
- Trådstrippere
- Elektrisk tape (valgfrit)
- Sikkerhedsbriller
Forinstallation:
- Sluk for strømmen: Locate the circuit breaker or fuse box that supplies power to the light fixture location. Turn off the main power switch.
- Udpak indholdet: Carefully remove all components from the packaging. Keep the packaging materials until installation is complete to ensure no small parts are lost.
- Review existing wiring: Ensure the existing electrical box is securely mounted and capable of supporting the fixture's weight.
Montering af armaturet:
- Attach the mounting plate (B) to the electrical box using the mounting screws (C). Ensure the plate is level and secure.
- Pull the electrical wires from the electrical box through the center hole of the mounting plate.
Ledningsforbindelser:
- Connect the bare copper ground wire from the fixture to the bare copper ground wire from the electrical box using a wire connector (D). If your electrical box has a ground screw, wrap the fixture's ground wire around it before connecting to the supply ground wire.
- Connect the white (neutral) wire from the fixture to the white (neutral) wire from the electrical box using a wire connector (D).
- Connect the black (hot) wire from the fixture to the black (hot) wire from the electrical box using a wire connector (D).
- Ensure all wire connections are secure. Wrap electrical tape around the wire connectors for added insulation if desired.
Sikring af armaturet:
- Carefully push all excess wiring into the electrical box.
- Align the holes on the fixture body (A) with the threaded posts on the mounting plate (B).
- Secure the fixture body to the mounting plate using the decorative nuts (E). Tighten firmly but do not overtighten.
Installation af pære:
- Insert one medium base (E26) bulb (not included) into the socket. Do not exceed the maximum recommended wattage på 100 watt.

Billede: Side view of the wall lantern with a clear incandescent bulb installed, showing the internal socket.
Sizing and Selection Guidance Video:
For additional guidance on selecting the appropriate size and mounting height for outdoor lighting fixtures, please watch the official Progress Lighting video below:
Video: An official Progress Lighting guide on sizing and selecting outdoor lighting fixtures, covering optimal placement for entryways, garages, and other outdoor areas.
Betjeningsvejledning
Once the fixture is securely installed and wired, restore power at the circuit breaker. The light fixture can then be operated using your wall switch or external control system (if applicable).
Opretholdelse
- Rensning: To clean the fixture, turn off the power and allow it to cool. Wipe with a soft, damp klud. Brug ikke slibende rengøringsmidler eller opløsningsmidler, da de kan beskadige overfladen eller glasset.
- Udskiftning af pære: Ensure power is off before replacing the bulb. Allow the bulb to cool completely before touching. Replace with a new medium base (E26) bulb, not exceeding 100 Watts.
- Periodisk eftersyn: Kontrollér regelmæssigt alle forbindelser og monteringsbeslag for tæthed.
Fejlfinding
| Problem | Mulig årsag | Løsning |
|---|---|---|
| Lyset tændes ikke. | Ingen strøm til armaturet. | Kontroller afbryderen eller sikringen. Sørg for, at vægkontakten er tændt. |
| Løse ledningsforbindelser. | Sluk for strømmen og kontroller alle ledningsforbindelser. | |
| Defekt pære. | Udskift pære. | |
| Lyse flimrer. | Løs pære. | Spænd pæren i fatningen. |
| Forkert pæretype eller wattage. | Ensure bulb meets specifications. | |
| Løse ledninger. | Sluk for strømmen og kontroller alle ledningsforbindelser. |
Garanti og support
Progress Lighting products are manufactured to the highest standards and are backed by a limited warranty. For specific warranty details, technical support, or replacement parts, please visit the official Progress Lighting webwebstedet eller kontakt deres kundeserviceafdeling. Behold din købskvittering som købsbevis.
For mere information, besøg: Progress Lighting-butik på Amazon


