1. Introduktion
This manual provides comprehensive instructions for the installation, operation, maintenance, and troubleshooting of your Cisco Meraki MX60 Small Branch Security Appliance. The MX60 is a cloud-managed multi-service router designed for small branch deployments, offering integrated security, networking, and application control capabilities.
Please read this manual thoroughly before setting up and operating the device to ensure proper functionality and to maximize its performance and security features.
2. Produktet er slutview
The Cisco Meraki MX60-HW is a cloud-managed multi-service router that integrates several critical network functions into a single appliance. It serves as a router, next-generation firewall, traffic shaper, VPN appliance, content filter, and Internet gateway. Centralized management is performed through Meraki's secure multi-tenant cloud platform, known as the Meraki Dashboard.
Nøglefunktioner:
- Requires the purchase of a Dashboard and Cloud Controller License for operation.
- Supports approximately up to 20 users, suitable for small branch offices.
- Stateful Firewall throughput of 100 Mbps for robust security.
- Layer 7 application visibility and traffic shaping for granular control over network usage.
- Accelerates CIPS, FTP, HTTP, and TCP traffic for optimized network performance.

Figur 2.1: Front view of the Cisco Meraki MX60 Security Appliance, showing LED indicators for power and network ports.
3. Fysisk beskrivelse
Frontpanel:
The front panel of the MX60 features LED indicators that provide status information about the device and its network connections. These typically include a power indicator and individual indicators for each LAN port.
Bagside:
The rear panel houses all physical connectivity ports and the power input. It includes Ethernet ports for WAN (Internet) and LAN connections, a USB port, and a reset button.
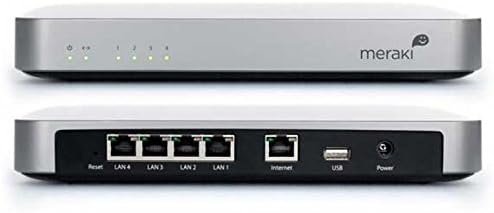
Figur 3.1: For og bag view of the Cisco Meraki MX60, illustrating the power input, USB port, Internet (WAN) port, LAN ports (1-4), and reset button on the rear panel, along with front panel LEDs.
4. Opsætning og installation
Follow these steps to set up your Cisco Meraki MX60 appliance:
- Pak enheden ud: Carefully remove the MX60 from its packaging. Verify that all components are present.
- Tilslut til strøm: Connect the provided power adapter to the 'Power' port on the rear of the MX60 and then plug it into a power outlet. The power LED on the front panel should illuminate.
- Connect to the Internet (WAN): Connect an Ethernet cable from your Internet service provider's modem or router to the 'Internet' port on the rear of the MX60.
- Opret forbindelse til lokalt netværk (LAN): Connect Ethernet cables from your network switches or client devices to the 'LAN 1-4' ports on the rear of the MX60.
- Indledende konfiguration: The MX60 is cloud-managed. Access the Meraki Dashboard (dashboard.meraki.com) to register your device and begin configuration. A valid Meraki license is required for the device to function.
Sørg for korrekt ventilation omkring enheden for at forhindre overophedning.
5. Betjeningsvejledning
The Cisco Meraki MX60 is managed entirely through the cloud-based Meraki Dashboard. Once the device is connected to the internet and registered, all configuration, monitoring, and troubleshooting are performed remotely via the dashboard.
Meraki Dashboard Access:
- Åbn a web browser og naviger til dashboard.meraki.com.
- Log in with your Meraki account credentials.
- From the dashboard, you can configure firewall rules, VPN settings, traffic shaping policies, content filtering, and monitor network performance and client usage.
LED-indikatorer:
Refer to the Meraki documentation within the dashboard for a detailed explanation of the LED indicator states and their meanings, which typically include power status, internet connectivity, and LAN port activity.

Figur 5.1: Top view of the Cisco Meraki MX60, featuring the Meraki logo.
6. Vedligeholdelse
The Cisco Meraki MX60 requires minimal physical maintenance due to its cloud-managed nature. Firmware updates are automatically handled by the Meraki cloud.
- Rensning: Periodically clean the exterior of the device with a soft, dry cloth. Do not use liquid or aerosol cleaners. Ensure ventilation openings are free from dust and obstructions.
- Miljøforhold: Operate the device within recommended temperature and humidity ranges to ensure optimal performance and longevity. Avoid placing the device in direct sunlight or near heat sources.
- Firmware: Firmware updates are automatically pushed from the Meraki cloud. No manual intervention is typically required.
7. Fejlfinding
If you encounter issues with your MX60, consider the following troubleshooting steps:
- Ingen strøm: Ensure the power adapter is securely connected to both the MX60 and a working power outlet. Check the power LED on the front panel.
- Ingen internetforbindelse: Verify that the Ethernet cable from your modem/router is connected to the 'Internet' port on the MX60. Check the status of your Internet service provider's equipment. Confirm the MX60 has a valid Meraki license and is connected to the Meraki Dashboard.
- LAN Connectivity Issues: Ensure Ethernet cables are properly connected to the LAN ports. Check the status of the LAN port LEDs. Verify client device network settings.
- Enhedens nulstilling: To perform a factory reset, press and hold the 'Reset' button on the rear panel for at least 10 seconds using a paperclip or similar pointed object. This will revert the device to its default settings and remove it from the Meraki Dashboard. Use this option with caution.
- Dashboard Access: If you cannot access the Meraki Dashboard, verify your internet connection and ensure the MX60 is online.
For further assistance, refer to the extensive documentation available on the Meraki Dashboard or contact Meraki Support.
8. Specifikationer
| Feature | Detalje |
|---|---|
| Modelnavn | MX60 |
| Mærke | Cisco |
| Fabrikant | CISCO |
| Produktdimensioner | 11.8 x 10.5 x 3.3 tommer |
| Varens vægt | 3.77 pund |
| Stateful Firewall Throughput | 100 Mbps |
| Ethernet-porte | 5x GbE Ports (1 WAN, 4 LAN) |
| Forbindelsesteknologi | Kablet |
| Antenne type | Indre |
| Frekvensbåndsklasse | Single-Band |
| Kompatible enheder | Personlig computer |
| Anbefalede anvendelser | Forretning |
| Operativsystem | Linux, Mac OS, Windows (for management access) |
| Dato først tilgængelig | 13. december 2012 |
| ASIN | B00ANCNG56 |
9. Vigtig information
Juridisk ansvarsfraskrivelse:
This product is not returnable once licensed by Meraki. Operation of this device requires a cloud license, which must be purchased separately.
10. Support og garanti
For technical support, please contact Cisco Meraki support directly through the Meraki Dashboard or via their official support channels. Detailed warranty information is typically provided at the time of purchase or can be found on the official Cisco Meraki webwebsted.
Ensure you have your device's serial number and proof of purchase available when contacting support.


