1. Introduktion
The Behringer XENYX Q1002USB is a premium ultra-low noise, high headroom analog mixer designed for a wide range of audio applications, from studio recording to live sound. It features state-of-the-art XENYX Microphone Preamps, studio-grade 'one-knob' compressors, and a built-in USB/Audio Interface for direct connection to your computer.
This manual provides detailed instructions for setting up, operating, and maintaining your Q1002USB mixer, ensuring optimal performance and longevity.
2. Vigtige sikkerhedsinstruktioner
- Read these instructions thoroughly before operation.
- Gem disse instruktioner til fremtidig reference.
- Overhold alle advarsler og følg alle instruktioner.
- Brug ikke dette apparat i nærheden af vand.
- Rengør kun med en tør klud.
- Bloker ikke ventilationsåbninger. Installer i overensstemmelse med producentens anvisninger.
- Må ikke installeres i nærheden af varmekilder såsom radiatorer, varmeapparater, komfurer eller andre apparater (inklusive ampløftere), der producerer varme.
- Undgå at omgå sikkerhedsformålet med det polariserede stik eller stik med jordforbindelse. Et polariseret stik har to knive, hvor den ene er bredere end den anden. Et stik med jordforbindelse har to knive og et tredje jordstik. Det brede blad eller det tredje ben er tilvejebragt for din sikkerhed. Hvis det medfølgende stik ikke passer i din stikkontakt, skal du kontakte en elektriker for at få udskiftet den forældede stikkontakt.
- Beskyt netledningen mod at blive trådt på eller klemt, især ved stik, stikkontakter og det sted, hvor de kommer ud af apparatet.
- Brug kun tilbehør/tilbehør specificeret af producenten.
- Træk stikket ud af dette apparat under tordenvejr, eller når det ikke skal bruges i længere perioder.
- Overlad al service til kvalificeret servicepersonale. Service er påkrævet, når apparatet er blevet beskadiget på nogen måde, såsom strømforsyningsledning eller stik er beskadiget, væske er blevet spildt, eller genstande er faldet ind i apparatet, apparatet har været udsat for regn eller fugt, ikke fungerer normalt , eller er blevet droppet.
3. Produktet er slutview
The XENYX Q1002USB mixer features a compact design with intuitive controls for easy operation. Below is an overview of its main components and layout.
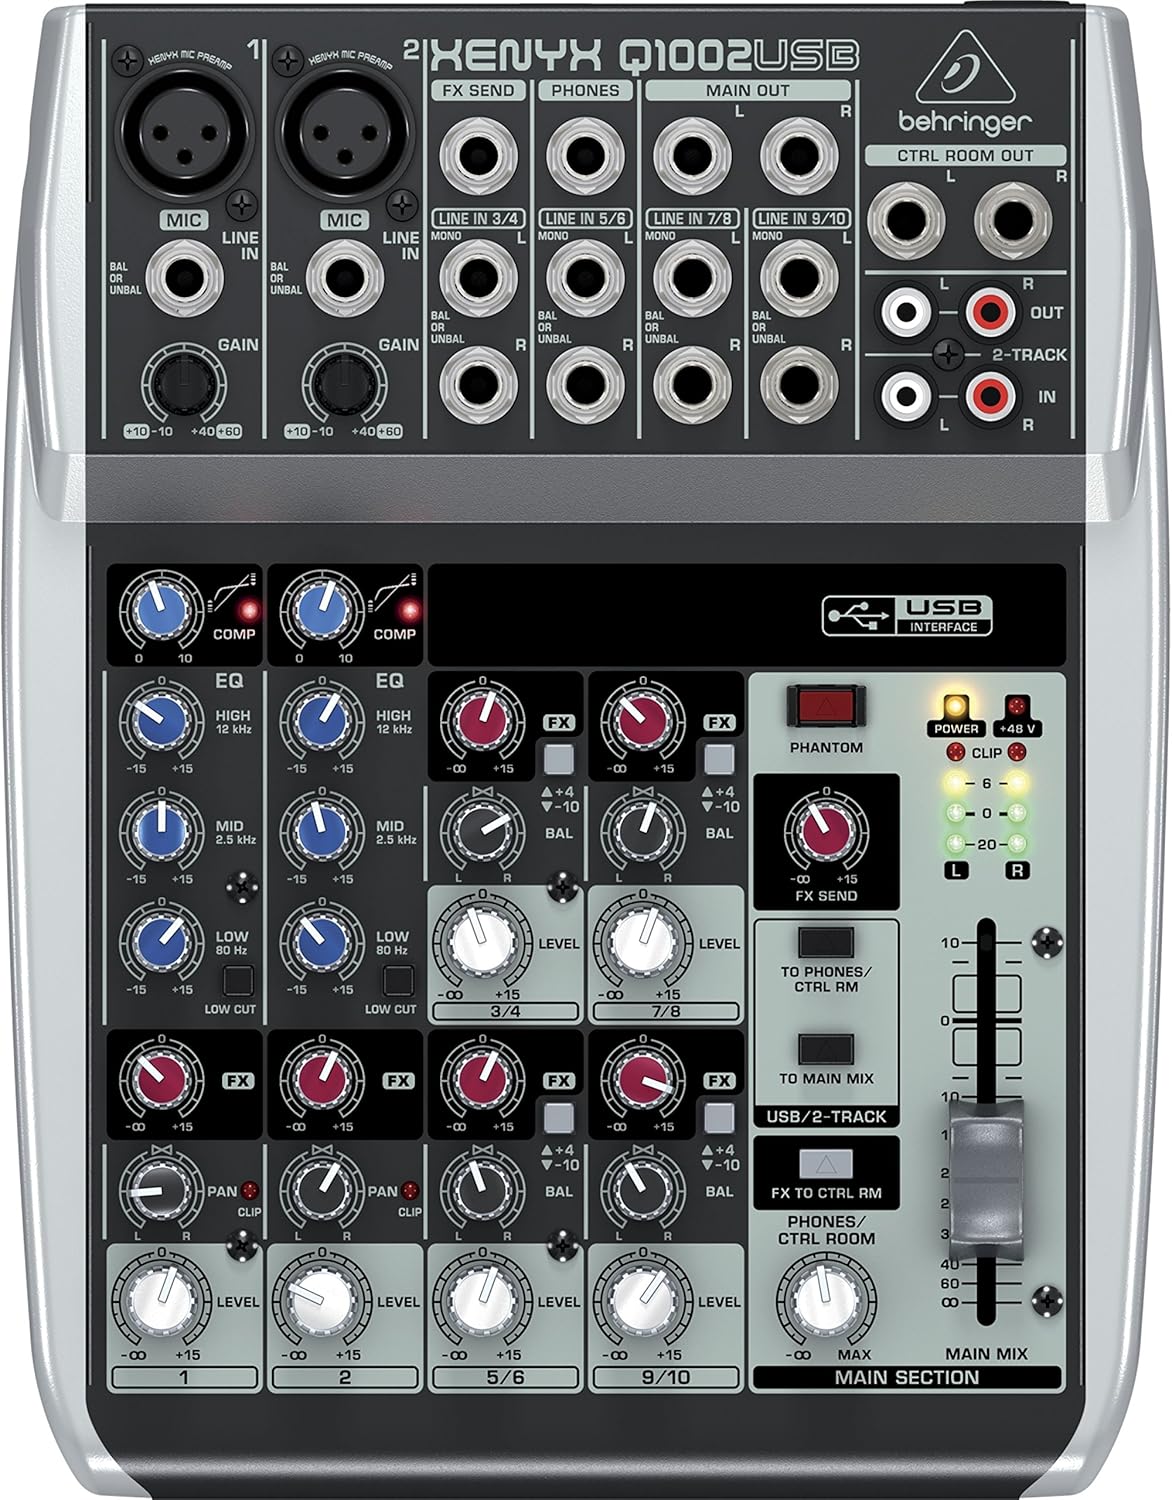
Figur 3.1: Øverst view of the XENYX Q1002USB mixer, highlighting its compact layout and control surface.

Figur 3.2: Vinklet view of the XENYX Q1002USB, providing a perspective of its physical dimensions and control knob arrangement.
3.1 Betjeningselementer på frontpanelet
- XENYX Mic Preamps: To mikrofonforstærkere af høj kvalitetamps with XLR and 1/4" inputs, offering excellent gain and low noise.
- Kompressorer: Dedicated 'one-knob' compressors on the first two channels for easy dynamic control.
- 3-bånds EQ: Neo-classic 'British' 3-band EQs on each channel for warm and musical sound shaping.
- FX Send: Controls for sending signal to external effects processors.
- Niveaukontrol: Individual channel level controls and a main mix fader.
- USB-grænseflade: Integrated USB port for direct connection to a computer for recording and playback.
- Fantomkraft: +48V phantom power switch for condenser microphones.

Figure 3.3: Simplified top panel diagram, illustrating the arrangement of inputs, outputs, and controls.
3.2 Bagpaneltilslutninger
The rear panel houses the power input and the USB connection for your computer.
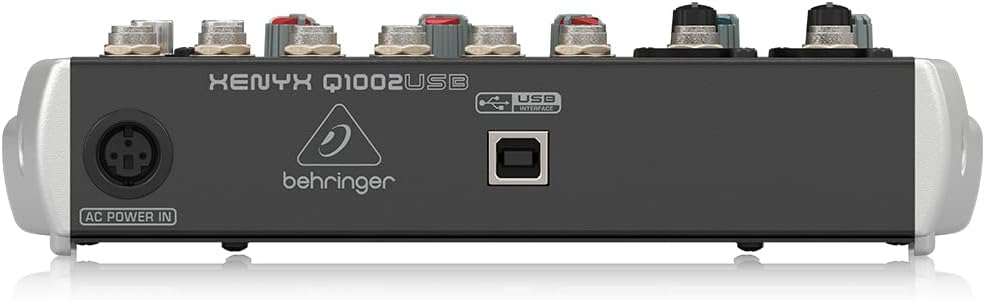
Figur 3.4: Bagside view of the XENYX Q1002USB, displaying the AC Power In and USB Interface ports.
4. Opsætning
4.1 Strømtilslutning
- Sørg for, at mixeren er placeret på en stabil, plan overflade.
- Connect the supplied power adapter to the 'AC POWER IN' port on the rear of the mixer.
- Plug the power adapter into a suitable electrical outlet. Note that the mixer does not have a dedicated power switch; it powers on when connected to the mains. Consider using a power strip with an on/off switch for convenient power control.
4.2 Lydindgangsforbindelser
Connect your microphones, instruments, and other audio sources to the appropriate input jacks.

Figur 4.1: Eksample of a microphone setup for audio input.
- Mikrofoner: Use XLR cables to connect microphones to the MIC inputs (Channels 1 and 2). If using condenser microphones, ensure +48V phantom power is enabled (see Section 5.5).
- Instrumenter/enheder på linjeniveau: Tilslut instrumenter (f.eks. keyboards, guitarer med forforstærkere)amps) or other line-level devices using 1/4" TS or TRS cables to the LINE IN jacks.
4.3 Udgangsforbindelser
Connect the mixer's outputs to your monitoring system, amplifter eller optageenhed.
- Hovedoutput: Use 1/4" TRS cables to connect the MAIN OUT (L/R) to your power amphøjttaler, aktive højttalere eller optageinterface.
- Kontrolrumsudgang: Connect your studio monitors to the CTRL ROOM OUT (L/R) using 1/4" TS cables.
- Hovedtelefoner: Sæt dine hovedtelefoner i PHONES 1/4" TRS-stikket.
- 2-Track Input/Output: Use RCA cables for connecting external recording devices or playback sources to the 2-TRACK IN/OUT.
4.4 USB Connection to Computer
The Q1002USB features a built-in USB audio interface for direct recording and playback with your computer.

Figure 4.2: Using the mixer with a computer via USB.
- Connect a USB cable from the USB INTERFACE port on the rear of the mixer to an available USB port on your computer.
- Your computer should automatically detect the mixer as an audio device. No special drivers are typically required for Windows or macOS.
- Select the Behringer Q1002USB as your input/output device in your computer's sound settings and your Digital Audio Workstation (DAW) software.
5. Betjeningsvejledning
5.1 Forstærkning Staging
Korrekt gevinst staging is crucial for achieving optimal sound quality and avoiding distortion.
- Start with all channel GAIN knobs at their minimum (fully counter-clockwise) position.
- Set the main MIX fader to 0 dB.
- While the audio source is active (e.g., speaking into a microphone, playing an instrument), slowly increase the GAIN knob for the respective channel.
- Observe the CLIP LED for that channel. Adjust the GAIN so that the CLIP LED only flashes occasionally on the loudest peaks. This indicates a healthy signal level without clipping.
5.2 Using the Compressors
The Q1002USB features easy-to-use 'one-knob' compressors on the first two channels to smooth out dynamic range.

Figure 5.1: Visual representation of signal compression.
- Turn the COMP knob clockwise to increase the amount of compression.
- The COMP LED will illuminate to indicate that compression is active.
- Adjust the knob to achieve a more consistent and controlled sound, especially for vocals and instruments with wide dynamic swings.
5.3 Adjusting the 3-Band EQ
Each mono channel features a 3-band 'British' EQ for tonal shaping.

Figure 5.2: The 'British' EQ provides warm and musical sound characteristics.
- HØJ: Adjusts the treble frequencies (12 kHz).
- MID: Adjusts the mid-range frequencies (2.5 kHz).
- LAV: Adjusts the bass frequencies (80 Hz).
- The center position (12 o'clock) is flat (no boost or cut). Turn clockwise to boost, counter-clockwise to cut.
5.4 FX Send and Return
The FX send allows you to route signal to an external effects processor.
- Use the FX knob on each channel to send a portion of that channel's signal to the FX SEND output.
- Connect the FX SEND output to the input of your external effects processor.
- Connect the output of your effects processor back to one of the stereo line inputs (e.g., Channels 5/6 or 7/8) on the mixer.
- Adjust the level of the returned effect using the corresponding channel's LEVEL knob.
5.5 Fantomstrøm (+48V)
Fantomstrøm er påkrævet til kondensatormikrofoner.
- Ensure all microphones are connected before activating phantom power.
- Press the PHANTOM +48V button to supply power to the XLR inputs. The corresponding LED will illuminate.
- Always turn off phantom power before connecting or disconnecting microphones to prevent potential damage.
5.6 USB/2-Track Routing
The USB/2-TRACK section controls how audio is routed to and from your computer.
- TO MAIN MIX: Press this button to send the USB/2-Track input signal to the main mix. This is useful for playing back audio from your computer through the mixer.
- TO PHONES/CTRL RM: Press this button to send the USB/2-Track input signal to the headphones and control room outputs, allowing you to monitor computer audio without sending it to the main mix.
6. Vedligeholdelse
Regular maintenance ensures the longevity and optimal performance of your Behringer XENYX Q1002USB mixer.
- Rensning: Disconnect the mixer from power before cleaning. Use a soft, dry cloth to wipe down the exterior. Avoid using abrasive cleaners, solvents, or waxes.
- Støvbeskyttelse: When not in use, cover the mixer with a dust cover to prevent dust and debris from entering the controls and internal components.
- Opbevaring: Opbevar mixeren et køligt, tørt sted væk fra direkte sollys, ekstreme temperaturer og høj luftfugtighed.
- Kabelstyring: Ensure all cables are neatly organized and not under strain to prevent damage to the connectors and ports.
7. Fejlfinding
This section addresses common issues you might encounter with your Q1002USB mixer.
| Problem | Mulig årsag | Løsning |
|---|---|---|
| Ingen lydudgang | Main mix fader is down; channel level is down; incorrect input/output connections; phantom power not engaged for condenser mics. | Increase main mix fader and channel level knobs. Verify all cables are correctly connected. Ensure +48V phantom power is on for condenser microphones. |
| Hum or static noise | Ground loop; faulty cable; power adapter issues; high gain settings. | Check all cable connections for proper seating and damage. Ensure all equipment is properly grounded. Try connecting the mixer to a different power outlet or a power conditioner. Reduce gain settings if too high. Some users have reported issues with the supplied power adapter; if the adapter becomes excessively hot or fails, consider replacing it with a genuine Behringer replacement. |
| USB audio not recognized by computer | Incorrect USB cable; USB port issue; computer audio settings. | Try a different USB cable and/or a different USB port on your computer. Ensure the mixer is powered on. Check your computer's sound settings and DAW preferences to confirm the Behringer Q1002USB is selected as the audio input/output device. |
| CLIP LED constantly lit | Input signal is too strong (clipping). | Reduce the GAIN knob for the affected channel until the CLIP LED only flashes occasionally on the loudest peaks. |
8. Specifikationer
Detailed technical specifications for the Behringer XENYX Q1002USB mixer.
| Feature | Specifikation |
|---|---|
| Varens vægt | 3 pund |
| Produktdimensioner | 10 x 2 x 8 tommer |
| Varemodelnummer | Q1002USB |
| Hardware-interface | USB |
| Strømkilde | Battery Powered (Note: Primary power is via AC adapter) |
| Wattage | 13 watt |
| Mærke | Behringer |
| Antal kanaler | 2 (mono mic/line), 4 (stereo line) |
| Forbindelsesteknologi | USB |
| Preamps | XENYX Mic Preamps |
| Kompressorer | Studio-grade 'one-knob' functionality |
| EQ | Neo-classic 'British' 3-band EQs |
9. Garanti og support
For detaljerede garantioplysninger og teknisk support henvises til den dokumentation, der følger med dit produkt, eller besøg den officielle Behringer-side. website. Behringer provides comprehensive support resources, including FAQs, driver downloads, and service center locations.
Officiel Behringer Webwebsted: www.behringer.com


