Indledning
Thank you for choosing the Mount-It! MI-2041 Small TV Monitor Wall Mount Arm. This articulating wall mount is designed to securely hold your 19 to 27-inch display, offering flexible viewing angles with its tilt, swivel, and extension capabilities. Please read this manual carefully before installation and use to ensure safe and proper operation.
Sikkerhedsoplysninger
ADVARSEL: Failure to read and follow all instructions may result in personal injury, property damage, or voiding of warranty. If you do not understand these instructions or have doubts about the safety of the installation, please contact Mount-It! customer support.
- Overskrid ikke den maksimale vægtkapacitet på 18.1 kg.
- Ensure the wall structure can safely support the combined weight of the mount and the display.
- This mount is designed for installation into a single wood stud. Do not install into drywall alone.
- Use appropriate safety gear during installation, including eye protection.
- Tighten all screws firmly but do not overtighten. Overtightening can damage the screws and components.
- Hold børn og kæledyr væk under installationen.
Pakkens indhold
Please verify that all components are present and undamaged before beginning installation. If any parts are missing or defective, contact Mount-It! customer support.
- Wall Mount Arm Assembly
- Aftagelig VESA-plade
- Mounting Hardware Kit (various screws, washers, spacers for TV/monitor and wall attachment)
- Installation Tools (e.g., wrench, small level)
- Instruktionsmanual
Specifikationer
| Modelnummer | MI-2041 |
| Kompatible skærmstørrelser | 19-27 tommer |
| Maksimal vægtkapacitet | 40 lbs (18.1 kg) |
| VESA-kompatibilitet | 75x75mm, 100x100mm |
| Forlængelse fra væg | 1.75 tommer (tilbagetrukket) til 15 tommer (udstrakt) |
| Tilt vinkel | +/- 15 grader |
| Drejevinkel | 180 degrees (arm) |
| Rotation | 360 degrees (VESA plate) |
| Materiale | Legeret stål |
| Produktdimensioner | 18 x 4 x 4 tommer (emballage) |
Opsætning og installation
Follow these steps carefully for a secure installation. It is recommended to have a second person assist during certain steps.
Step 1: Verify VESA Compatibility
Before mounting, ensure your TV or monitor has a VESA pattern of 75x75mm or 100x100mm. Measure the distance between the four mounting holes on the back of your display (horizontal x vertical) in millimeters.

A visual guide illustrating the compatible VESA mounting patterns (75x75mm and 100x100mm) for the MI-2041 mount. It also shows examples of incompatible larger VESA patterns.

En detaljeret view of the VESA plate, clearly marking the 75mm x 75mm and 100mm x 100mm bolt hole patterns, essential for verifying monitor compatibility.
Step 2: Locate a Wood Stud
This mount must be installed into a single wood stud for secure attachment. Use a stud finder to locate the center of a wood stud at your desired mounting height. Mark the center line of the stud.
Step 3: Mark and Drill Pilot Holes
Hold the wall plate of the mount against the wall, aligning its center with the marked stud center line. Use the included level to ensure it is perfectly horizontal. Mark the positions for the two mounting holes. Drill pilot holes at the marked locations. The recommended drill bit size will be specified in the included hardware kit instructions.
Step 4: Attach Wall Mount to Wall
Align the wall plate with the drilled pilot holes. Insert the lag bolts (or appropriate wall anchors if specified for your wall type and provided) through the wall plate and into the pilot holes. Tighten the bolts firmly with a wrench until the mount is securely fastened to the wall. Do not overtighten.

En overview of the Mount-It! MI-2041 articulating wall mount arm, showcasing its robust black alloy steel construction.

An overhead perspective of the mount, showing the articulating arm fully extended, providing a clear view of its structure.
Step 5: Attach VESA Plate to Display
Carefully place your TV or monitor face down on a soft, clean surface. Align the detachable VESA plate with the mounting holes on the back of your display. Select the correct screws, washers, and spacers from the hardware kit that fit your display's mounting holes. Secure the VESA plate to the display. Ensure the screws are tightened securely.

This image highlights the detachable VESA head feature, simplifying the installation process by allowing the VESA plate to be attached to the monitor separately before sliding it onto the arm.
Step 6: Mount Display to Arm
With assistance, carefully lift the display with the attached VESA plate. Slide the VESA plate onto the arm's mounting head. Ensure it is fully seated and secure. Tighten any locking screws or mechanisms on the VESA head to prevent accidental dislodgement.

The Mount-It! MI-2041 wall mount arm supporting a flat-screen monitor, demonstrating its low-profile design when retracted.
Betjening af monteringen
The MI-2041 mount offers various adjustments to optimize your viewoplevelse:
- Udvidelse/tilbagetrækning: The articulating arm allows you to extend your display up to 15 inches from the wall or retract it to a compact 1.75 inches. Gently push or pull the display to adjust its distance.
- Drejelig: The arm can swivel 180 degrees left or right, allowing you to angle your display as needed.
- Vip: The VESA plate allows for a +/- 15-degree tilt. Loosen the tilt adjustment knob/bolt, adjust to your desired angle, and then re-tighten to secure the position.
- Rotation: The VESA plate can rotate 360 degrees, enabling you to switch between landscape and portrait orientations for your display.

This diagram demonstrates the mount's ability to extend from 1.75 inches close to the wall up to 15 inches, providing flexible viewing vinkler.

This image shows the full range of motion, including 360-degree screen rotation for landscape or portrait orientation and a +/- 15-degree tilt capability for optimal viewing.
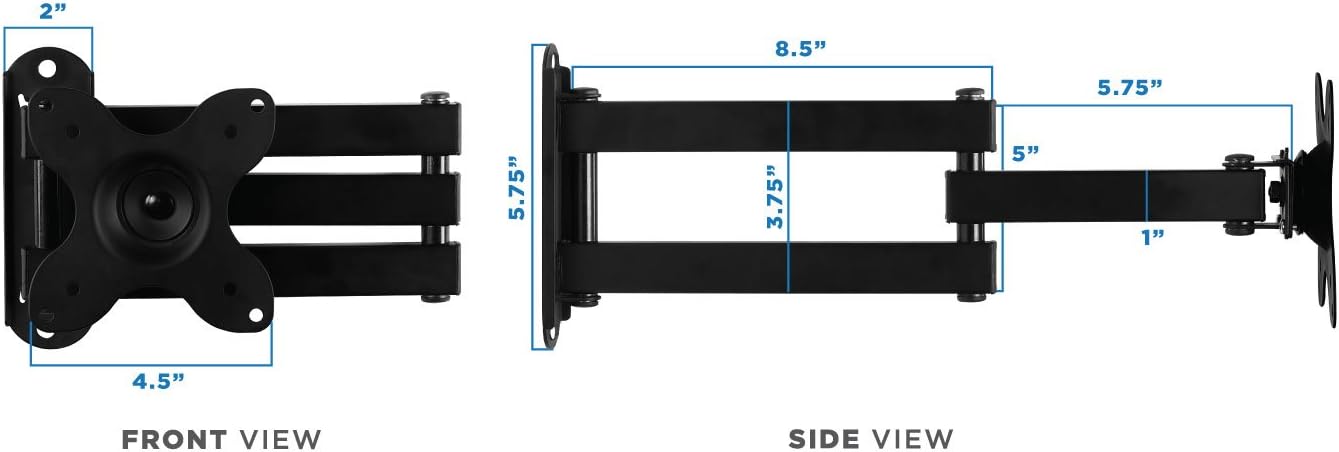
Detailed front and side views with measurements, indicating the compact design and articulation points of the MI-2041 mount.
Opretholdelse
Regular maintenance helps ensure the longevity and safe operation of your wall mount:
- Rensning: Tør holderen af med en blød, tør klud. Undgå at bruge slibende rengøringsmidler eller opløsningsmidler, der kan beskadige overfladen.
- Periodiske kontroller: Periodically check all bolts and screws to ensure they remain tight. Over time, vibrations or frequent adjustments can cause them to loosen. Re-tighten as necessary, but do not overtighten.
- Ledsmøring: If the articulating joints become stiff, a small amount of silicone-based lubricant can be applied to the moving parts.
Fejlfinding
If you encounter issues with your Mount-It! MI-2041, refer to the following common problems and solutions:
- Problem: The display is not level after installation.
Løsning: Check the wall plate's levelness. If the wall plate is level, the VESA plate might need adjustment. Some mounts allow for minor post-installation leveling adjustments. Ensure all bolts are tightened evenly. - Problem: The mount feels loose or wobbly.
Løsning: Re-check all mounting bolts on the wall and the VESA plate. Ensure they are securely tightened. Verify that the VESA plate is properly seated on the arm's mounting head and any locking mechanisms are engaged. For the VESA square center nut, ensure it is tightened sufficiently to prevent floppiness. - Problem: The tilt or swivel is too stiff or too loose.
Løsning: The mount has adjustable tension points for tilt and swivel. Locate the corresponding bolts/nuts (often on the articulating joints or VESA plate) and adjust them with the provided wrench or an appropriate tool. Tighten for more stiffness, loosen for easier movement. For tilt, once the desired angle is set, ensure the adjustment bolt is locked in place. - Problem: The display does not fit the mount.
Løsning: Double-check your display's VESA pattern against the mount's compatibility (75x75mm or 100x100mm). Ensure your display's weight does not exceed 40 pounds.
If these solutions do not resolve your issue, please contact Mount-It! customer support for further assistance.
Garanti og kundesupport
The Mount-It! MI-2041 Small TV Monitor Wall Mount Arm comes with a 5 ÅRS GARANTI. Denne garanti dækker fejl i materialer og udførelse ved normal brug.
For warranty claims, technical support, or any questions regarding your product, please contact our US-based customer support team. Our friendly and responsive team is available during normal business hours to assist you.
Please refer to the contact information provided on the Mount-It! official webwebstedet eller din produktemballage for at få de seneste supportoplysninger.


