1. Introduktion
This manual provides comprehensive instructions for the safe and effective use of the PeakTech True RMS P 3131 Clamp Meter with Multimeter. This device is designed for measuring AC/DC currents without circuit interruption, as well as AC/DC voltage and resistance, with continuity testing capabilities. It features a 3 3/4 digit LCD display with True RMS measurement for accurate readings.
Læs venligst denne manual grundigt, inden du bruger apparatet, og gem den til senere brug.
2. Sikkerhedsoplysninger
WARNING: Improper use of this meter can cause damage, shock, injury, or death. Always follow all safety precautions.
- Overhold altid lokale og nationale sikkerhedsforskrifter.
- Do not use the meter if it appears damaged or if the insulation on test leads is compromised.
- Sørg for, at måleren er indstillet til den korrekte funktion og det korrekte område, før du foretager målinger.
- Avoid contact with live circuits. Use appropriate personal protective equipment (PPE).
- The device is rated for CAT II 600V. Do not exceed these limits.
- Udskift batterierne med det samme, når indikatoren for lavt batteri vises.
- Do not operate the meter in explosive atmospheres.
3. Produktet er slutview og komponenter
The PeakTech P 3131 is a robust and reliable clamp meter. Familiarize yourself with its main components:

Figur 1: Forside view of the PeakTech P 3131 Clamp Meter, showing the clamp jaw, function selector, LCD display, and input terminals.
- Clamp Kæbe: For non-contact AC/DC current measurement.
- Funktionsvælger: To select measurement modes (A~, A=, V~, V=, Ω/Continuity, OFF).
- LCD-skærm: Viser måleaflæsninger, enheder og indikatorer.
- Knapper: AC/DC, ZERO, H/MAX (Data Hold/Max Hold).
- Indgangsterminaler: COM (common) and VΩ (voltage/resistance) for test leads.
- Håndbeskyttelse: Provides protection against accidental contact.
4. Opsætning
4.1 Batteriinstallation
The PeakTech P 3131 requires two 1.5V AAA batteries (included). To install or replace batteries:
- Sørg for, at enheden er slukket.
- Find batteridækslet på bagsiden af måleren.
- Brug en skruetrækker til at åbne rummet.
- Insert the two AAA batteries, observing correct polarity (+ and -).
- Sæt batterirummets dæksel på igen og fastgør det med skruen.
When the low battery indicator appears on the display, replace the batteries immediately to ensure accurate measurements.
4.2 Tilslutning af testledninger
For bdtage, resistance, and continuity measurements, connect the supplied test leads:
- Indsæt den sorte testledning i KOM (common) input terminal.
- Indsæt den røde testledning i VΩ indgangsterminal.

Figure 2: PeakTech P 3131 Clamp Meter shown with its carrying case, test leads, batteries, and user manual.
5. Betjeningsvejledning
5.1 Tænd/sluk
Rotate the function selector dial from the "OFF" position to any desired measurement function to power on the meter. To power off, rotate the dial back to "OFF". The meter features an automatic power-off function (can be deactivated) to conserve battery life.
5.2 AC/DC strømmåling (Clamp)
To measure current without breaking the circuit:
- Drej funktionsvælgeren til A~ (AC-strøm) eller A= (DC-strøm) position.
- Tryk på AC/DC button if you need to switch between AC and DC current modes (if the dial position combines them).
- Tryk på NUL button to zero the display before measuring DC current, especially for small currents, to compensate for residual magnetism.
- Åbn clamp kæben ved at trykke på aftrækkeren.
- Enclose only en conductor with the clamp kæbe. Sørg for, at kæben er helt lukket.
- Aflæs den aktuelle værdi på LCD-displayet.
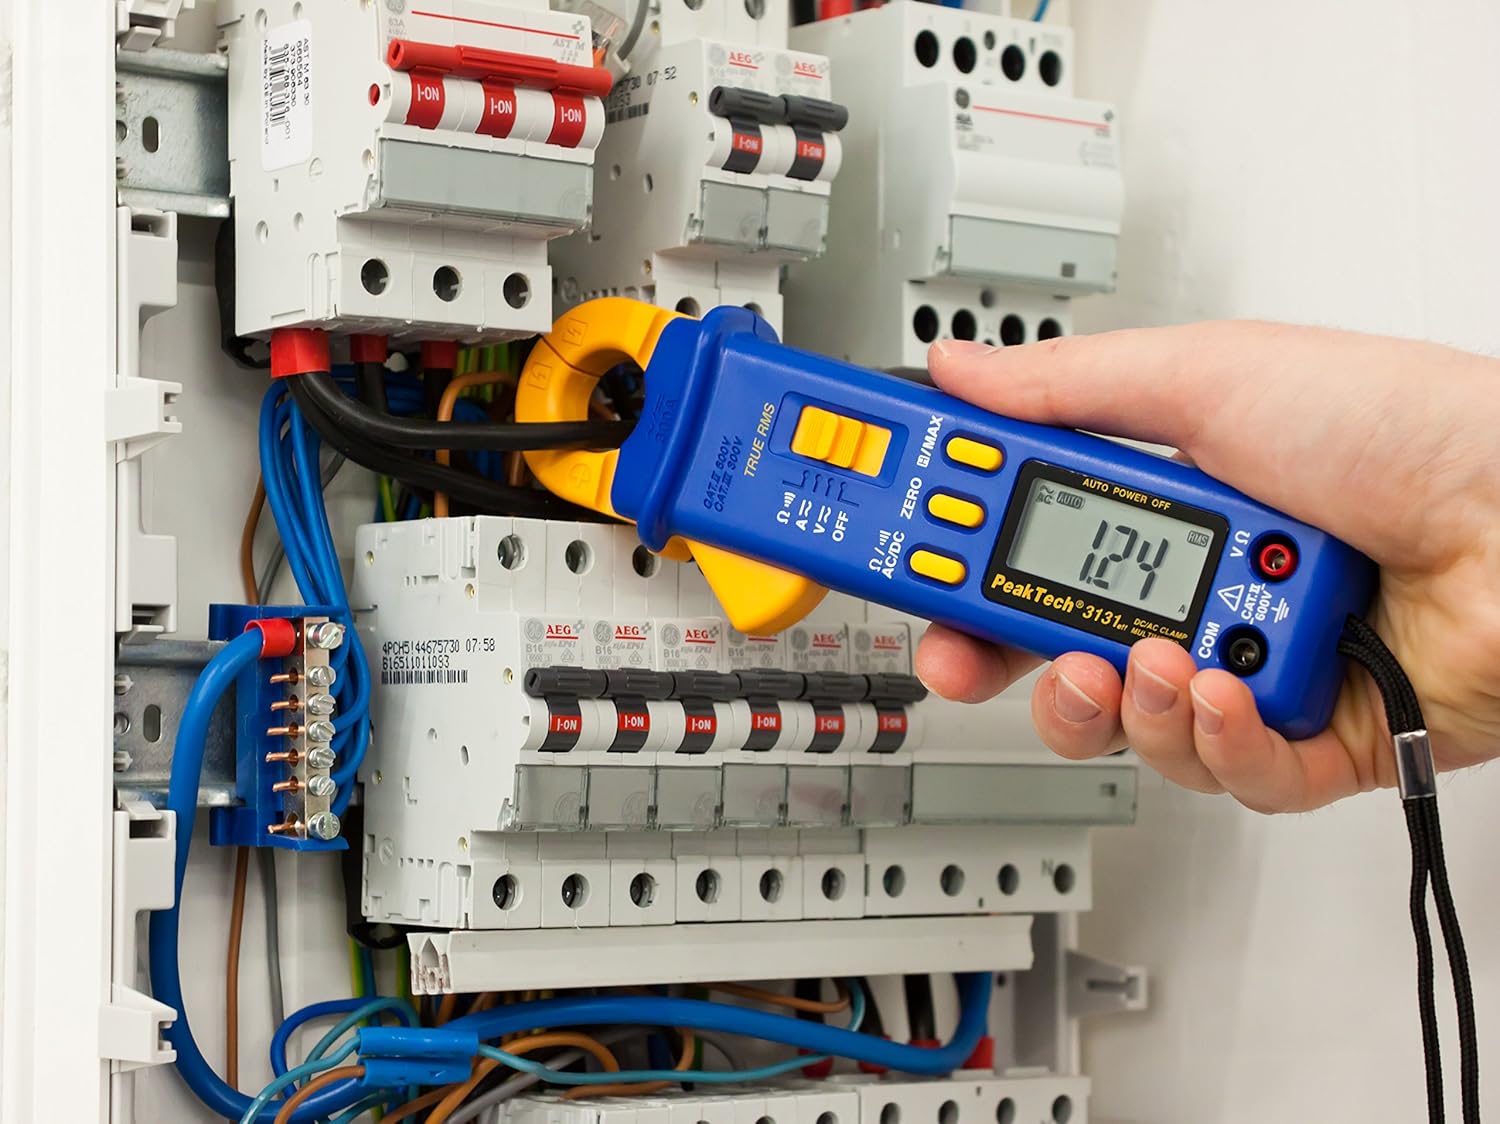
Figure 3: The PeakTech P 3131 Clamp Meter in use, measuring current on a single conductor within an electrical panel.
5.3 AC/DC Voltage Måling
At måle voltage:
- Tilslut testledningerne som beskrevet i afsnit 4.2.
- Drej funktionsvælgeren til V~ (AC-volumentage) eller V= (DC bindtage) stilling.
- Tilslut testproberne parallelt til det kredsløb eller den komponent, du ønsker at måle.
- Læs bindtage -værdi på LCD -displayet.
5.4 Modstands- og kontinuitetsmåling
To measure resistance or check for continuity:
- Tilslut testledningerne som beskrevet i afsnit 4.2.
- Drej funktionsvælgeren til Ω/))) (Resistance/Continuity) position.
- For resistance: Connect the test probes across the component. Ensure the circuit is de-energized.
- For continuity: Touch the test probes to the two points you want to check. A continuous beep indicates a low-resistance path (continuity).
- Aflæs modstandsværdien på LCD-displayet.
5.5 Specialfunktioner
- Ægte RMS: The meter measures True Root Mean Square values for AC voltage and current, providing accurate readings for non-sinusoidal waveforms.
- Datahold (H): Tryk på H/MAX Tryk kortvarigt på knappen for at fryse den aktuelle aflæsning på displayet. Tryk igen for at slippe.
- Maximum Value Hold (MAX): Tryk og hold på H/MAX button to capture and display the maximum measured value. Press again to exit.
- NUL-funktion: Used to zero the display for DC current measurements to eliminate offset errors.
- Automatisk afstandsmåling: The meter automatically selects the appropriate measurement range.
- Automatisk sluk: The meter automatically turns off after a period of inactivity to save battery. This feature can typically be disabled by holding a specific button during power-on (refer to the device's on-screen indicators or a more detailed manual if available).
6. Vedligeholdelse
6.1 Rengøring
Tør målerens hus af med enamp en klud og et mildt rengøringsmiddel. Brug ikke slibemidler eller opløsningsmidler. Sørg for, at måleren er helt tør før brug.
6.2 Udskiftning af batteri
Refer to Section 4.1 for instructions on battery replacement. Always use two fresh 1.5V AAA batteries. Remove batteries if the meter is not used for an extended period to prevent leakage.
6.3 Opbevaring
Store the meter in a cool, dry place, away from direct sunlight and extreme temperatures. Use the provided carrying case for protection.
7. Fejlfinding
| Problem | Mulig årsag | Løsning |
|---|---|---|
| Måleren tænder ikke. | Døde eller forkert installerede batterier. | Kontroller batteripolariteten; udskift batterierne. |
| "OL" eller "OVER" vises. | Målingen overstiger det valgte område eller målerens maksimale kapacitet. | Select a higher range (if manual ranging) or ensure measurement is within meter's limits. |
| Inaccurate DC current reading. | Residual magnetism in clamp kæbe. | Tryk på NUL button before measurement. |
| Ingen kontinuitetsbip. | Åbent kredsløb eller høj modstand. | Check connections; ensure circuit is complete. |
If problems persist, contact PeakTech customer support or a qualified service technician.
8. Tekniske specifikationer
| Parameter | Specifikation |
|---|---|
| Vise | 3 3/4 digit LCD, max. 3999 counts |
| DC bindtage (DCV) | 0.1 mV to 600 V (Accuracy: 0.5% + 2 digits) |
| AC Voltage (ACV) | 1 mV to 600 V (Accuracy: 1.5% + 5 digits) |
| DC Current (DCA) | 10 mA to 300 A (Accuracy: 1% + 2 digits) |
| AC Current (ACA) | 10 mA to 300 A (Accuracy: 1% + 3 digits) |
| Modstand (Ω) | 0.1 Ω to 40 MΩ (Accuracy: 0.9% + 2 digits) |
| Kontinuitetstest | Buzzer funktion |
| Ægte RMS | Yes, for AC measurements |
| Kæbeåbning | 22 mm max. conductor diameter |
| Sikkerhedsvurdering | EN 61010-1, CAT II 600 V |
| Strømforsyning | 2 x 1.5V AAA batterier |
| Dimensioner (L x B x H) | 192 x 66 x 27 mm (ca. 7.56 x 2.6 x 1.06 tommer) |
| Vægt | 205 g (ca. 0.45 lbs) |
9. Garanti og support
PeakTech products are manufactured under strict quality control. This product is covered by a standard manufacturer's warranty against defects in materials and workmanship. Please refer to the warranty card included with your product or visit the official PeakTech webhjemmeside for detaljerede garantivilkår.
For technical support, service, or calibration inquiries, please contact your local PeakTech distributor or the PeakTech customer service department. Contact information can typically be found on the PeakTech webwebsted eller i produktemballagen.


