1. Introduktion
This manual provides detailed instructions for the proper setup, operation, and maintenance of the Park Tool TS-2DI Dial Indicator Gauge Set. This precision instrument is designed to enhance the accuracy of wheel truing when used with compatible Park Tool Truing Stands.
The TS-2DI measures a wheel’s lateral and radial run-out with a precision of 0.01mm, allowing for highly accurate wheel adjustments.
2. Produktet er slutview
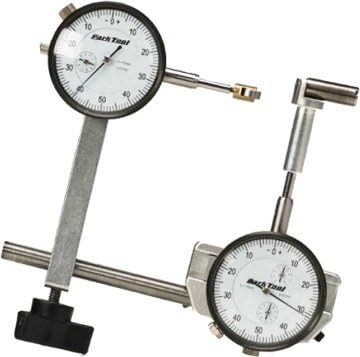
Figur 1: The Park Tool TS-2DI Dial Indicator Gauge Set, showing two dial indicators with mounting brackets and specially designed tips. One indicator is positioned for radial measurement, and the other for lateral measurement.
The TS-2DI set includes two dial indicators, mounting brackets, and specialized tips. These components are designed for easy integration with specific Park Tool Truing Stands.
Nøglefunktioner:
- Measures lateral and radial run-out to 0.01mm.
- Designed for easy mounting on Park Tool TS-2, TS-2.2, TS-2.3, TS-4, or TS-4.2 Truing Stands (with flat caliper plate).
- Allows precise setting and following of wheel tolerances.
- Includes two dial indicators for simultaneous measurement.
3. Kompatibilitet
The TS-2DI Dial Indicator Gauge Set is compatible with the following Park Tool Truing Stands:
- TS-2 Professional Wheel Truing Stand
- TS-2.2 Professional Wheel Truing Stand
- TS-2.2P Powder Coated Professional Wheel Truing Stand
- TS-2.3 Professional Wheel Truing Stand
- TS-4 Professional Wheel Truing Stand
- TS-4.2 Professional Wheel Truing Stand
Ensure your truing stand has a flat caliper plate for proper mounting of the TS-2DI.
4. Opsætning og installation
Follow these steps to properly install the TS-2DI Dial Indicator Gauge Set onto your compatible Park Tool Truing Stand:
- Prepare the Truing Stand: Ensure your truing stand is securely mounted and stable. Remove any existing caliper arms or indicators if they obstruct the mounting area for the TS-2DI.
- Monter beslagene: Attach the TS-2DI mounting brackets to the designated points on your truing stand's caliper plate. The brackets are designed to slide onto the existing caliper arms or mounting points. Secure them firmly using the provided fasteners.
- Install Dial Indicators: Carefully insert each dial indicator into its respective mounting bracket. One indicator is typically positioned to measure lateral run-out (side-to-side movement of the rim), and the other for radial run-out (up-and-down movement of the rim).
- Adjust Indicator Position: Position the tips of the dial indicators so they are close to, but not touching, the rim surface. Ensure the indicator plungers are perpendicular to the rim for accurate readings.
- Zero the Indicators: Once the wheel is mounted in the truing stand and the indicators are positioned, gently bring the indicator tips into contact with the rim. Rotate the outer bezel of each dial indicator to align the '0' mark with the needle. This sets the reference point for measurement.
For visual guidance, refer to the official Park Tool website or instructional videos for your specific truing stand model.
5. Betjeningsvejledning
Using the TS-2DI Dial Indicator Gauge Set for precise wheel truing involves careful observation and adjustment:
- Monter hjulet: Securely mount the bicycle wheel into the truing stand. Ensure the quick-release or axle nuts are tightened appropriately to prevent movement during truing.
- Position Indicators: Adjust the dial indicators so their tips lightly touch the rim surface. The lateral indicator should contact the side of the rim, and the radial indicator should contact the braking surface or a consistent part of the rim's circumference.
- Set Zero Point: Rotate the wheel slowly. Identify the point of maximum deviation (highest or lowest point for radial, furthest left or right for lateral). Adjust the indicator's bezel to set this point as '0' or a convenient reference. Alternatively, you can set the indicator to zero at a neutral point and observe deviations from there.
- Measure Run-out: Slowly rotate the wheel 360 degrees. Observe the needle movement on both dial indicators. The total range of movement from the lowest to highest reading indicates the total run-out. For example, if the needle moves from -10 to +10, the total run-out is 20 units (0.20mm).
- Adjusting the Wheel: Based on the readings, make spoke tension adjustments to correct lateral and radial run-out. For lateral run-out, tighten spokes on the side towards which the rim deviates. For radial run-out, tighten spokes in the area where the rim is low, or loosen spokes where it is high. Make small, incremental adjustments.
- Re-measure and Repeat: After each adjustment, rotate the wheel and re-measure the run-out. Continue this process until the desired tolerance is achieved. The TS-2DI allows for very fine adjustments, enabling you to achieve highly accurate truing.
Always refer to the wheel manufacturer's specifications for acceptable run-out tolerances.
6. Vedligeholdelse
Proper maintenance ensures the longevity and accuracy of your TS-2DI Dial Indicator Gauge Set:
- Rensning: After each use, wipe down the dial indicators and mounting brackets with a clean, dry, soft cloth. Avoid using harsh chemicals or solvents that could damage the finish or internal mechanisms.
- Opbevaring: Store the TS-2DI in a clean, dry environment, preferably in its original packaging or a protective case, to prevent dust accumulation and physical damage.
- Inspektion: Periodically inspect the indicator tips for wear or damage. Replace worn tips to maintain accuracy. Check mounting hardware for tightness.
- Smøring: The internal mechanisms of dial indicators are typically factory-lubricated and sealed. Avoid disassembling the indicators or applying lubricants unless specifically instructed by Park Tool.
7. Fejlfinding
| Problem | Mulig årsag | Løsning |
|---|---|---|
| Unøjagtige aflæsninger | Indicator tip not perpendicular to rim; loose mounting; dirty rim surface; worn indicator tip. | Ensure indicator tip is perpendicular. Tighten mounting hardware. Clean rim surface. Replace worn tip. |
| Indicator needle sticks or moves erratically | Dust or debris in mechanism; physical damage; plunger bent. | Clean the indicator carefully. If problem persists, contact Park Tool support for repair or replacement. Do not attempt to disassemble. |
| Difficulty mounting to truing stand | Incompatible truing stand model; incorrect bracket orientation. | Verify truing stand compatibility (refer to Section 3). Ensure brackets are oriented correctly as per instructions. |
8. Specifikationer
- Model: TS-2DI
- Målepræcision: 0.01mm (lateral and radial run-out)
- Vægt: Cirka 1.58 pund (0.72 kg)
- Materiale: Metal
- Kompatibilitet: Park Tool TS-2, TS-2.2, TS-2.3, TS-4, TS-4.2 Truing Stands (with flat caliper plate)
- Pakkedimensioner: 8.7 x 4.72 x 4.06 tommer (22.1 x 12 x 10.3 cm)
- UPC: 763477008190
9. Garantioplysninger
Park Tool products are manufactured to high standards and are backed by a limited warranty against defects in materials and workmanship. For specific warranty terms and conditions, please refer to the official Park Tool Warranty Policy på deres webwebsted eller kontakt deres kundeservice.
Købsbevis kan være påkrævet ved garantikrav.
10. Kundesupport
For technical assistance, replacement parts, or further inquiries regarding your Park Tool TS-2DI Dial Indicator Gauge Set, please contact Park Tool customer support:
- Webwebsted: www.parktool.com
- Kontaktside: www.parktool.com/en-us/contact
When contacting support, please have your product model (TS-2DI) and purchase information readily available.


