Indledning
This manual provides comprehensive instructions for the setup, operation, and maintenance of your Sonic Alert SBJ525SS Digital Alarm Clock. Please read this manual thoroughly before using the device to ensure proper function and longevity. This alarm clock is designed to provide reliable timekeeping and alarm functions, including a powerful vibrating bed shaker, loud audible alarm, and visual alert features.
Sikkerhedsoplysninger
- Ensure the power adapter is connected to a standard electrical outlet.
- Udsæt ikke enheden for vand eller overdreven fugt.
- Undgå at placere enheden i nærheden af varmekilder eller i direkte sollys.
- Opbevares utilgængeligt for børn.
- Use only the provided power adapter and bed shaker.
Pakkens indhold
Bekræft at alle varer er til stede i din pakke:
- Sonic Alert SBJ525SS Digital Alarm Clock Unit
- 12-Volt Vibrating Bed Shaker
- Strømadapter
- Instruktionsmanual
Produkt overview
Gør dig bekendt med de forskellige dele og betjeningselementer på dit vækkeur.
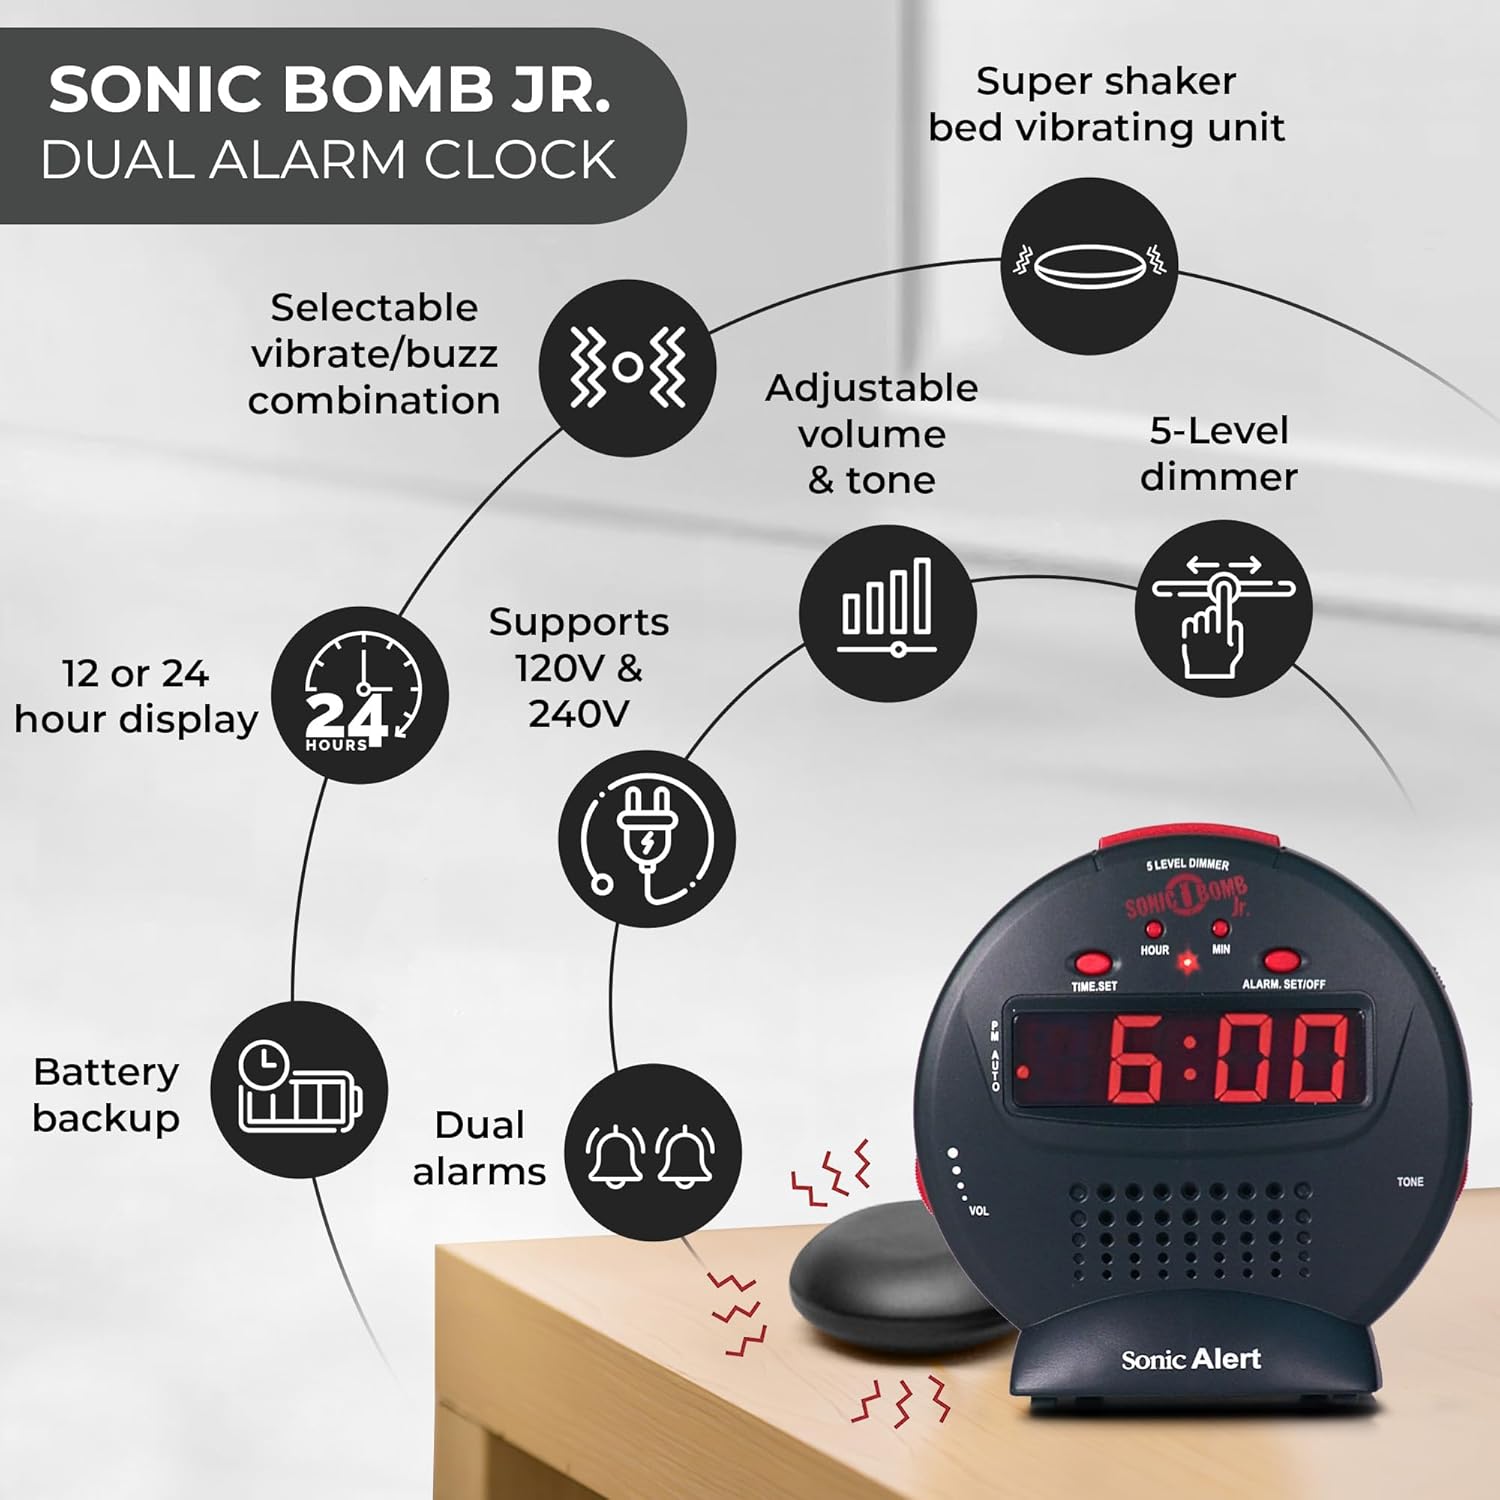
Billedbeskrivelse: A diagram illustrating the Sonic Alert SBJ525SS Digital Alarm Clock. Key features highlighted include the 12 or 24-hour display, battery backup, dual alarms, selectable vibrate/buzz combination, adjustable volume and tone, 5-level dimmer, and the super shaker bed vibrating unit. The clock supports 120V & 240V power.
The clock features a large digital display, control buttons for time and alarm settings, and adjustment knobs for volume and tone. A dedicated port is available for the bed shaker connection.
Opsætning
1. Strømtilslutning
- Connect the power adapter to the DC IN jack on the back of the alarm clock.
- Plug the power adapter into a standard electrical wall outlet. The display will illuminate.
2. Installation af batteribackup
The alarm clock requires 2 AA batteries (not included) for battery backup functionality. This ensures your time and alarm settings are retained during a power outage.
- Find batterirummet i bunden af enheden.
- Åbn batterirummets dæksel.
- Insert 2 AA batteries, observing the correct polarity (+/-).
- Sæt batterirummets dæksel på igen.

Billedbeskrivelse: A graphic illustrating the battery backup feature of the alarm clock. It shows the clock on a nightstand with a small circular battery icon (CR2032, 3V) next to it, indicating the type of battery used for backup. The text emphasizes that batteries are not included and are for retaining settings during power outages.
3. Tidsindstilling
- Tryk og hold på TIDSINDSTILLING knappen. Timecifrene vil begynde at blinke.
- Tryk på TIME Tryk gentagne gange på knappen for at justere timetallet. Se på PM-indikatoren for korrekt AM/PM-indstilling.
- Tryk på MIN knappen gentagne gange for at justere minutterne.
- Trykke TIDSINDSTILLING igen for at bekræfte tidspunktet.
- For at skifte mellem 12-timers og 24-timers format skal du trykke på 12/24H button (if available, otherwise it might be part of time set cycle).
4. Sengeshakerforbindelse
The vibrating bed shaker is an integral part of the Sonic Alert system, designed for heavy sleepers or individuals with hearing impairments.
- Locate the jack labeled SHAKER on the back of the alarm clock.
- Insert the plug of the bed shaker into this jack.
- Place the bed shaker under your pillow, between your mattress and box spring, or under a fitted sheet for optimal vibration.

Billedbeskrivelse: A composite image showing three different methods for placing the super bed shaker: under a pillow, under a fitted sheet, and under a mattress. The image also highlights the 6ft long cable of the shaker.
Betjeningsvejledning
1. Indstilling af alarmer (dobbelt alarm)
The SBJ525SS features dual alarms, allowing you to set two independent wake-up times.
- Tryk og hold på ALARM SET/OFF button once for Alarm 1. The hour digits for Alarm 1 will flash.
- Brug TIME og MIN knapperne for at indstille det ønskede alarmtidspunkt.
- Trykke ALARM SET/OFF again to confirm Alarm 1 and proceed to Alarm 2. The hour digits for Alarm 2 will flash.
- Brug TIME og MIN buttons to set the desired time for Alarm 2.
- Trykke ALARM SET/OFF a third time to confirm Alarm 2 and exit alarm setting mode.
- For at aktivere eller deaktivere en alarm skal du trykke på ALARM SET/OFF button briefly (not held). Each press cycles through Alarm 1 ON, Alarm 2 ON, Both Alarms ON, Both Alarms OFF. An indicator light on the display will show which alarm(s) are active.

Billedbeskrivelse: A bedroom scene with a couple sleeping, and the Sonic Alert alarm clock prominently displayed on a nightstand. The text overlay emphasizes the "Dual Alarm Clock" feature, allowing two different alarms to be set for reliable wake-up times.
2. Alarm Modes (Vibrate, Sound, Both)
The alarm clock offers various alert modes:
- Vibrate Only: The bed shaker will activate without an audible alarm.
- Kun lyd: The audible alarm will sound without bed shaker activation.
- Begge: Both the bed shaker and audible alarm will activate simultaneously.
To select the alarm mode, use the ALARMtilstand switch located on the side or back of the unit. Cycle through the options until your desired mode is selected.

Billedbeskrivelse: A woman sleeping in bed with the Sonic Alert alarm clock and its bed shaker visible on the adjacent nightstand. The image highlights the clock's features: a powerful 6-volt bed shaker, 102dB loud alarm with adjustable tone and volume, alarm and bed shaker test mode, and built-in red flashing lights.
3. Snooze-funktion
Når alarmen lyder, skal du trykke på den store SLUM button on top of the unit to temporarily silence the alarm. The alarm will sound again after the set snooze duration.
- The snooze duration is adjustable from 1 to 30 minutes. Refer to the full instruction manual for specific steps on adjusting the snooze time.

Billedbeskrivelse: A man sleeping in bed with the Sonic Alert alarm clock on his bedside table. An overlay graphic shows a slider indicating the adjustable snooze duration from 1 to 30 minutes.
4. Brightness Dimmer
Adjust the display brightness to your preference using the 5-level dimmer function.
- Find DIMMER control (often a slider or button) on the unit.
- Adjust the control to cycle through the 5 brightness levels, from brightest (5) to dimmest (1).

Billedbeskrivelse: A woman sleeping in a bedroom with the Sonic Alert alarm clock on her nightstand. Below, a series of five clock images illustrate the different brightness levels of the display, from level 5 (brightest) to level 1 (dimmest), demonstrating the five-level dimmer feature.
5. Justering af lydstyrke og tone
Customize the audible alarm sound to your preference.
- Brug BIND (Volume) knob/slider to increase or decrease the alarm's loudness.
- Brug TONE knob/slider to adjust the pitch of the alarm sound.
Billedbeskrivelse: Et nærbillede view of the Sonic Alert alarm clock, specifically highlighting the volume control slider on its side. The accompanying text explains how to adjust the sound with ease using the knobs for volume and tone.

Billedbeskrivelse: The Sonic Alert alarm clock on a white surface, with a graphic overlay demonstrating the adjustable tone feature. Sound waves emanate from the clock, and a slider indicates the range of tone adjustments available.
6. USB Charging Port Usage
The alarm clock includes a built-in USB port for charging compatible handheld devices.
- Locate the USB charging port on the side or back of the unit.
- Tilslut din enheds USB-opladerkabel til porten.
- Ensure your device begins charging. Note that charging speed may vary depending on the device and cable.

Billedbeskrivelse: A woman reaching for her smartphone, which is connected and charging via the built-in USB port on the Sonic Alert alarm clock, placed on a nightstand next to her bed.
Opretholdelse
- Rensning: Tør enheden af med en blød, tør klud. Brug ikke flydende rengøringsmidler eller slibende materialer.
- Udskiftning af batteri: Replace backup batteries annually or when the battery low indicator appears to ensure continuous backup functionality.
- Opbevaring: Hvis enheden opbevares i en længere periode, skal backupbatterierne fjernes for at forhindre lækage.
Fejlfinding
| Problem | Mulig årsag | Løsning |
|---|---|---|
| Uret er slukket eller flimrer. | Power adapter not connected or faulty; power outage. | Ensure power adapter is securely plugged in. Check wall outlet. If power outage, battery backup should maintain time (display will be off). |
| Alarmen lyder/vibrerer ikke. | Alarm not activated; incorrect alarm mode selected; volume too low; bed shaker not connected. | Verify alarm is ON (indicator light). Check alarm mode switch. Increase volume. Ensure bed shaker is securely plugged in. |
| Tids-/alarmindstillinger går tabt efter strømafbrydelsetage. | Backup-batterierne er døde eller ikke installeret. | Install fresh AA batteries in the battery compartment. |
| USB-opladning er langsom eller virker ikke. | Device incompatibility; faulty USB cable; device requires higher power output. | Try a different USB cable. Ensure your device is compatible with standard USB charging. The clock's USB port provides standard charging output. |
Specifikationer
| Mærke | Sonic Alert |
| Modelnummer | SBJ525SS |
| Display Type | Digital |
| Særlige funktioner | Alarm, Auto Dimmable, Snooze, Vibrating Bed Shaker, USB Charging Port, Red Flashing Alert Lights |
| Strømkilde | Corded Electric with Battery Backup (2 AA batteries required, not included) |
| Produktdimensioner | 5 cm B x 5 cm H |
| Materiale | Plast |
| Alarmhøjde | Up to 102dB (with bed shaker) |
Garanti og support
The Sonic Alert SBJ525SS Digital Alarm Clock comes with a Limited Warranty. For specific warranty terms and conditions, please refer to the warranty card included with your product or visit the official Sonic Alert webwebsted.
For technical support, troubleshooting assistance, or to inquire about replacement parts, please contact Sonic Alert customer service:
- Webwebsted: www.sonicert.com
- Kontaktoplysninger: Henvis til embedsmanden webwebstedet eller produktemballagen for de mest aktuelle kontaktoplysninger.

Billedbeskrivelse: An open instruction manual for the Sonic Bomb Jr. alarm clock, showing detailed operational instructions and diagrams. This image signifies that a manual is included with the product for user guidance.


