Indledning
This manual provides comprehensive instructions for the installation, operation, maintenance, and troubleshooting of your Phylrich Revere & Savannah Lavatory Faucet, Model D102_015. Please read this manual thoroughly before beginning installation or use to ensure proper function and longevity of your product.
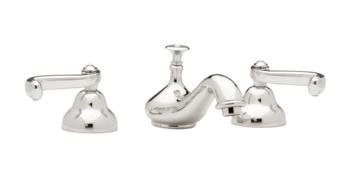
Image: Phylrich Revere & Savannah Lavatory Faucet (Model D102_015) featuring a polished finish, low spout, and lever handles. The image displays the complete widespread faucet assembly including the central spout and two side handles.
Specifikationer
| Feature | Detalje |
|---|---|
| Mærke | Phylrich |
| Model | D102_015 |
| Finish Type | Poleret |
| Inkluderede komponenter | Dræne |
| Håndtag Type | Løftestang |
| Installationstype | Udbredt |
| Maksimal flowhastighed | 1.5 gallon pr. Minut |
| Tudhøjde | 12 tommer |
| UPC | 883908753380 |
Opsætning og installation
Before beginning installation, ensure you have all necessary tools and components. It is recommended to consult a professional plumber if you are unsure about any steps.
Nødvendige værktøjer:
- Justerbar skruenøgle
- VVS-kit eller silikoneforsegling
- Phillips skruetrækker
- Basin skruenøgle (valgfri, til trange rum)
- Sikkerhedsbriller
Installationstrin:
- Sluk for vandforsyningen: Find hovedafspærringsventilen til vand i dit hjem eller afspærringsventilerne under vasken. Luk dem helt.
- Fjern den gamle vandhane (hvis relevant): Disconnect the water supply lines from the old faucet. Unscrew the mounting nuts and remove the old faucet and drain assembly. Clean the sink surface thoroughly.
- Install New Faucet Body: Apply a thin bead of plumber's putty or silicone sealant around the base of the new faucet spout and handles. Insert the faucet body and handles into the corresponding holes on the sink or countertop.
- Sikker vandhane: From underneath the sink, thread the mounting nuts onto the faucet shanks and hand-tighten. Use an adjustable wrench to tighten securely, but do not overtighten.
- Tilslut vandforsyningsledninger: Attach the hot and cold water supply lines to the corresponding inlets on the faucet shanks. Ensure connections are tight to prevent leaks.
- Installer afløbssamling: Follow the instructions provided with the included drain. Typically, this involves applying sealant to the drain flange, inserting it into the sink drain hole, and securing it from underneath with a washer and nut. Connect the drain tailpiece to your P-trap.
- Test for lækager: Slowly turn on the main water supply. Check all connections for leaks. If leaks are present, tighten the connections as needed.
- Skyllehane: Remove the aerator from the spout. Turn on both hot and cold water for a few minutes to flush out any debris from the lines. Turn off the water, reattach the aerator.
Betjeningsvejledning
Your Phylrich Lavatory Faucet is designed for ease of use and reliable performance.
Vandgennemstrømning og temperaturkontrol:
- Koldt vand: Turn the right lever handle counter-clockwise to open the cold water supply.
- Varmt vand: Turn the left lever handle counter-clockwise to open the hot water supply.
- Mixing Water: Adjust both lever handles to achieve your desired water temperature and flow rate.
- Shutting Off: Turn the lever handles clockwise until the water flow stops completely.
Afløbsdrift:
The included drain assembly typically operates via a lift rod located at the back of the faucet. Pull the rod up to close the drain stopper and push it down to open the drain.
Vedligeholdelse og pleje
Proper care and maintenance will ensure the lasting beauty and performance of your Phylrich faucet.
Rensning:
- Rengør vandhanen regelmæssigt med en blød, tør klud.amp klud og mild sæbe.
- GØR IKKE use abrasive cleaners, harsh chemicals, or polishes containing alcohol, ammonia, or bleach, as these can damage the polished finish.
- Skyl grundigt efter rengøring og tør med en blød klud for at undgå vandpletter.
Vedligeholdelse af belufter:
- Hvis vandgennemstrømningen bliver begrænset eller ujævn, kan perlatoren være tilstoppet.
- Skru perlatoren af enden af tuden.
- Rinse any debris from the screen. For stubborn mineral deposits, soak the aerator in a 50/50 solution of white vinegar and water.
- Sæt perlatoren sikkert på igen.
Fejlfinding
Se følgende tabel for almindelige problemer og deres løsninger.
| Problem | Mulig årsag | Løsning |
|---|---|---|
| Lav vandgennemstrømning | Tilstoppet perlator; delvist lukket afspærringsventil; snavs i forsyningsledningen. | Rengør perlatoren (se Vedligeholdelse); sørg for, at afspærringsventilerne er helt åbne; skyl forsyningsledningerne. |
| Leaking at Faucet Base | Loose mounting nuts; insufficient sealant during installation. | Tighten mounting nuts; if problem persists, reapply plumber's putty/sealant. |
| Dripping from Spout | Slidt patron; snavs i patronen. | Contact Phylrich customer support for replacement cartridge or professional assistance. |
| Problemer med vandtemperaturen | Incorrect hot/cold supply line connection; water heater issues. | Kontroller forsyningsledningens forbindelser; kontroller vandvarmerens indstillinger. |
If you encounter issues not listed here or if the suggested solutions do not resolve the problem, please contact Phylrich customer support.
Garantioplysninger
Phylrich products are manufactured to the highest quality standards and are backed by a limited warranty. For specific warranty terms and conditions applicable to your D102_015 faucet, please refer to the warranty card included with your product or visit the official Phylrich webwebsted. Gem din købsbevis til garantikrav.
Kundesupport
For technical assistance, replacement parts, or warranty inquiries, please contact Phylrich customer support:
- Webwebsted: www.phylrich.com (Tjek venligst den officielle webhjemmeside for de seneste kontaktoplysninger.)
- Telefon: Refer to the Phylrich webwebstedet eller produktemballagen for regionale kontaktnumre.
When contacting support, please have your model number (D102_015) and proof of purchase readily available.


