1. Introduktion
This manual provides detailed instructions for the installation, setup, operation, and maintenance of the Intermatic FM1D20A-24 Electronic 24-Hour/7-Day Timer Module. Please read this manual thoroughly before attempting to install or operate the device to ensure proper function and safety.
2. Sikkerhedsoplysninger
ADVARSEL: Risk of electric shock. Installation and servicing of this device should be performed by qualified personnel only. Disconnect power at the circuit breaker or fuse before installing or servicing. Follow all national and local electrical codes.
- Ensure the power supply matches the device's voltage rating (24V).
- Do not exceed the maximum current rating of 16A.
- Hold enheden væk fra fugt og ekstreme temperaturer.
- Forsøg ikke at åbne eller reparere enheden selv. Kontakt kvalificeret servicepersonale.
3. Pakkens indhold
Kontroller, at alle komponenter er til stede ved udpakning:
- 1 x Intermatic FM1D20A-24 Electronic 24-Hour/7-Day Timer Module
4. Produktet er slutview
The Intermatic FM1D20A-24 is an electronic timer module designed for precise 24-hour and 7-day scheduling. It features a digital display and intuitive controls for programming up to 20 ON/OFF operations.
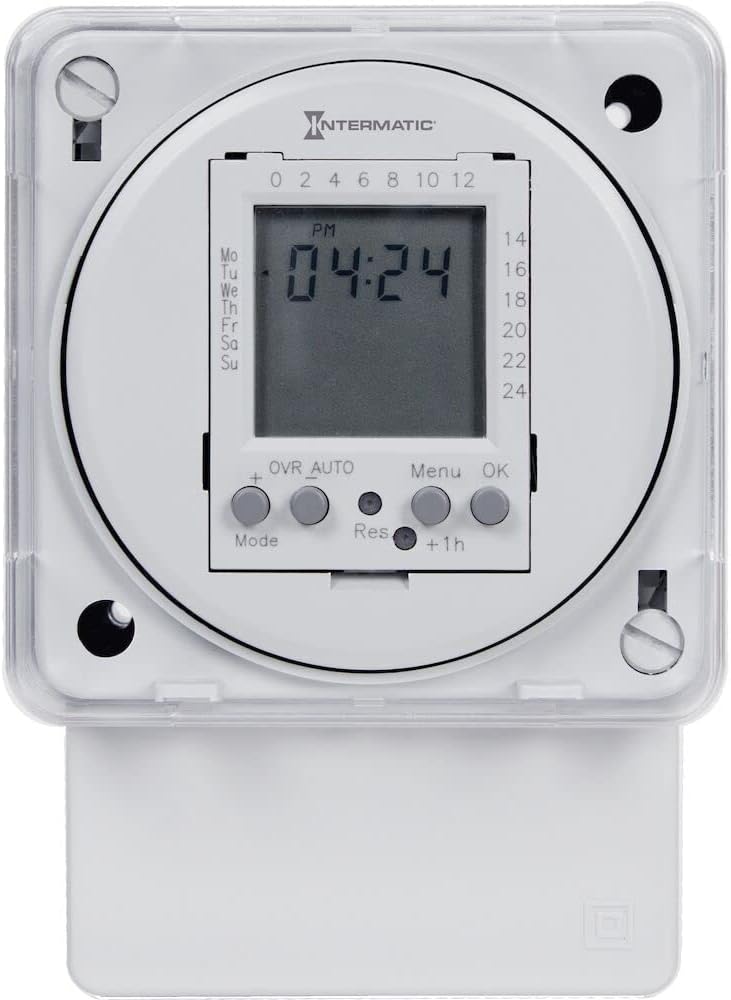
Figur 1: Front view of the Intermatic FM1D20A-24 Timer Module, showing the digital display and control buttons.

Figur 2: Nærbillede view of the timer module's display, indicating current time and day, along with the 'Mode', '+', 'OVR AUTO', 'Res', 'Menu', 'OK', and '+1h' buttons.

Figur 3: Side view of the timer module, illustrating its compact design and potential mounting points for surface or DIN rail installation.
5. Installation
The FM1D20A-24 timer module supports both surface and DIN rail mounting.
5.1 Montering
- Overflademontering: Secure the module to a flat surface using appropriate screws through the designated mounting holes.
- DIN-skinnemontering: Attach the module to a standard DIN rail by snapping it into place.
5.2 Ledningsføring
VIGTIG: All wiring must comply with local and national electrical codes. Ensure power is disconnected before wiring.
- Connect the 24V power supply to the designated input terminals.
- Connect the load (device to be controlled) to the output terminals. The timer module features an SPDT (Single Pole Double Throw) switch style.
- Bekræft, at alle forbindelser er sikre, før strømmen genoprettes.
6. Opsætning
6.1 Indledende opstart
Upon initial power-up, the display may be blank or show default settings. The internal clock will need to be set.
6.2 Indstilling af aktuel tid og dag
- Press the 'Mode' button to enter the time setting mode.
- Use the '+' button to adjust the hour, minute, and day.
- Press 'OK' to confirm each setting and move to the next.
- Once the time and day are set, press 'OK' to exit the setting mode.
6.3 Programmering af TIL/FRA-hændelser
The timer supports up to 20 ON/OFF operations.
- Press the 'Menu' button to access the programming menu.
- Navigate through the program slots (P1 ON, P1 OFF, P2 ON, P2 OFF, etc.) using the '+' button.
- For each program slot, press 'OK' to select it.
- Use the '+' button to set the desired time and day(s) for the ON or OFF event.
- Press 'OK' to confirm each setting.
- Repeat for all desired ON/OFF events.
- Press 'Menu' to exit the programming mode.
7. Betjeningsvejledning
7.1 Manual Override (OVR AUTO)
The 'OVR AUTO' button allows for temporary manual control of the output, overriding the programmed schedule. Pressing it will toggle the output state (ON/OFF) and return to automatic operation at the next scheduled event.
7.2 Time Adjustment (+1h)
The '+1h' button can be used for quick adjustment of the current time, typically for daylight saving time changes. Pressing it will advance the current time by one hour.
7.3 Reset Function (Res)
The 'Res' (Reset) button is typically a recessed button that requires a pointed object (like a pen tip) to press. This button will reset the timer to its factory default settings, erasing all programmed events and resetting the clock. Use with caution.
8. Vedligeholdelse
The Intermatic FM1D20A-24 timer module requires minimal maintenance.
- Rensning: Tør enhedens yderside af med en blød, tør klud. Brug ikke slibende rengøringsmidler eller opløsningsmidler.
- Batteri: This device does not require user-replaceable batteries for operation or memory retention.
- Inspektion: Periodically inspect wiring connections for tightness and signs of wear or damage.
9. Fejlfinding
9.1 Display is Blank
- Check if the power supply (24V) is connected and active.
- Sørg for, at alle ledningsforbindelser er sikre.
9.2 Programmed Events Not Executing
- Kontroller, at det aktuelle klokkeslæt og den aktuelle dag er indstillet korrekt.
- Check that the programmed ON/OFF times and days are accurate.
- Ensure the timer is not in manual override mode (check 'OVR AUTO' status).
- Confirm the load is properly connected and functional.
9.3 Enheden svarer ikke
- Attempt a soft reset by pressing the 'Res' button with a pointed object. Note that this will erase all settings.
- If the issue persists, disconnect power for a few minutes and then restore it.
10. Specifikationer
| Modelnummer | FM1D20A-24 |
| Mærke | Intermatic |
| Type | Electronic 24-Hour/7-Day Timer Module |
| Voltage | 24V |
| Frekvens | 50/60Hz |
| Nuværende vurdering | 16A |
| Maks. antal operationer | 20 (ON/OFF) |
| Monteringstype | Surface, DIN Rail |
| Skift stil | SPDT |
| Materiale | Plast |
| Produktdimensioner | 2.06" D x 83" B x 4" H |
| Varens vægt | 0.01 ounce |
| Certificeringer | UL (Canada and US), CE |
11. Garanti og support
For warranty information, please refer to the manufacturer's description or contact Intermatic customer support directly. Technical assistance and further support can be obtained through the official Intermatic webstedet eller autoriserede servicecentre.
Fabrikant: Intermatic Incorporated
Webwebsted: www.intermatic.com


