1. Produktet er slutview
The ROCKLER Gang Lock Front Mount is designed to secure multiple drawers with a single key turn. This adjustable system allows for flexible positioning of drawer locking pins, providing efficient and reliable security for your cabinetry. Crafted from durable brass, it features a polished finish and comes with two brass keys.
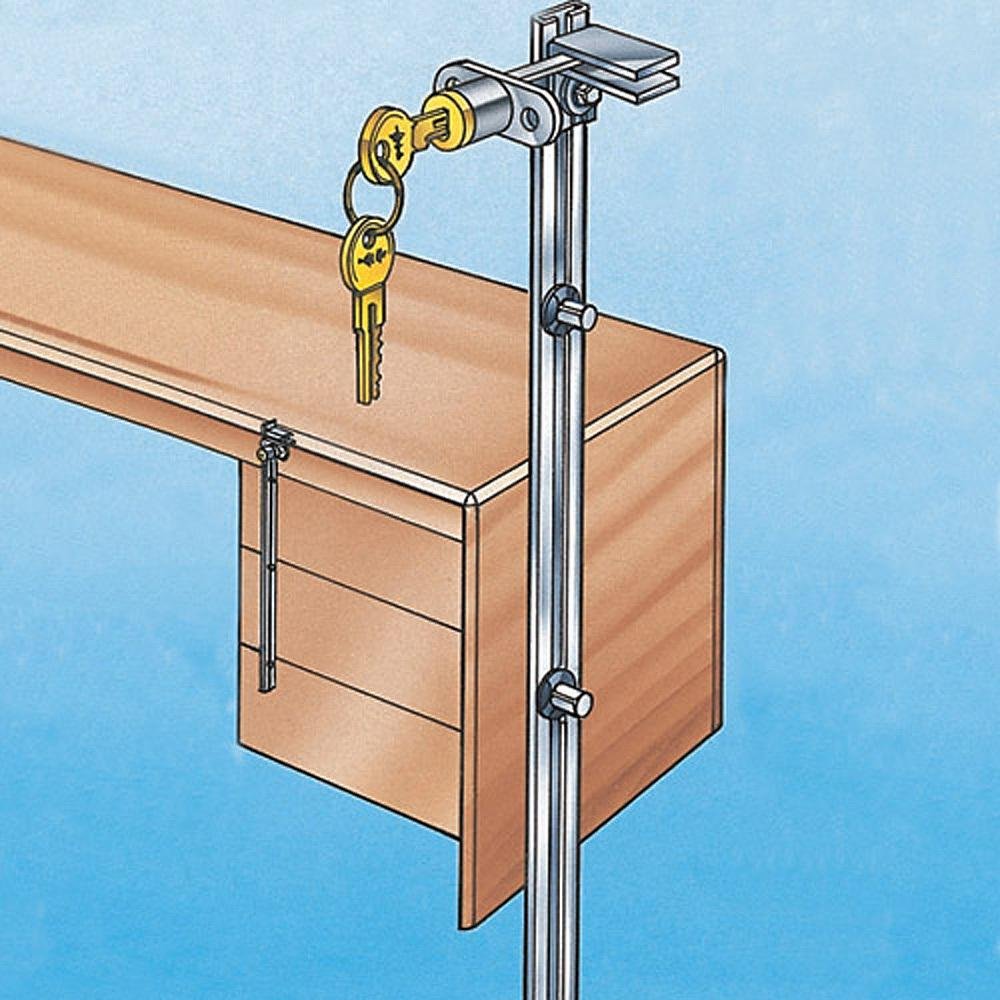
Image: The Gang Lock Front Mount in an installed configuration, demonstrating its function with keys.
2. Nøglefunktioner
- Messingkonstruktion: Made from durable brass material for long-lasting use.
- Nøglelåssikkerhed: Features a key lock mechanism for added security and peace of mind.
- Moderne stil: Sleek, modern design complements contemporary decor.
- Håndkontrol: Comes with a hand control for easy operation and precise adjustments.
- Poleret finish: Shines with a polished brass finish for a stylish look.
- Multi-Drawer Locking: Designed to unlock up to three drawers simultaneously with a single key turn.
- Adjustable Pins: Allows for flexible positioning of drawer locking pins.
3. Installation og opsætning
3.1 Nødvendigt værktøj
- Bore
- 3/4" (19 mm) borehoved
- Målebånd eller lineal
- Blyant eller tusch
- Screwdriver (if securing mounting plate)
3.2 Installationstrin
- Forbered monteringsoverfladen: Identify the desired location on the cabinet or furniture where the lock will be mounted. Ensure the surface is clean and clear of obstructions.
- Drill Mounting Hole: Using a 3/4" (19mm) drill bit, carefully drill a hole through the mounting surface at the marked location. This hole is for the main cylinder of the lock.
- Indsæt låsehus: Insert the main body of the gang lock through the drilled hole from the front of the cabinet.
- Sikker lås: From the inside of the cabinet, secure the lock body using the provided hardware (e.g., nut, washer) to ensure it is firmly in place.
- Install Locking Pins: Attach the adjustable locking pins to the mechanism. These pins will extend into the drawers to secure them.
- Adjust Pin Position: With the drawers closed, adjust the position of each locking pin to ensure it properly engages with the corresponding drawer. The system is designed to be adjustable for optimal alignment.
- Test drift: Insert a key and test the lock's operation. Ensure all intended drawers lock and unlock smoothly with a single turn of the key.
4. Betjening
To operate the ROCKLER Gang Lock Front Mount, simply insert one of the provided brass keys into the keyhole. Turn the key clockwise to lock the drawers and counter-clockwise to unlock them. The design allows for all connected drawers (typically up to three) to be secured or released simultaneously with a single turn of the key.
Ensure the key is fully inserted before turning to prevent damage to the lock mechanism or the key itself.
5. Pleje og vedligeholdelse
- Rensning: To maintain the polished brass finish, wipe the lock surface with a soft, dry cloth. Avoid abrasive cleaners or harsh chemicals, as these can damage the finish.
- Smøring: If the key mechanism becomes stiff over time, apply a small amount of graphite lubricant or a specialized lock lubricant into the keyhole. Do not use oil-based lubricants as they can attract dust and debris.
- Inspektion: Periodically check the mounting screws and locking pins to ensure they remain secure and properly aligned. Tighten any loose components as needed.
6. Fejlfinding
| Problem | Mulig årsag | Løsning |
|---|---|---|
| Key will not turn or is stiff. | Lack of lubrication, debris in keyhole, bent key. | Apply graphite lubricant to keyhole. Clean out any visible debris. Use only original, undamaged keys. |
| Drawers do not unlock/lock. | Locking pins misaligned, obstruction, key not fully inserted. | Ensure key is fully inserted. Check and adjust the alignment of the locking pins. Remove any obstructions preventing drawer movement. |
| Lock feels loose. | Monteringsudstyret er løst. | Tighten the nut or screws securing the lock body from the inside of the cabinet. |
7. Produktspecifikationer
| Attribut | Detalje |
|---|---|
| Mærke | ROCKLER |
| Modelnummer | LYSB001F7P3MM-ELECTRNCS |
| Materiale Type | Messing |
| Låsemekanisme | Nøglelås |
| Påkrævet huldiameter | 3/4" (19 mm) |
| Nøgler inkluderet | Two brass keys, keyed alike |
| Stil | Moderne |
8. Garanti og support
For specific warranty information regarding your ROCKLER Gang Lock Front Mount, please refer to the product packaging or the official ROCKLER webwebsted. Generelle garantibetingelser dækker typisk defekter i materialer og udførelse under normal brug.
If you encounter any issues or have questions not covered in this manual, please contact ROCKLER customer support through their official website or the contact information provided at the point of purchase. When contacting support, please have your model number (LYSB001F7P3MM-ELECTRNCS) ready.


