1. Introduktion
The MSD 8173 2-Pin Weathertight Connector is designed to provide a secure and sealed electrical connection for various automotive and outdoor applications. This connector is engineered to be unaffected by water, chemicals, vibration, or dirt, ensuring reliable performance in challenging environments. It features self-lubricating silicone seals and positive locking mechanisms to prevent accidental disconnections and maintain integrity.
This manual provides detailed instructions for the proper installation, operation, and maintenance of your MSD 8173 connector.
2. Komponenter overview
The MSD 8173 Weathertight Connector system typically includes the following components:
- Male and Female Connector Housings
- Male and Female Terminals (pins)
- Silicone Wire Seals (red and green)
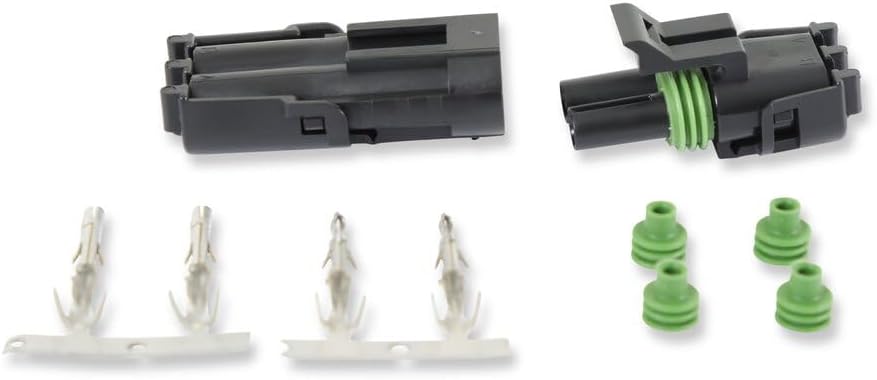
Figur 2.1: Eksploderet view of the MSD 8173 connector components, including housings, terminals, and seals.

Figur 2.2: Intern view of the connector housings, showing pin receptacles and sealing areas.
3. Opsætning og installation
Proper installation is crucial for the weathertight performance of the MSD 8173 connector. Follow these steps carefully:
3.1. Preparing Wires and Terminals
- Strip approximately 3-4mm of insulation from the end of each wire.
- Slide a silicone wire seal onto each stripped wire, ensuring the narrow end faces the stripped wire.
- Crimp the appropriate terminal (male or female) onto the stripped end of each wire using a suitable crimping tool. Ensure a secure electrical and mechanical connection.
- Slide the silicone seal over the crimped terminal until it seats firmly against the terminal's base.
3.2. Inserting Terminals into Housing
- Open the secondary lock on the connector housing (if applicable).
- Carefully insert each crimped terminal, with its seal, into the correct cavity of the connector housing. Push until you feel a click, indicating the terminal is locked in place.
- Once all terminals are inserted, close the secondary lock on the housing to secure them.
3.3. Connecting the Housings
Align the male and female connector housings and push them together firmly until the locking tabs engage with an audible click. This ensures a secure and sealed connection.
Video 3.1: Demonstration of crimping wires, inserting terminals into the connector housing, and connecting the two halves of a similar weathertight connector. This video illustrates the general installation process.
4. Betjening
Once properly installed, the MSD 8173 Weathertight Connector provides a reliable and sealed electrical pathway. The positive locking mechanism ensures the connection remains secure even under vibration, while the silicone seals prevent moisture, dust, and contaminants from entering the electrical contacts. The connector is indexed to prevent incorrect mating.
5. Vedligeholdelse
The MSD 8173 Weathertight Connector is designed for minimal maintenance due to its robust construction and sealing properties. Periodically inspect the connectors for:
- Fysisk skade: Check for cracks, breaks, or deformation of the housing.
- Sikker forbindelse: Ensure the male and female halves are fully engaged and locked.
- Ledningsintegritet: Inspect wires entering the connector for fraying or damage to insulation.
If any damage is observed, replace the affected connector components to maintain optimal performance and safety.
6. Fejlfinding
Should you encounter issues with your MSD 8173 Weathertight Connector, consider the following:
- Ingen elektrisk kontinuitet:
- Verify that terminals are correctly crimped onto wires.
- Ensure terminals are fully seated and locked within the housing.
- Check for proper mating of the male and female connector halves.
- Moisture or Dirt Ingress:
- Confirm that silicone wire seals are properly installed and seated.
- Ensure the connector halves are fully engaged and the secondary lock is closed.
- Inspect the connector housing for any damage that could compromise the seal.
- Løs forbindelse:
- Ensure the locking tabs on the connector housings are fully engaged.
- Check for any foreign objects preventing full engagement.
7. Specifikationer
| Feature | Detalje |
|---|---|
| Modelnavn | MSD 8173 Weathertight 2-Pin Connector |
| Varenummer | MSD-8173 |
| Materiale | Plast |
| Farve | No Color (typically black with green/red seals) |
| Temperaturområde | Negative 40 to 257 degrees Fahrenheit |
| Forsegling | Self-lubricating silicone seals, weathertight |
| Låsemekanisme | Positive locks with click, indexed to prevent mismatch |
| Varens vægt | 0.5 pund |
| Emnedimensioner (LxBxH) | 7.9 x 6.1 x 1.3 tommer |
8. Garantioplysninger
This product is covered by a manufacturer's warranty. For specific details regarding warranty coverage, terms, and conditions, please refer to the documentation included with your purchase or contact MSD customer support directly. Keep your proof of purchase for warranty claims.
9. Kundesupport
For technical assistance, installation questions, or any other inquiries regarding your MSD 8173 Weathertight Connector, please contact MSD customer support. Contact information can typically be found on the product packaging or the official MSD webwebsted.


