1. Introduktion
The Werner MT-13 Telescoping Multi-Ladder is a versatile and professional-grade ladder designed for a variety of tasks. Its unique design allows it to be easily transformed into multiple configurations, including a twin stepladder, extension ladder, stairway stepladder, or two scaffold bases. Constructed from durable aluminum with double-riveted steps and heavy-duty non-marring feet, this ladder offers stability and safety for both indoor and outdoor applications. This manual provides essential information for the safe and effective use, setup, and maintenance of your MT-13 Multi-Ladder.

Figure 1: The Werner MT-13 Multi-Ladder in its A-frame stepladder configuration.
2. Sikkerhedsoplysninger
ADVARSEL: Manglende overholdelse af disse sikkerhedsinstruktioner kan resultere i alvorlig personskade eller død.
- Always read and understand the entire instruction manual before using the ladder.
- Inspect the ladder before each use. Ensure all parts are in good working order, including hinges, locks, and feet. Do not use if damaged.
- Ensure the ladder is placed on a firm, level, and non-slippery surface. The heavy-duty non-marring feet are designed for slip resistance.
- Maintain a 3-point contact (two hands and one foot, or one hand and two feet) with the ladder at all times when climbing or descending.
- Do not overload the ladder. The MT-13 has a 300-pound duty rating. When used as a twin stepladder, it supports 300 pounds per side (including person and materials).
- Ræk ikke for langt. Hold din krop centreret mellem sidegelænderne.
- Ensure all locking mechanisms (push-knob hinges and spring-loaded J-locks) are fully engaged before use.
- Undgå at bruge stigen i blæsende forhold eller i nærheden af elektriske ledninger.
- Do not stand on the top cap or the highest step not designated for standing.
- The extra-wide flared bottom provides firm support, but always ensure proper setup for maximum stability.
3. Opsætning og konfiguration
The Werner MT-13 Multi-Ladder can be configured into several useful positions. Always ensure the ladder is on a stable surface before attempting any configuration changes.
3.1. A-Frame Stepladder Configuration
To set up as an A-frame stepladder, unfold the ladder until both sections form an 'A' shape. Ensure the push-knob hinges at the top are fully locked. The inner sections can be adjusted for height using the spring-loaded J-locks.

Figure 2: Compact A-frame stepladder setup.

Figure 3: Detail of the double-riveted steps and non-marring feet, ensuring stability.
3.2. Extension Ladder Configuration
To convert to an extension ladder, fully extend one side of the A-frame and then the other, ensuring the top hinges are straight and locked. Adjust the height by disengaging the spring-loaded J-locks, telescoping the sections to the desired length (in one-foot increments), and then re-engaging the J-hooks. Always ensure the ladder is at the correct angle (approximately 75 degrees from the ground) for stability.

Figure 4: The MT-13 configured as an extension ladder.
3.3. Stairway Stepladder Configuration
For use on stairs or uneven surfaces, the ladder can be set up as a stairway stepladder. This involves adjusting the length of each side independently using the J-locks to accommodate the height difference. Ensure both sections are stable and locked before use.

Figure 5: Stairway stepladder setup for uneven surfaces.
3.4. Scaffold Bases Configuration
The MT-13 can also be separated into two individual scaffold bases. This requires detaching the two halves of the ladder. These bases can then be used with a plank (not included) to create a stable work platform. Refer to the detailed instructions for this specific setup to ensure proper and safe assembly.
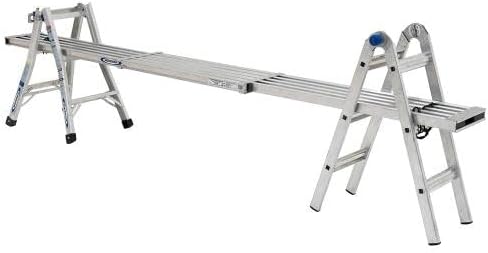
Figure 6: The MT-13 used as scaffold bases with a plank (plank not included).
4. Betjening
Once the Werner MT-13 Multi-Ladder is correctly configured and all locking mechanisms are engaged, it is ready for use. Always ensure the ladder is stable before climbing.
- Klatring og nedstigning: Always face the ladder when climbing or descending. Use both hands to grip the side rails or rungs.
- Working on the Ladder: Keep your belt buckle (center of gravity) between the side rails. Avoid leaning too far to one side. For tasks requiring extended reach, consider using the scaffold configuration with a plank for a wider, more stable platform.
- Belastningskapacitet: Remember the 300-pound duty rating. This includes your weight, tools, and materials. When used as a twin stepladder, each side can support 300 pounds, allowing for two users if necessary, provided the total load on each side does not exceed the limit.
- Justering af højde: Height adjustments are made easy with the spring-loaded J-locks. Simply disengage the J-locks on either side, telescope the section out to the desired length (in one-foot increments), and then re-engage the J-hooks. Always ensure both sides are adjusted equally in A-frame or extension modes unless specifically setting up for stairs.
5. Vedligeholdelse
Proper maintenance will extend the life and ensure the safe operation of your Werner MT-13 Multi-Ladder.
- Rensning: Rengør stigen regelmæssigt medamp cloth to remove dirt, grease, or other debris. Avoid harsh chemicals that could damage the aluminum finish.
- Inspektion: Before each use, visually inspect the ladder for any signs of damage, wear, or loose components. Check:
- All rivets and connections for tightness.
- The condition of the double-riveted steps.
- The integrity of the heavy-duty non-marring feet for wear or damage.
- The smooth operation and locking of the push-knob hinges and spring-loaded J-locks.
- The condition of the side rails for dents, bends, or cracks.
- Smøring: If the spring-loaded J-locks or hinges become stiff, a light lubricant (e.g., silicone spray or WD-40) can be applied to the moving parts. Wipe off any excess.
- Opbevaring: Store the ladder in a dry, protected area away from extreme temperatures and direct sunlight. Store it in its most compact form to save space.
- Reparationer: Do not attempt to repair damaged parts yourself. Contact Werner customer support or a qualified service center for professional repairs.
6. Fejlfinding
This section addresses common issues you might encounter with your Werner MT-13 Multi-Ladder.
| Problem | Mulig årsag | Løsning |
|---|---|---|
| Ladder feels unstable or wobbly. | Not fully extended/locked; uneven surface; damaged feet. | Ensure all locking mechanisms are fully engaged. Place on a firm, level surface. Inspect feet for wear and replace if necessary. |
| J-locks or hinges are stiff/difficult to operate. | Accumulation of dirt/debris; lack of lubrication. | Clean the mechanisms thoroughly. Apply a light lubricant (e.g., silicone spray) to moving parts. |
| Ladder sections do not slide smoothly. | Dirt/debris in channels; minor deformation. | Clean the inner and outer channels. If there's a deformation, do not force it; contact customer support. |
| Ladder appears damaged (bends, cracks, broken parts). | Impact; excessive load; manufacturing defect. | DO NOT USE. Contact Werner customer support immediately. |
7. Specifikationer
| Feature | Detalje |
|---|---|
| Modelnummer | MT-13 |
| Materiale | Aluminium |
| Belastningskapacitet | 300 Pounds (Type 1A Duty Rating) |
| Maksimal højde | 156 tommer (13 fod) |
| Varens vægt | 28 pund |
| Produktdimensioner (foldet) | 48"W x 8"H (Note: This seems to be a partial dimension, likely for storage or a specific configuration. Users should refer to full product dimensions for all configurations.) |
| Antal trin | 13 |
| Særlige funktioner | Heavy Duty, Telescoping, Multi-position (Stepladder, Extension, Stairway, Scaffold) |
| UPC | 051751065084 |
8. Garanti og support
8.1. Garantioplysninger
Werner MT-13 teleskopstigen leveres med en Livstidsgaranti against materials and workmanship. This warranty covers defects in materials and manufacturing under normal use and service. Please retain your proof of purchase for warranty claims.
8.2. Kundesupport
For any questions, technical assistance, or warranty claims, please contact Werner customer support. Refer to the official Werner webwebstedet eller produktemballagen for de mest aktuelle kontaktoplysninger.
Werner Webwebsted: www.wernerco.com


