Indledning
The SeaLife SL545 SportDiver II is a compact 35mm camera designed for both underwater and land use. Its robust Lexan housing allows for operation at depths up to 164 feet (50 meters), making it an ideal companion for diving, snorkeling, and other water sports. The camera features a fully automatic 35mm system with a built-in flash, ensuring ease of use in various lighting conditions.
This manual provides essential information for setting up, operating, maintaining, and troubleshooting your SportDiver II camera to ensure optimal performance and longevity.

Figure 1: SeaLife SL545 SportDiver II Camera with Housing
This image shows the complete SeaLife SL545 SportDiver II camera, encased in its transparent Lexan underwater housing. A black wrist strap is attached, indicating its readiness for aquatic use.
Opsætning
1. Udpakning og komponenter
Your SeaLife SportDiver II camera system consists of two primary components: the compact 35mm inner camera and the durable, transparent Lexan waterproof housing.
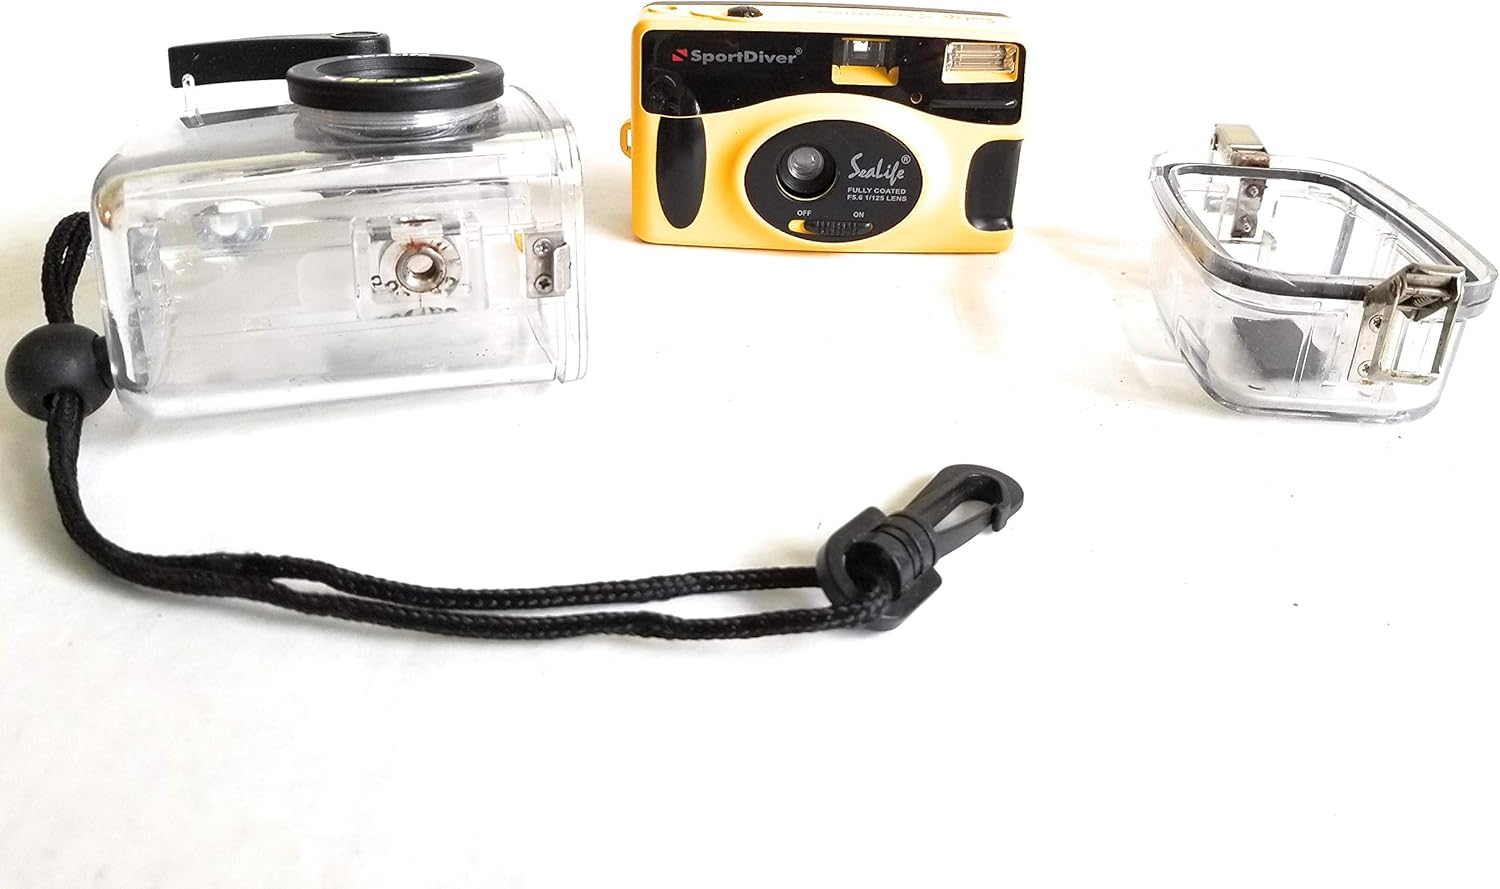
Figure 2: SportDiver II Components
This image displays the SeaLife SportDiver II system disassembled, showing the yellow inner 35mm camera, the clear front section of the Lexan housing, and the clear back section of the housing, along with the attached wrist strap.
2. Ilægning af film
- Remove the inner 35mm camera from the Lexan housing.
- Open the camera back by sliding the latch on the side.
- Insert a 35mm film canister into the film chamber, ensuring the film leader is aligned with the take-up spool.
- Gently pull the film leader across to the take-up spool and ensure it catches.
- Luk kameraet helt tilbage, indtil det klikker sikkert på plads.
- Advance the film by pressing the shutter button and winding the film advance wheel until the frame counter shows '1'.
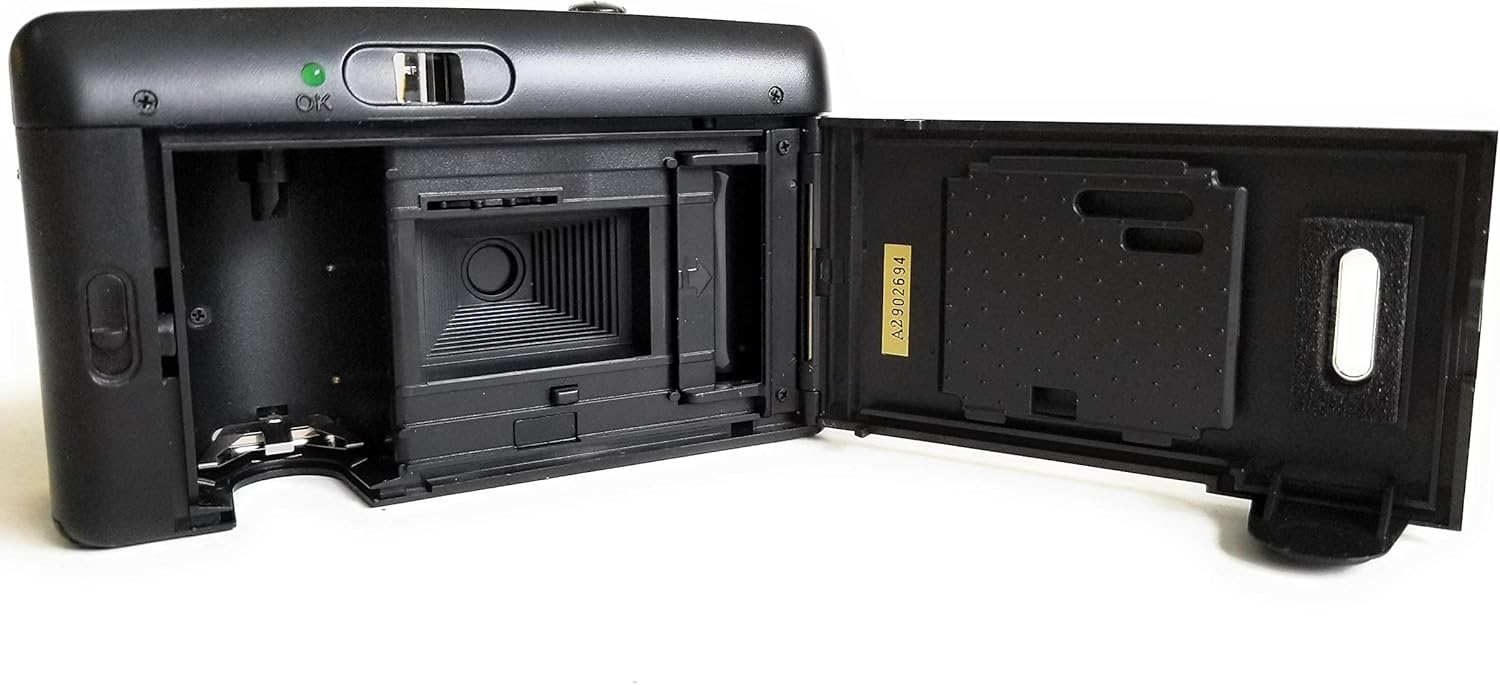
Figure 3: Inner Camera Film Compartment
Dette billede giver en view of the inner 35mm camera with its back cover open, revealing the film loading compartment and the take-up spool.
3. Inserting Camera into Housing
- Ensure the inner camera is clean and dry.
- Carefully place the inner camera into the front section of the Lexan housing, aligning the lens and controls.
- Close the back section of the housing, ensuring the rubber O-ring seal is clean and properly seated.
- Secure the housing latches firmly. Perform a dry test (without the camera inside) in shallow water if you are unsure about the seal integrity.
Betjeningsvejledning
1. Tænd/sluk
The inner camera has an ON/OFF switch located near the lens. Ensure the camera is switched to 'ON' before placing it into the housing for underwater use. The camera cannot be turned on or off once sealed inside the housing.

Figure 4: Inner Camera Front View
This image shows the front of the yellow inner 35mm camera, highlighting the lens and the ON/OFF switch located below it.
2. Optagelse af billeder
The SportDiver II features a large "Push Here" shutter-release lever on the housing, designed for easy activation even when wearing gloves. Simply press this lever to take a photograph.

Figure 5: Housing Lens Detail
Et nærbillede view of the SeaLife SportDiver II camera's lens area within its clear housing, showing the 'SportDiver' branding around the lens port.
3. Built-in Flash
The camera has a built-in flash that operates automatically in low-light conditions. No manual flash control is required.
4. Film frem- og tilbagespoling
After each shot, the camera automatically advances the film to the next frame. Once the roll is complete, the camera will automatically rewind the film back into the canister. Do not open the camera back until the film has been fully rewound.
Opretholdelse
1. Rengøring af huset
After each use, especially after saltwater exposure, rinse the Lexan housing thoroughly with fresh water. Pay close attention to the O-ring seal area. Use a soft cloth to wipe away any debris. Do not use abrasive cleaners.
2. O-Ring Care
The O-ring is crucial for maintaining the waterproof seal. Regularly inspect the O-ring for any signs of damage, cracks, or embedded debris. Keep it clean and lightly lubricated with silicone grease (not petroleum jelly) to ensure a proper seal. Replace the O-ring if any damage is observed.
3. Opbevaring
Store the camera and housing in a cool, dry place away from direct sunlight. It is recommended to store the housing with the latches open to prevent compression of the O-ring over long periods, which can lead to seal failure.
Fejlfinding
- Blurred Pictures: Ensure the lens is clean and free of smudges. For underwater shots, maintain proper distance from subjects. The camera has a fixed focus lens, typically optimized for subjects a few feet away.
- Film Not Advancing/Rewinding: Check that the film is loaded correctly and the camera back is securely closed. If the issue persists, the camera mechanism may require professional inspection.
- No Pictures Taken: Verify the inner camera is switched 'ON' before sealing it in the housing. Ensure the film is properly loaded and has not reached its end.
- Vandlækage: Immediately remove the camera from the water. Inspect the O-ring for dirt, hair, or damage. Ensure the housing latches are fully secured. A damaged O-ring must be replaced before further underwater use.
- Dark Underwater Photos: The built-in flash has a limited range. For best results, photograph subjects within 3-8 feet (1-2.5 meters) of the camera. Consider external lighting accessories for deeper or darker conditions (if compatible with SeaLife accessories).
Specifikationer
| Feature | Detalje |
|---|---|
| Modelnavn | Sport Diver Camera |
| Varemodelnummer | SL545 |
| Filmformattype | 35 mm |
| Speciel funktion | Vandtæt |
| Eksponeringskontroltype | Automatisk |
| Min lukkerhastighed | 1/125 |
| Produktdimensioner | 8.7 x 6.3 x 3.1 tommer |
| Varens vægt | 1.4 pund |
| Fabrikant | Hav liv |
Garanti og support
Warranty information for your SeaLife SL545 SportDiver II camera is typically provided with the product packaging at the time of purchase. Please refer to the documentation included in your original box for specific warranty terms and conditions.
For technical support, service, or to inquire about compatible accessories, please visit the official SeaLife webwebstedet eller kontakt deres kundeserviceafdeling direkte. Kontaktoplysninger kan normalt findes på producentens webwebstedet eller i den originale produktdokumentation.


