1. Vigtige sikkerhedsforanstaltninger
Please read all instructions carefully before using your Acekool Espresso Machine. Keep this manual for future reference.
- Ensure the appliance is placed on a stable, level surface away from water sources.
- Apparatet, netledningen eller stikket må ikke nedsænkes i vand eller andre væsker.
- Tag stikket ud af stikkontakten, når den ikke er i brug, og før rengøring. Lad den køle af, før du tilføjer eller fjerner dele.
- Betjen ikke noget apparat med en beskadiget ledning eller stik, eller efter at apparatet ikke fungerer korrekt eller er blevet beskadiget på nogen måde.
- Tæt opsyn er nødvendigt, når et apparat bruges af eller i nærheden af børn.
- Brug kun tilbehør anbefalet af producenten.
- Undgå kontakt med bevægelige dele.
- Må ikke bruges udendørs.
- Sørg altid for, at vandtanken er fyldt til det rette niveau før brug.
- Vær forsigtig ved håndtering af varme overflader og damp.
2. Produktet er slutview
The Acekool Espresso Machine is designed to provide a professional coffee experience at home or in the office. It features a 20-bar Italian pump, a built-in grinder with 30 adjustable settings, and a powerful steam wand for milk frothing.
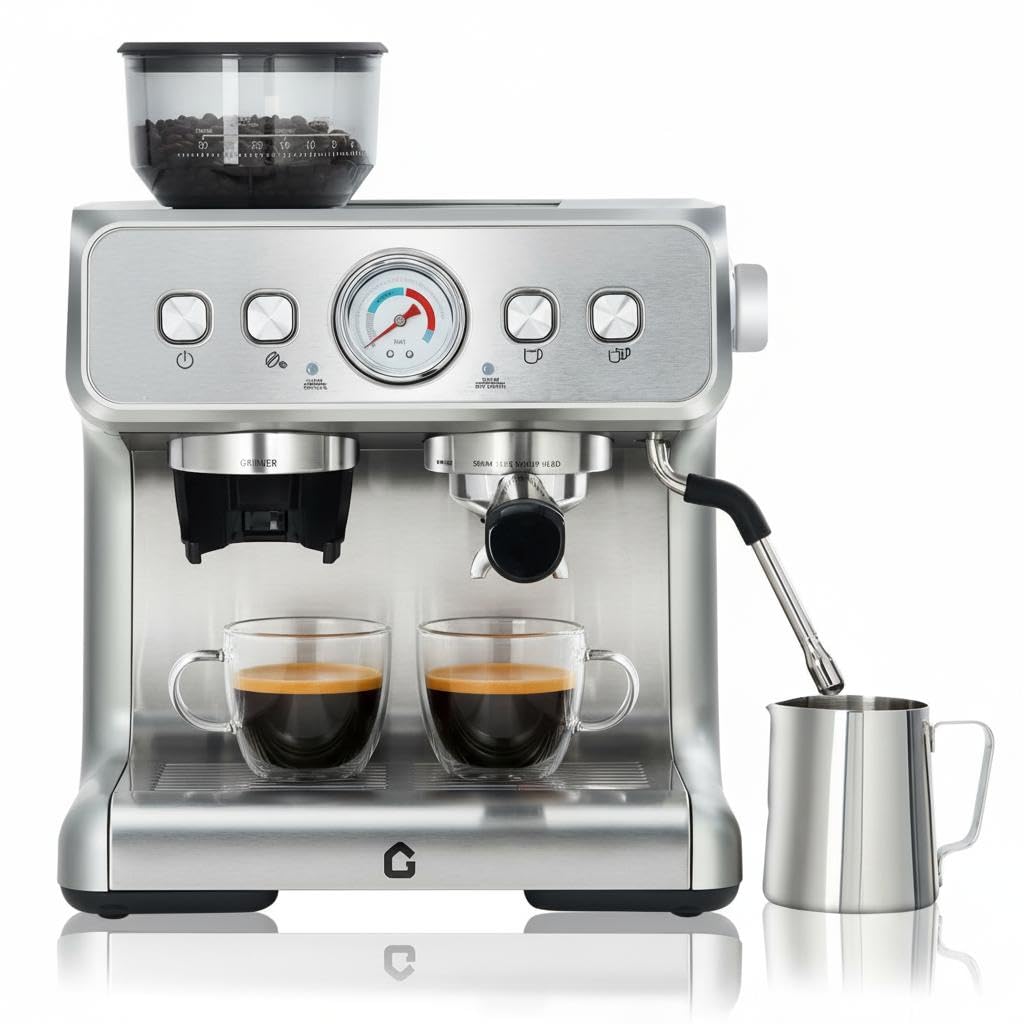
Front view of the Acekool Espresso Machine, showcasing its sleek design and a pressure gauge indicating 20 Bar high pressure extraction.
Nøglefunktioner:
- 20-Bar Professional Pump: Delivers optimal pressure for rich espresso with perfect crema.
- Indbygget kværn: Features 30 adjustable settings for fresh grounds directly into the portafilter.
- 1450W Powerful Steam System: Creates silky and dense milk foam for lattes and cappuccinos.
- Customizable Coffee Experience: Adjust grind coarseness and shot volume for personalized brews.
- Removable Water Tank (0.74 Gallon / 2.8 Liters): Nem at fylde og rengøre.
- Aftagelig drypbakke: Forenkler rengøring og vedligeholdelse.
- Automatisk rengøringsfunktion: For praktisk vedligeholdelse.
Inkluderede komponenter:

Image showing all components included with the Acekool Espresso Machine, such as the portafilter, filter baskets, tamper, milk jug, and cleaning brush.
- Pressure Funnel
- Single Cup Filter Screen
- Double Cup Filter Screen
- Rustfrit stål mælkekande
- Tamper
- Organizer boks
- Brewing Head Cleaning Brush
- Instruktionsmanual (dette dokument)
3. Opsætning
Follow these steps for initial setup of your espresso machine.

Visual guide for the initial setup process, including adding water, coffee beans, adjusting grind, and starting the preheating cycle.
- Udpakning: Fjern forsigtigt al emballage, og placer maskinen på en stabil, flad og varmebestandig overflade.
- Vandtank: Remove the 0.74 Gallon (2.8 Liters) water tank from the back of the machine. Fill it with fresh, cold water up to the MAX line. Replace the tank securely.
- Strømtilslutning: Sæt netledningen i en jordet stikkontakt.
- Forvarmning: Press the power button to turn on the machine. The machine will begin to preheat. Wait until the indicator lights signal that the machine has reached the optimal temperature.
- Indledende skylning: Before first use, run a few cycles of hot water through the brewing head and steam wand without coffee to clean the internal components.
- Opsætning af kværn: Open the lid of the bean hopper and fill it with fresh whole coffee beans. Ensure the lid is securely closed.
4. Betjeningsvejledning
4.1 Maling af kaffe

Illustration of the 30 grind settings available on the built-in grinder, ranging from coarse to fine, with recommendations for extraction speed.
- The machine features a built-in conical burr grinder with 30 adjustable settings.
- Rotate the grind size selector dial to choose your desired fineness. Finer settings (lower numbers) are for espresso, while coarser settings (higher numbers) are suitable for pour-over or French press.
- Place the portafilter under the grinder chute. Press the grind button to dispense fresh grounds directly into the portafilter.
- Brug den medfølgende tampfor at komprimere kaffegrumsen jævnt.
4.2 Espresso-ekstraktion

Diagram illustrating the benefits of 20 Bar extraction and pre-infusion for optimal coffee flavor and complete extraction.
- Insert the prepared portafilter into the brewing head and lock it into place.
- Placer din(e) espressokop(per) på drypbakken under portafilterets tuder.
- Select your desired shot volume (single or double) using the control panel. The machine will automatically perform a pre-infusion cycle, followed by 20-bar pressure extraction.
- The built-in pressure gauge will display the extraction pressure during the process. Aim for the optimal pressure range for best results.
4.3 Steam Wand Operation (Milk Frothing)

Image demonstrating the 1400W powerful steam system, showing the steam wand in action and options for hot water and adjustable steam.
- Fyld mælkekanden i rustfrit stål med kold mælk (med eller uden mælk).
- Turn the steam knob to activate the steam function. Wait for the steam indicator light to illuminate, indicating the steam is ready.
- Submerge the steam wand tip just below the surface of the milk. Open the steam valve to release steam.
- Move the jug up and down gently to create microfoam. Once desired texture and temperature are reached, close the steam valve.
- Tør straks dampdysen af med en damppistol.amp klud for at forhindre mælkerester i at tørre ind.
4.4 Varmtvandsfunktion
- The machine can dispense hot water for tea or Americanos.
- Refer to your machine's control panel for the specific hot water button or setting.
5. Vedligeholdelse
Regelmæssig rengøring og vedligeholdelse sikrer optimal ydeevne og levetid for din espressomaskine.

Image highlighting the removable water tank and drip tray for easy cleaning, along with descaling instructions.
5.1 Daglig rengøring
- Drypbakke: Empty and clean the removable drip tray daily. Wash with warm, soapy water and rinse thoroughly.
- Portafilter og filterkurve: Fjern brugt kaffegrums efter hver brug, og skyl filterholderen og filterkurvene under varmt vand.
- Dampstang: Tør altid dampdysen af umiddelbart efter opskumning af mælk medamp cloth. Purge the wand briefly to clear any internal milk residue.
- Ydre: Tør maskinens ydre af med en blød, damp klæde. Brug ikke slibende rengøringsmidler.
5.2 Rengøring af vandtank
- Remove the water tank and wash it with mild detergent and warm water. Rinse thoroughly to remove any soap residue.
- Refill with fresh, cold water.
5.3 Afkalkning
- Descaling is essential to remove mineral buildup and should be performed regularly (e.g., every 2-3 months, depending on water hardness).
- Brug en kommerciel afkalkningsopløsning, der er specielt designet til espressomaskiner, i henhold til producentens anvisninger.
- Alternativt kan en opløsning af hvid eddike og vand (forholdet 1:1) anvendes.
- Run the descaling solution through the machine's brewing head and steam wand.
- After descaling, run several cycles of fresh water through the machine to rinse thoroughly.
5.4 Rengøring af kværn
- Periodically clean the grinder burrs to prevent oil buildup and ensure consistent grinding.
- Refer to the machine's specific instructions for removing and cleaning the grinder burrs. Use the provided cleaning brush to remove coffee grounds.
6. Fejlfinding
If you encounter issues with your Acekool Espresso Machine, refer to the following common problems and solutions.
| Problem | Mulig årsag | Løsning |
|---|---|---|
| Ingen kaffeudløb | Water tank empty; Clogged filter; Machine not preheated | Fyld vandtanken; Rengør filterkurven; Lad maskinen forvarme helt |
| Svag espresso / For hurtig ekstraktion | Kaffegrums for grov; Ikke nok kaffe; Utilstrækkeligamping | Adjust grinder to a finer setting; Increase coffee dose; Tamp mere fast |
| Bitter espresso / Too slow extraction | Coffee grounds too fine; Too much coffee; Over-tamping | Adjust grinder to a coarser setting; Reduce coffee dose; Tamp with less force |
| Ingen damp fra stangen | Steam wand clogged; Machine not at steam temperature | Clean steam wand hole; Wait for steam indicator light |
| Vandlækage fra maskinen | Vandtanken er ikke sat korrekt i; Drypbakken er fuld; Problem med pakningen | Ensure water tank is properly inserted; Empty drip tray; Contact customer support if issue persists |
If the problem persists after attempting these solutions, please contact Acekool customer support.
7. Specifikationer
Detailed technical specifications for the Acekool Espresso Machine.
| Feature | Detalje |
|---|---|
| Mærke | Acekool |
| Modelnavn | 8414234206350 |
| Varemodelnummer | ZlzuMUw6KjChKeiuzu5nOQ7vaG4X |
| Farve | Sølv |
| Produktmål (D x B x H) | 15.67 cm x 16.61 cm x 18.86 cm |
| Varens vægt | 25.4 pund |
| Kapacitet | 2.8 liter (vandtank) |
| Pumpetryk | 20 Bar |
| Magt | 1450W |
| Speciel funktion | Auto Clean Function, Built-in Grinder, Steam Wand |
| Inkluderede komponenter | Milk Frother (Stainless Steel Milk Jug) |
| UPC | 820567835323 |
| GTIN | 820567835323 |
8. Garanti og support
Your Acekool Espresso Machine is built for reliable performance and comes with comprehensive support.
- Garanti: This product is covered by a 1-year limited warranty from the date of purchase.
- Teknisk support: Acekool provides lifetime technical support for this product.
- Certificeringer: The machine is ETL-certified, ensuring it meets recognized safety standards.
- Kontakt support: For warranty claims, technical assistance, or any questions regarding your machine, please visit the official Acekool Store or contact their customer service directly. You can find more information at Acekool Store on Amazon.