
Indledning
The Xvive AT-2 Pro is a compact, multi-functional audio testing device designed for audio professionals and enthusiasts. It integrates five essential tools: a signal generator, an XLR cable tester, a 48V phantom power checker, an XLR input meter, and a headphone/built-in speaker monitor. This manual provides instructions for the proper use and maintenance of your AT-2 Pro to ensure optimal performance and longevity.

Image: The Xvive AT-2 Pro highlighting its five core functions.
Sikkerhedsoplysninger
- Udsæt ikke enheden for vand eller overdreven fugt.
- Undgå ekstreme temperaturer.
- Forsøg ikke at skille enheden ad eller ændre den. Overlad al service til kvalificeret personale.
- Use only the specified USB-C cable for charging.
- Opbevares utilgængeligt for børn.
Pakkens indhold
Bekræft at alle varer er til stede i din pakke:
- Xvive AT-2 Pro Audio Tester Unit
- USB-C ladekabel
- Jack adapter
- Beskyttende pose

Image: Contents of the Xvive AT-2 Pro package.
Produkt overviewBetjening og funktioner
Familiarize yourself with the various inputs, outputs, and controls on your AT-2 Pro.
Billede: Detaljeret view of the AT-2 Pro's control panel.
- XLR Input/Output: Standard 3-pin XLR connectors for cable testing, signal generation, and input metering.
- 1/4" Jack Input/Output: For connecting to various audio equipment.
- 1/8" hovedtelefonudgang: Til overvågning af lyd.
- Lydstyrkeknap: Adjusts headphone and built-in speaker volume.
- Signal Generator Buttons: Select 1kHz Tone or Pink Noise.
- Output Pad Switches: Adjust output level (-10dB, -20dB, -40dB).
- XLR Cable Test Button: Initiates XLR cable pin-by-pin test.
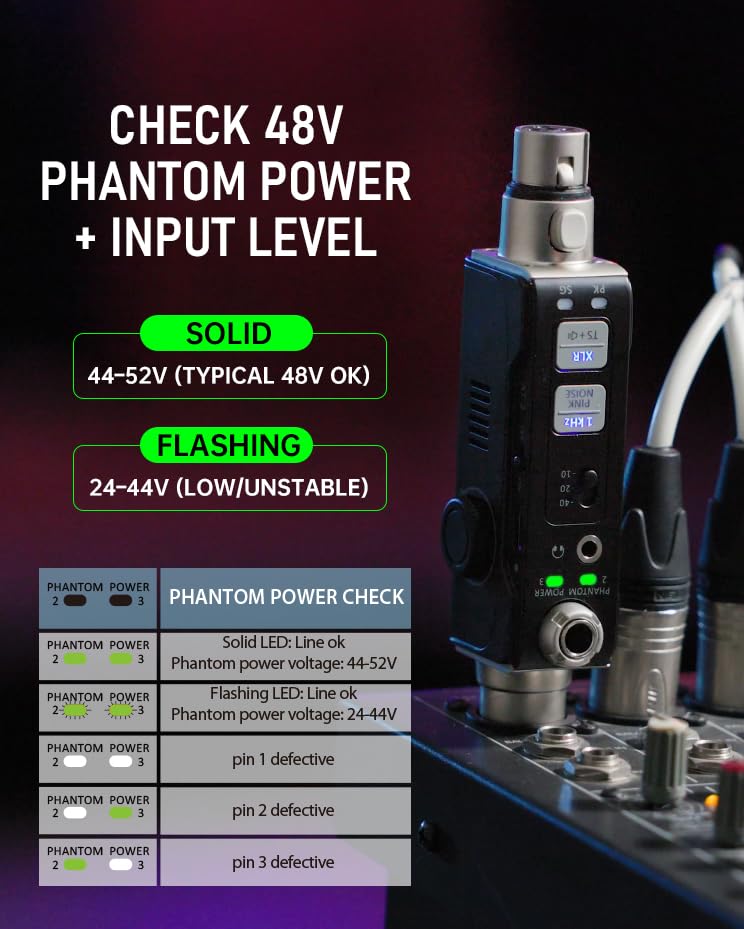
- Phantom Power Check LEDs: Indicate 48V phantom power status.
- Input Level Meter LEDs: Display signal presence (SG) and peak levels (PK).
- USB-C-port: Til opladning af det interne batteri.
Opsætning og opladning
Indledende opladning
Before first use, fully charge the AT-2 Pro using the provided USB-C cable. Connect the cable to the USB-C port on the device and to a standard USB power adapter (not included). The charging indicator will show progress and turn off when fully charged (approximately 1.5 hours).
Tænd/sluk
Press and hold the power button to turn the device on or off. The display will illuminate upon activation.
Driftstilstande
1. Signal Generator (1kHz Tone & Pink Noise)
The signal generator provides a clean test signal for various audio equipment.
- Connect the AT-2 Pro to the input of the device you wish to test (e.g., mixer, DI box, active speaker) using an XLR or 1/4" cable.
- Tryk på 1kHz tone or Pink Støj button to select the desired signal.
- Adjust the output level using the -10/-20/-40 dB pad switches to match the input sensitivity of the connected equipment.
- Monitor the signal through the connected equipment or via the AT-2 Pro's headphone output/built-in speaker.

Image: Signal Generator function in use.


2. XLR Cable Tester (Pin-by-Pin)
Test XLR cables for continuity and correct wiring.
- Connect both ends of the XLR cable to the AT-2 Pro's XLR input and output ports.
- Tryk på XLR Cable Test button. The device will automatically cycle through pins 1, 2, and 3, indicating their status.
- Alternatively, you can manually select pins to test by repeatedly pressing the button.
- Green LEDs indicate a good connection for each pin. Red LEDs or no illumination indicate a fault.

Image: XLR Cable Tester in action, showing pin status.
3. 48V Phantom Power Check + XLR Input Metering
Verify phantom power supply and monitor input signal levels.
- Connect the AT-2 Pro to an XLR input that is expected to provide phantom power.
- De Phantom Power Check LEDs will indicate the voltage: a solid light for 44-52V (typical 48V OK) and a flashing light for 24-44V (low/unstable).
- De XLR Input Meter LEDs (SG for Signal, PK for Peak) will illuminate to show signal presence and warn of very hot levels.

Image: Phantom Power Check and Input Level Meter.
4. Headphone/Built-in Speaker Monitoring
Listen to incoming audio signals directly from the device.
- Connect headphones to the 1/8" headphone output jack or use the built-in speaker.
- Adjust the volume using the dedicated volume knob.
- This feature allows for quick verification of audio signals at any point in your signal chain.

Image: Headphone Monitoring feature.
Fejlfinding
Common issues and solutions for the Xvive AT-2 Pro.
| Problem | Mulig årsag | Løsning |
|---|---|---|
| Ingen strøm | Low battery; device off | Charge the unit; press and hold power button to turn on. |
| No signal from generator | Incorrect output pad setting; incorrect cable connection | Adjust output pad; ensure cables are securely connected. |
| XLR cable test fails | Faulty cable; improper connection | Ensure cable is fully inserted; replace cable if necessary. |
| No phantom power detected | Source not providing 48V; faulty source | Verify phantom power is enabled on the source; test with another source. |
| No audio from headphone/speaker | Volume too low; no input signal | Increase volume; ensure an audio signal is present at the input. |
Specifikationer
- Model: AT-2 PRO
- Funktioner: Signal Generator (1kHz Tone, Pink Noise), XLR Cable Tester, 48V Phantom Power Checker, XLR Input Meter, Headphone/Built-in Speaker Monitor
- Output Pad Levels: -10dB, -20dB, -40dB
- Phantom Power Detection: Solid LED (44-52V), Flashing LED (24-44V)
- Batteri: Rechargeable Nonstandard Battery (included)
- Opladning: USB-C, approx. 1.5 hours for full charge
- Dimensioner: 8.19 x 4.29 x 2.6 tommer (ca.)
- Vægt: 5.3 g (omtrentlig)
Officiel produktvideo
Video: En officiel overview of the Xvive AT-2 Pro Audio Tester, demonstrating its 5-in-1 signal generator, XLR cable tester, and other features.
Garanti og support
The Xvive AT-2 Pro Audio Tester comes with a limited manufacturer's warranty. For detailed warranty information, technical support, or service inquiries, please refer to the official Xvive webwebstedet eller kontakt deres kundesupport direkte. Gem din købskvittering som købsbevis i tilfælde af garantikrav.
For yderligere hjælp, besøg venligst Xvive Store on Amazon.