Indledning
The Breville Oracle Jet Espresso Machine is designed to provide a professional-level coffee experience at home. This machine integrates automatic grinding, dosing, and tamping, along with precise temperature control and hands-free milk frothing, to simplify the process of crafting specialty coffee beverages.
Nøglefunktioner omfatter:
- 4 Keys Formula: Designed to use the right dose of freshly ground beans, ensure precise temperature control, optimal water pressure, and create true microfoam milk.
- Swipe and Select: Responsive touchscreen with pre-programmed café favorites, including Cold Brew and Cold Espresso.
- Baratza European Precision Burrs: Fully-integrated grinder with 45 grind settings for auto grind, dose, and tamp.
- Auto MilQ™: Hands-free milk frothing with adjustable temperatures (104°F to 167°F) and 8 texture levels, optimized for various milk types.
- ThermoJet® Heating System: Provides fast heat-up and is up to 32% more energy efficient.
- Professional Level Temperature Control: Heated group head customizable in +/- 1 degree increments.
- Barista Guidance: Automatically detects over or under-extracted shots and recommends grind size adjustments.
- Auto Queue: Seamlessly initiates automatic steaming or espresso extraction.
- 58 mm Stainless Steel Portafilter: Delivers an ideal dose of 22g of freshly ground beans.
Opsætning
1. Udpakning og placering
Carefully remove all components from the packaging. Place the machine on a flat, stable surface. Ensure adequate clearance around the machine for operation and maintenance.
2. Fyldning af vandtanken
The water tank can be filled from the top front or by removing the tank from the back of the machine. Ensure the water filter is correctly installed.
Video: Filling the water tank from the front access point. The video shows water being poured into the front opening of the machine, which then flows into the visible water tank at the back, indicating the water level with a 'MAX' line.
Video: Removing and filling the water tank from the back. The video demonstrates pulling out the water tank from the rear of the machine for refilling, highlighting the water filter's location.
3. Fyldning af bønnebeholderen
Open the lid of the bean hopper located at the top of the machine. Pour fresh coffee beans into the hopper. The hopper features an easy quarter-turn switch for removal, even when full, for cleaning.
Video: Filling the bean hopper with coffee beans. The video shows coffee beans being poured into the clear hopper on top of the machine, which has a quarter-turn lid for easy access.
4. Første opstart
Press the power button. The touchscreen will guide you through initial setup steps. You can adjust the grind size using the manual dial on the side, with real-time feedback on the LCD screen.
Video: Adjusting grind size with manual dial and LCD feedback. The video shows a hand turning the grind size dial on the side of the machine, and the touchscreen display updates the grind setting in real-time.
Betjeningsvejledning
1. Fremstilling af espresso
Select 'Espresso' from the touchscreen menu. The machine will automatically grind, dose, and tamp the coffee into the 58 mm portafilter. You can choose between single or double shots.

Image: Automatic grind and dose with Baratza European Precision Burrs. This image shows the portafilter filled with freshly ground coffee, ready for tamping.

Image: Professional 58 mm stainless steel portafilter for a full bodied 22g dose. A close-up of the portafilter with tamped coffee grounds, highlighting the precision of the dose.
Video: Espresso extraction process. The video shows espresso being extracted from the portafilter into two small glasses, demonstrating the machine's brewing capability.
2. Automatic Milk Frothing (Auto MilQ™)
Place the milk jug under the steam wand. Select your desired milk type (dairy, soy, almond, oat) and adjust temperature and microfoam levels on the touchscreen. The Auto MilQ™ system will deliver silky microfoam hands-free.

Image: Auto MilQ™ hands-free silky smooth microfoam with settings optimized for dairy, soy, almond and oat. This image shows the steam wand frothing milk in a jug, with icons for different milk types.
Video: Automatic milk frothing process. The video shows the steam wand automatically frothing milk in a jug, demonstrating the Auto MilQ™ feature.
3. Cold Brew & Cold Espresso
The touchscreen offers dedicated options for Cold Brew and Cold Espresso. These settings extract coffee at lower temperatures, reducing acidic notes for a smoother flavor profile.

Image: Simply swipe and select from your specialty café favorites with new Cold Brew and Cold Espresso. The touchscreen displays options for various coffee drinks, including Cold Brew, being selected by a finger.
4. Barista Guidance and Auto Queue
The Barista Guidance feature provides recommendations to achieve a balanced pour by detecting over or under-extracted shots. Auto Queue allows you to seamlessly initiate milk steaming or espresso extraction, saving time.

Image: Barista Guidance recommends adjustments for a more balanced pour after automatically detecting over or under extracted espresso shots. The touchscreen shows a message recommending a grind size adjustment based on the espresso shot.
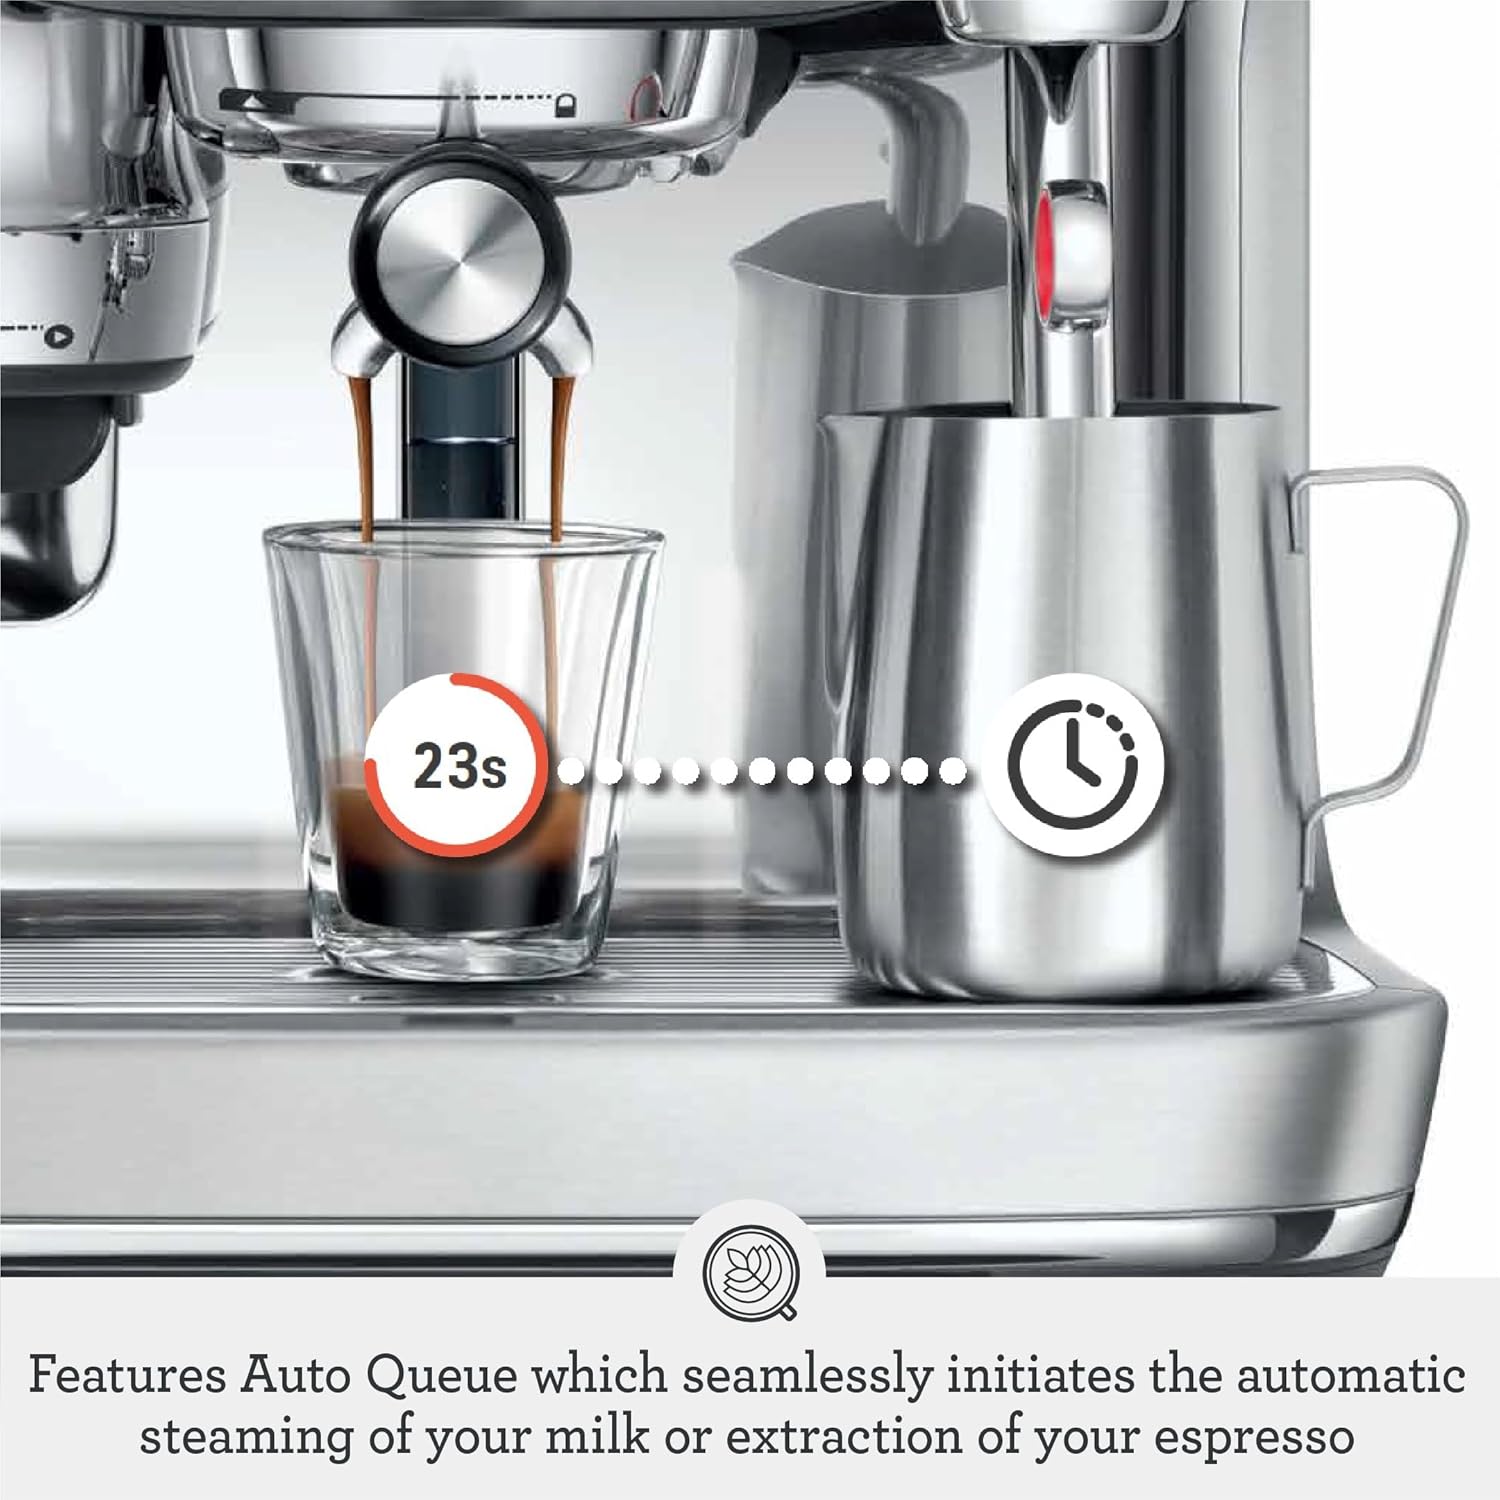
Image: Features Auto Queue which seamlessly initiates the automatic steaming of your milk or extraction of your espresso. The image shows an espresso shot being pulled, with a timer icon indicating the Auto Queue feature.
Opretholdelse
1. Rengøringscyklus
The machine will alert you when a cleaning cycle is required. This involves using a cleaning disc and espresso cleaning tablet or powder. Follow the on-screen instructions for a thorough deep clean.
Video: How to deep clean Breville Espresso machine. The video demonstrates the steps for running a cleaning cycle, including placing a cleaning disc and tablet into the portafilter.
2. Drip Tray and Water Filter
Regularly empty and clean the drip tray. Replace the water filter as indicated by the machine or as per the instruction book to maintain water quality and machine performance.
Fejlfinding
Problemer med firmwareopdatering
Some users have reported issues with core functionality (e.g., tamping) after firmware updates. If you experience unexpected behavior, consider disabling automatic updates or operating the machine without Wi-Fi connectivity to prevent potential software-related disruptions.
Inconsistent Grind Weight
The automatic dosing may sometimes show slight inconsistencies in grind weight, especially with fewer beans in the hopper. Manual adjustment of grind size and dose may be necessary to achieve desired results.
Specifikationer
- Mærke: Breville
- Modelnavn: Breville Oracle Jet Espresso Machine, Black Truffle
- Modelnummer: BES985BTR1BNA1
- Kapacitet: 77 Væske ounces
- Farve: Sort trøffel
- Produktdimensioner: 14.5" D x 15" B x 16.7" H
- Varens vægt: 26.7 pund
- Materiale: Rustfrit stål
- Kaffemaskine type: Espressomaskine
- Driftstilstand: Fuldautomatisk
- Wattage: 1700 watt
- Voltage: 120 volt
- Human Interface Input: Touchskærm
- Filtertype: Genanvendelig
- Inkluderede komponenter: Filter, Knock Box™ 10, Milk Frother
Garanti og support
For warranty information and customer support, please refer to the documentation included with your product or visit the official Breville website. Contact details for consumer support are typically provided in the instruction book.