1. Introduktion
Thank you for choosing the Pisichen 27-inch 4K UHD Touchscreen Monitor with Webcam. This manual provides essential information for the safe and efficient operation of your new monitor. Please read it thoroughly before use and retain it for future reference.
2. Sikkerhedsoplysninger
- Strømkilde: Use only the power adapter supplied with the monitor. Ensure the power outlet meets the voltage krav.
- Ventilation: Bloker ikke ventilationsåbningerne. Sørg for tilstrækkelig plads omkring skærmen for korrekt luftgennemstrømning.
- Væskeeksponering: Keep the monitor away from liquids. Do not expose it to rain or moisture.
- Rensning: Disconnect the power cable before cleaning. Use a soft, dry cloth. Avoid abrasive cleaners.
- Placering: Placer skærmen på en stabil, plan overflade for at forhindre den i at falde.
- Service: Forsøg ikke selv at udføre service på skærmen. Overlad al service til kvalificeret personale.
3. Pakkens indhold
Kontroller venligst pakkens indhold ved udpakning. Hvis der mangler eller er beskadigede dele, skal du kontakte din forhandler.
- Pisichen 27-inch 4K UHD Touchscreen Monitor
- Skærmstativ (base og arm)
- Strømadapter
- HDMI kabel
- USB-B to USB-A Cable (for Touch Function)
- Brugermanual
4. Produktet er slutview
4.1 Nøglefunktioner
- Ultra HD 4K Touchscreen Display: 27-inch 4K Ultra HD screen with vibrant colors, sharp details, and wide viewing angles. Features a responsive 10-point touchscreen for intuitive control.
- Built-in High-Definition Webcam: Integreret webcam for video calls, online meetings, and streaming, reducing desk clutter.
- Alsidig tilslutning: Multiple ports including HDMI, DisplayPort, and USB-C for easy connections to various devices. Supports both touch and traditional input.
- Optimized for Productivity and Creativity: Large 4K touch display for precise control and streamlined workflows, ideal for graphic designers, content creators, and multitasking.
- Sleek and Functional Design: Modern design with an adjustable stand for optimal viewing angles and comfort during extended use.
4.2 Monitorporte
The monitor features various ports for connecting to your devices. Refer to the image below for port identification.

Billede: Bagside view of the monitor displaying the HDMI, DP, Type-C, USB-B Touch, USB-A, Audio, and DC Power ports.
- HDMI-port: Connects to devices via HDMI cable for video and audio input.
- DP-port: Connects to devices via DisplayPort cable for video and audio input.
- Type-C port: Connects to devices via USB-C cable for video, audio, and power delivery. (Requires USB-C port on signal device to support DisplayPort Alternate Mode for touch functionality).
- USB-B Touch Port: Connects to your computer via USB-B to USB-A cable to enable touchscreen functionality.
- USB-A-port (x2): Til tilslutning af USB-enheder.
- Lydport: Til tilslutning af eksterne lydenheder.
- DC strømport: Tilsluttes strømadapteren.
5. Opsætningsvejledning
5.1 Samling af stativet
- Tag forsigtigt skærmens og stativets komponenter ud af emballagen.
- Attach the stand arm to the monitor's VESA mounting points.
- Secure the stand base to the arm using the provided screws.
- Ensure all connections are tight and the monitor is stable.
5.2 Tilslutning til en enhed
The monitor supports various connection types. Choose the appropriate cable for your device.

Image: Connection diagrams illustrating how to connect the monitor as a secondary display (HDMI/DP + DC), a touchscreen monitor (HDMI/DP + USB-B + DC), or via USB-C (USB-C + DC).
- For Video and Audio (Non-Touch): Connect an HDMI or DisplayPort cable from your computer to the corresponding port on the monitor.
- For Video, Audio, and Touch (Windows PC): Connect an HDMI or DisplayPort cable for video/audio. Additionally, connect the USB-B to USB-A cable from the monitor's USB-B Touch Port to a USB-A port on your computer.
- For Video, Audio, and Touch (USB-C Compatible Device): Connect a USB-C cable from your device to the monitor's Type-C port. Ensure your device's USB-C port supports DisplayPort Alternate Mode for touch functionality.
5.3 Strømtilslutning
- Connect the power adapter to the monitor's DC Power Port.
- Sæt strømadapteren i en stikkontakt.
6. Betjeningsvejledning
6.1 Tænd/sluk
Tryk på tænd/sluk-knappen på skærmen for at tænde eller slukke den.
6.2 On-Screen Display (OSD) menu
Use the control buttons (typically located on the back or bottom of the monitor) to navigate the OSD menu. This menu allows you to adjust settings such as brightness, contrast, color temperature, input source, and other display parameters.
6.3 Touchskærmens funktionalitet
The monitor features a 10-point multi-touch screen. Ensure the USB-B to USB-A cable (or USB-C cable for compatible devices) is connected to enable touch functionality.

Image: A user's hand interacting with the monitor screen, highlighting the responsive 10-point touch experience.
- Basic Touch: Tap to click, swipe to scroll.
- Multi-Touch-bevægelser: Use two fingers to zoom in/out, rotate, or pan, depending on the application.
- Touch Calibration (Windows Only): If the cursor does not align with your touch, calibration may be required. Go to Control Panel > Hardware and Sound > Tablet PC Settings > Calibrate. Follow the on-screen prompts.
6.4 Using the Built-in Webcam
Den integrerede webcam is automatically detected by most operating systems and video conferencing applications. No additional drivers are typically required.

Image: The monitor displaying a video conference call, showcasing its integrated webcam for seamless communication.
- Åbn din foretrukne videokonferencesoftware (f.eks. Zoom, Microsoft Teams, Skype).
- Select the integrated webcam as your video input device in the application's settings.
6.5 Adjusting Display Resolution
To set the resolution of the monitor (Windows):
- Right-click on your desktop and select "Display Settings."
- Find your monitor (if multiple displays are connected).
- Under "Display resolution," select the recommended resolution of 3840 x 2160.
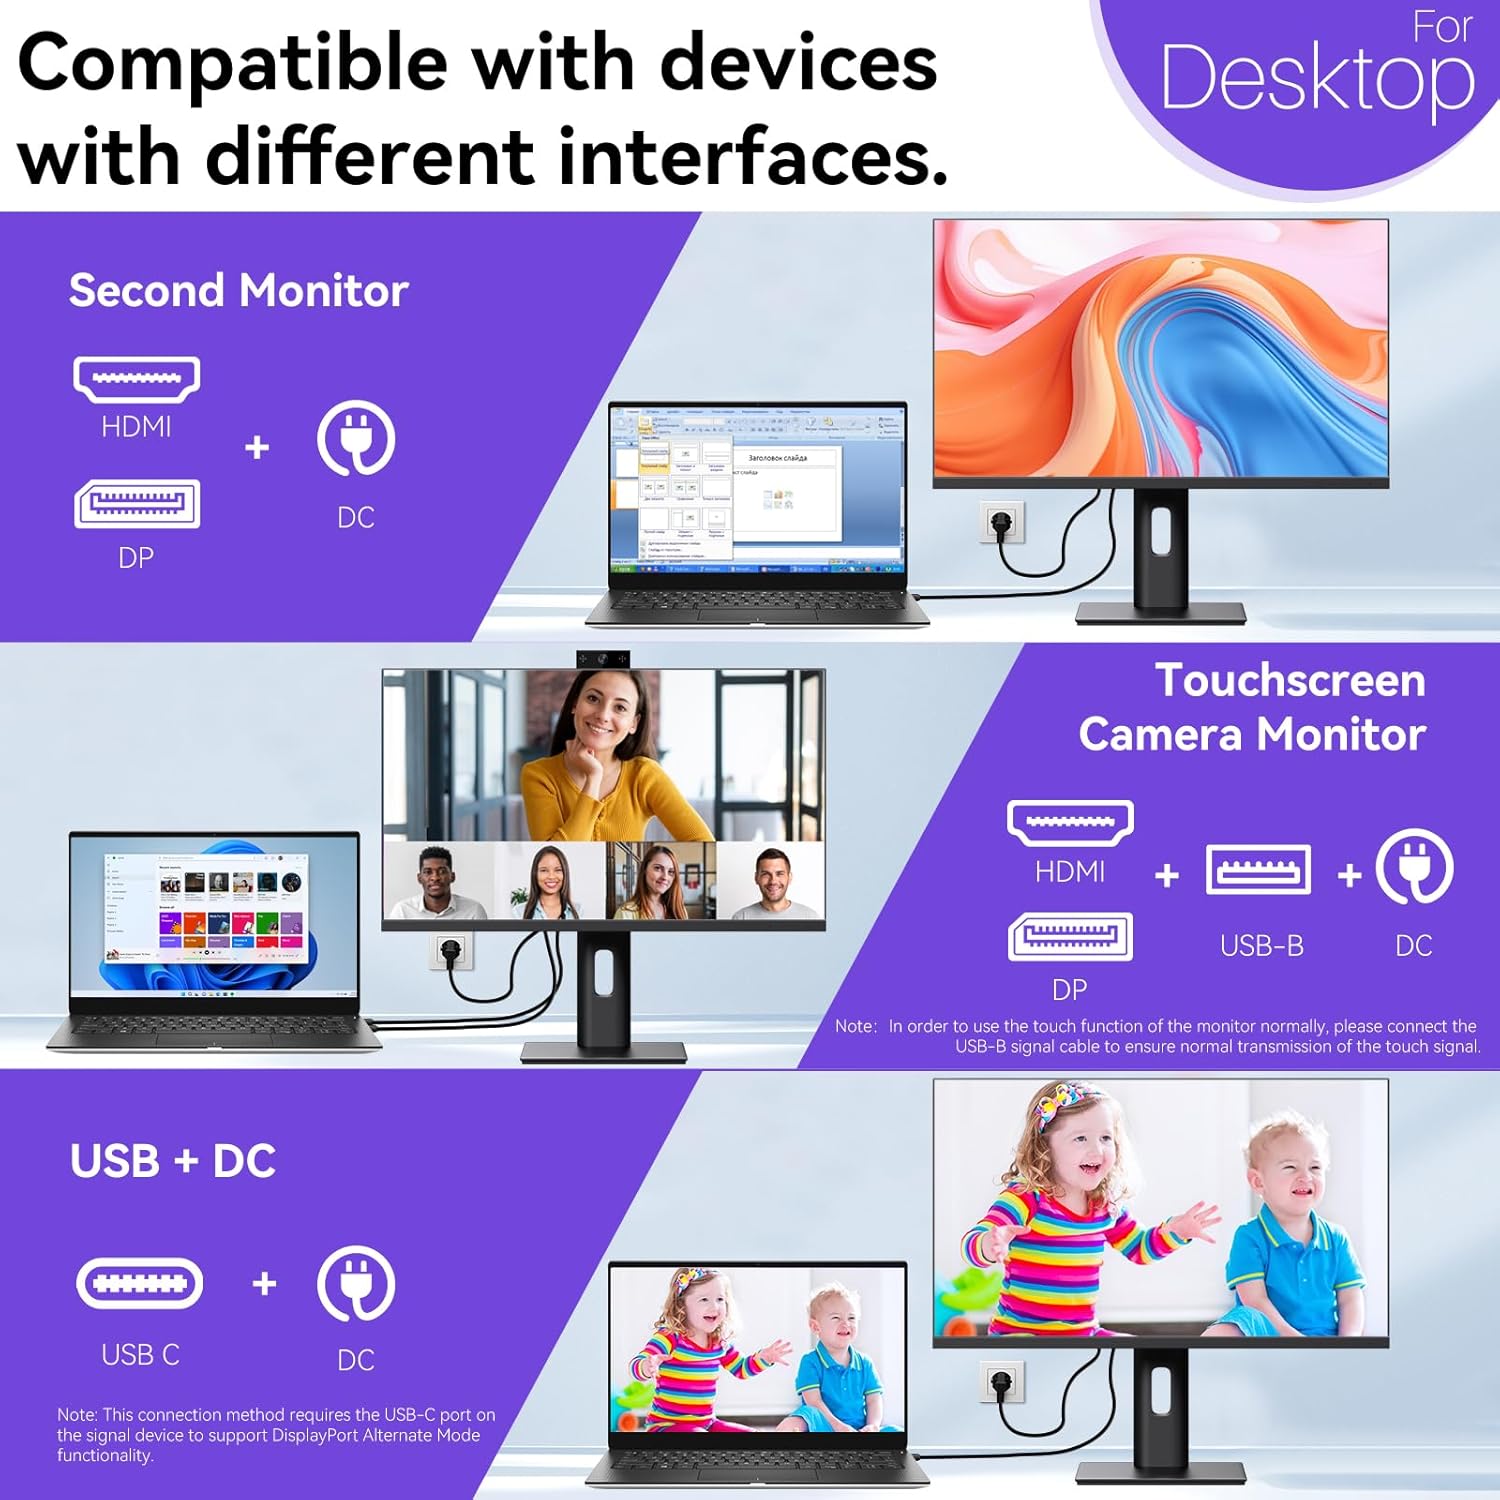
Image: A visual comparison demonstrating the superior clarity of 4K UHD (3840x2160) compared to FHD (1920x1080) and QHD (2560x1440) resolutions.
7. Vedligeholdelse
- Rengøring af skærmen: Tør forsigtigt skærmen af med en blød, fnugfri klud. Tør forsigtigt genstridige mærker afampRengør kluden med vand eller en skærmspecifik rengøringsopløsning. Sprøjt ikke væske direkte på skærmen.
- Rengøring af Casing: Brug en blød, tør klud til at rengøre skærmenasing.
- Opbevaring: Hvis skærmen opbevares i længere tid, skal den afbrydes til strømmen, pakkes i originalemballagen og opbevares et køligt og tørt sted.
8. Fejlfinding
If you encounter issues with your monitor, refer to the following troubleshooting guide. For problems not listed, please contact customer support.
| Problem | Mulig årsag | Løsning |
|---|---|---|
| Intet billede på skærmen | Strømkabel frakoblet; Videokabel frakoblet; Forkert indgangskilde valgt. | Ensure power cable is securely connected. Check video cable (HDMI/DP/USB-C) connections. Select correct input source via OSD menu. |
| Touchscreen reagerer ikke | USB-B cable not connected; USB-C port not supporting DisplayPort Alternate Mode; Device incompatibility (e.g., iPhone). | Ensure the USB-B to USB-A cable is connected from the monitor to your computer. If using USB-C, verify your device's USB-C port supports DisplayPort Alternate Mode. Note: Touch function is not supported when connected to an iPhone due to iOS system restrictions. |
| Cursor moves incorrectly (Windows) | Touchscreen calibration required. | Perform touchscreen calibration: Go to Control Panel > Hardware and Sound > Tablet PC Settings > Calibrate. |
| Webcam ikke fundet | USB connection issue; Software settings. | Ensure all necessary USB cables are connected. Check your application's settings to select the correct webcam. |
9. Specifikationer
| Feature | Detalje |
|---|---|
| Mærke | Pisichen |
| Modelnummer | 27INTSCMR-4K |
| Skærmstørrelse | 27 tommer |
| Opløsning | 3840 x 2160 pixels (4K UHD 2160p) |
| Aspektforhold | 16:9 |
| Billedlysstyrke | 400 Candela |
| Beskrivelse af skærmoverfladen | Blank |
| Produktdimensioner | 14.37 x 24.21 x 16.54 tommer |
| Varens vægt | 16.59 pund |
| Fabrikant | Shenzhen Konowa Electronics Co., LTD |
| Forbindelse | HDMI, DisplayPort, USB-C, USB-B (for touch), USB-A (x2), Audio Port |
10. Garanti og support
This product comes with a manufacturer's warranty. Please refer to the warranty card included in your package for specific terms and conditions. For technical support or inquiries, please contact Pisichen customer service at support_2308@163.com. When contacting support, please provide your model number and a detailed description of the issue, including any relevant pictures or videos.