
1. Introduktion
This manual provides detailed instructions for the installation, operation, and maintenance of your STUDIOFINIX Bluetooth 5.4 4-Zone 8-Channel Audio Amplifier Receiver. This amplifier is designed to deliver high-fidelity audio across multiple rooms, offering independent zone control, various input options, and a professional karaoke function. Please read this manual thoroughly before use to ensure proper setup and optimal performance.
2. Sikkerhedsinstruktioner
- Strømkilde: Brug kun den medfølgende strømadapter. Sørg for, at lydstyrkentage matcher kravene specificeret på enheden.
- Ventilation: Do not block any ventilation openings. Install in a location with adequate airflow to prevent overheating.
- Vand og fugt: Udsæt ikke enheden for regn, fugt eller dryppende/sprøjtende væsker. Holdes væk fra vandkilder.
- Varme: Må ikke placeres i nærheden af varmekilder såsom radiatorer, varmeregistre, komfurer eller andre apparater, der producerer varme.
- Rensning: Unplug the unit from the power outlet before cleaning. Use a dry, soft cloth only.
- Service: Forsøg ikke selv at servicere dette produkt. Overlad al service til kvalificeret servicepersonale.
- Højttalerimpedans: Ensure connected speakers have an impedance of 4-8 ohms. Connecting speakers with lower impedance may damage the amplivligere.
3. Pakkens indhold
Bekræft, at alle nedenstående varer er inkluderet i din pakke:
- STUDIOFINIX Amplifier x 1
- Strømadapter x 1
- Black Terminal Connectors x 4
- Brugsanvisning x 1

Figure 3.1: Package Contents. The image displays the amplifier unit, its power adapter, four black terminal connectors, and the user manual.
4. Produktet er slutview
4.1 Introduktion til frontpanelet
The front panel provides access to primary controls and input ports for convenient operation.

Figure 4.1: Front Panel Layout. Key controls include the Volume/Power ON/OFF knob, MIC VOL knob, MIC input, AUX input, USB port, TF Card slot, and Bass/Treble adjustment knobs.
- VOLUME/PWR ON/OFF: Controls the master volume and powers the unit on/off.
- MIC VOL: Justerer lydstyrken på den tilsluttede mikrofon.
- MIC input: 3.5mm jack for microphone connection.
- AUX-indgang: 3.5mm jack for auxiliary audio devices.
- USB-port: Til afspilning af lyd files fra et USB-drev.
- TF-kortslot: Til afspilning af lyd filefra et TF-kort (MicroSD).
- BAS/TREBLE: Adjusts the low and high frequency response of the audio output.
4.2 Toppanel Introduktion
The top panel features controls for mode selection, playback, and echo effects for karaoke.

Figure 4.2: Top Panel Layout. This view highlights the MODE button, playback controls (Fast Retreat/Previous Song, Play/Pause, Fast Forward/Next Song), and the ECHO button for microphone effects.
- KØRSELSVEJLEDNING: Switches between input sources (Bluetooth, Optical, AUX, LINE IN, USB, TF Card).
- Afspilningskontroller: Buttons for previous track, play/pause, and next track when using USB/TF card or Bluetooth.
- EKKO: Activates and adjusts the echo effect for the microphone input.
- Zone Control Buttons (1, 2, 3, 4): Independently turn on or off each of the four audio zones.
4.3 Back Panel Introduction
The back panel contains the main speaker outputs and additional wired input options.

Figure 4.3: Back Panel Layout. This image shows the DC IN port, speaker output terminals for Zones 1-4 (supporting 8 speakers), Optical input, and stereo RCA Line In (R/L) inputs.
- DC IN: Power input port for the provided power adapter.
- Speaker Outputs (ZONE 1-4): Connect up to 8 speakers (2 per zone) with 4-8 ohm impedance. Red terminals are positive (+), black terminals are negative (-).
- OPTISK indgang: Digital lydindgang til tilslutning af enheder som tv'er eller spillekonsoller.
- LINE IN (R/L): Stereo RCA inputs for connecting analog audio sources.
5. Opsætning
5.1 Højttalertilslutning
De amplifier supports up to 8 speakers, divided into 4 independent zones. Ensure your speakers have an impedance of 4-8 ohms.
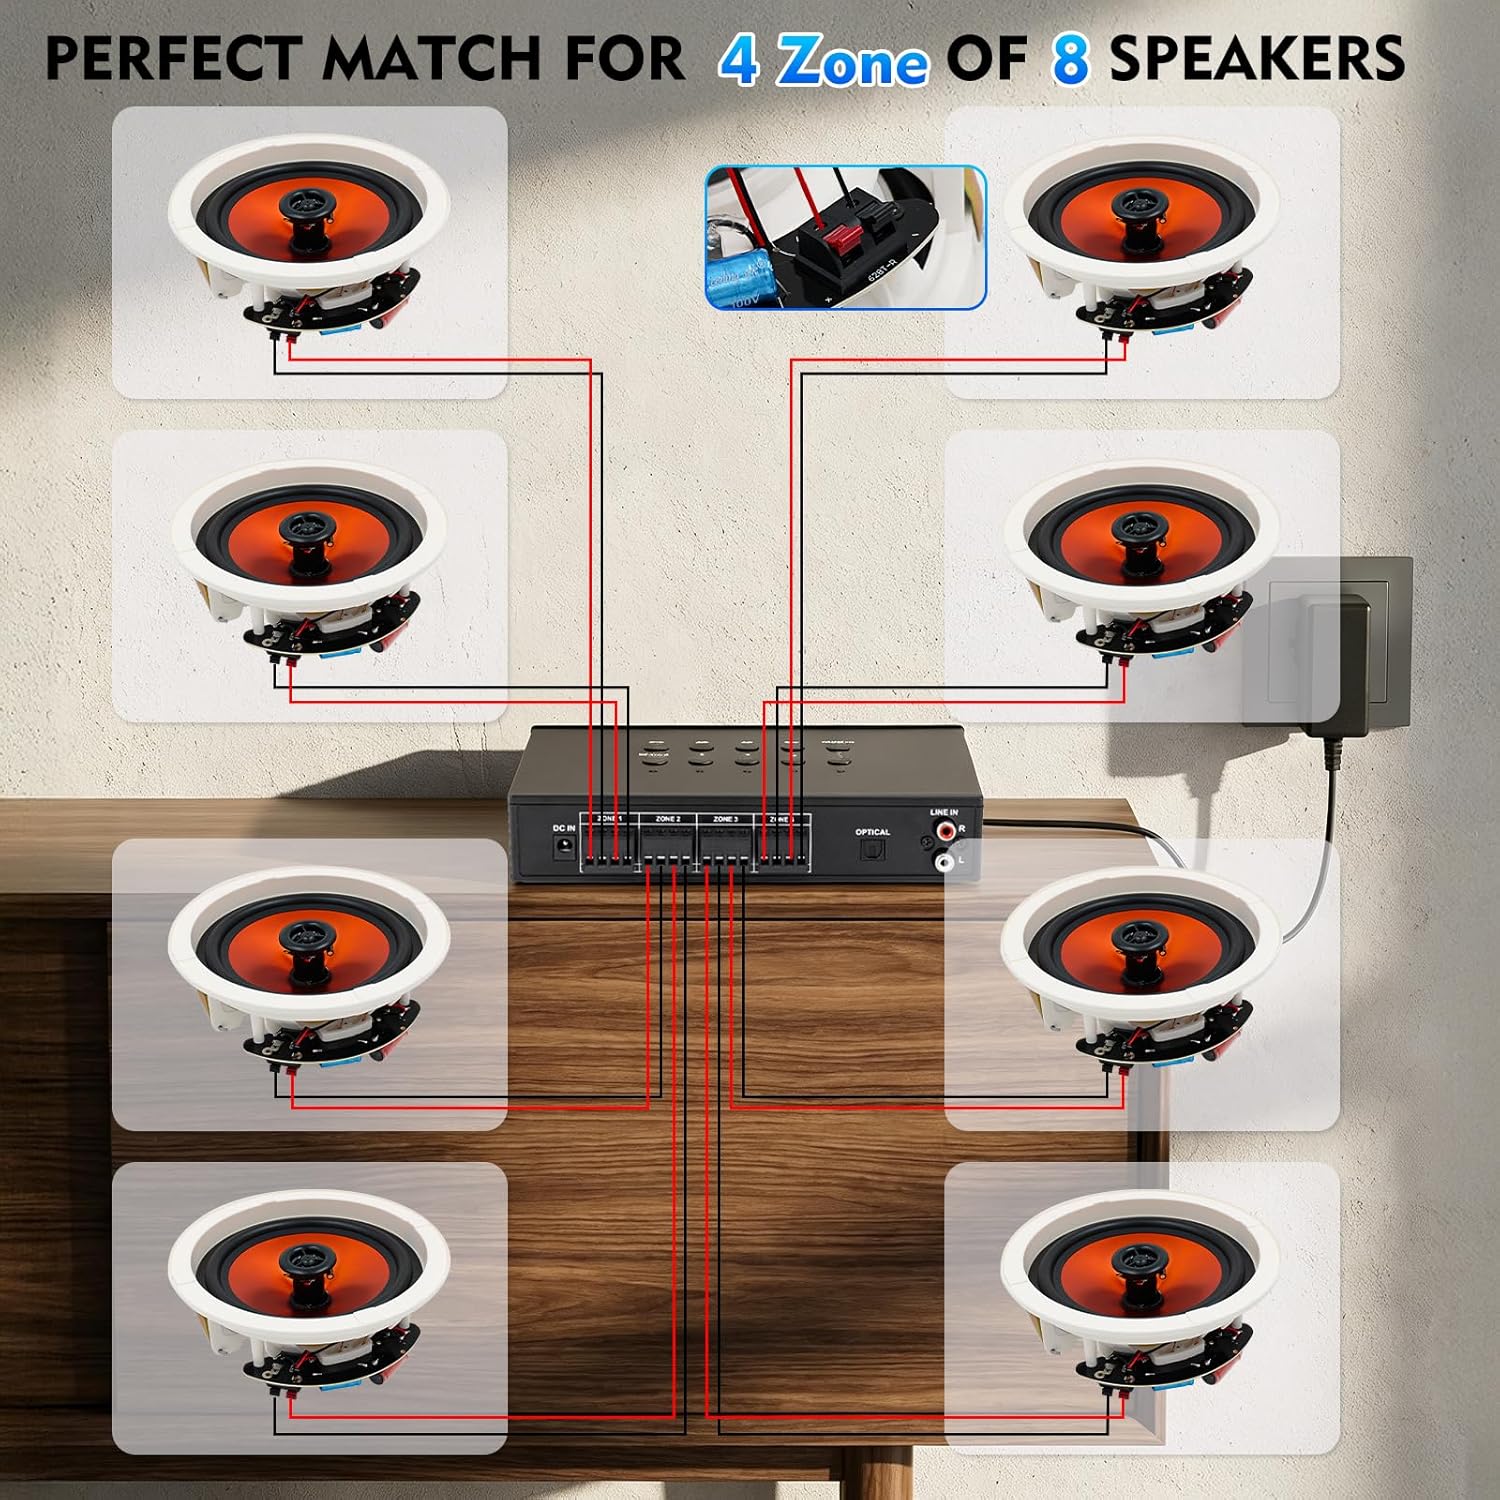
Figure 5.1: Speaker Wiring Diagram. This illustration demonstrates connecting two speakers per zone, with red wires to positive (+) terminals and black wires to negative (-) terminals on the ampliferens bagpanel.
- Identificer de positive (+) og negative (-) terminaler på dine højttalere.
- Connect the positive (+) wire from each speaker to the corresponding red (+) terminal on the amplifier for the desired zone.
- Connect the negative (-) wire from each speaker to the corresponding black (-) terminal on the amplifier for the desired zone.
- Repeat for all speakers across the 4 zones. Ensure all connections are secure.
5.2 Strømtilslutning
After connecting all speakers and audio sources, connect the power adapter.
- Insert the DC plug of the power adapter into the 'DC IN' port on the back of the amplivligere.
- Sæt strømadapteren i en passende stikkontakt.
6. Betjeningsvejledning
6.1 Tænd/sluk og lydstyrkekontrol
- For at tænde for amplifier, rotate the VOLUME/PWR ON/OFF knob clockwise until the display illuminates.
- For at slukke skal du dreje knappen mod uret, indtil den klikker af.
- Adjust the master volume by rotating the VOLUME/PWR ON/OFF knop.
6.2 Valg af indgangskilde
Tryk på MODE button on the top panel to cycle through available input sources: Bluetooth, Optical, AUX, LINE IN, USB, and TF Card.
6.3 Bluetooth -parring
Sådan tilslutter du en Bluetooth-enhed:

Figure 6.1: Bluetooth Connectivity. The image shows a smartphone successfully paired with the amplifier, indicating stable Bluetooth 5.4 connection for wireless audio streaming.
- Vælg Bluetooth-tilstand ved hjælp af MODE button. The display will show "BT" or a similar indicator.
- Aktiver Bluetooth på din smartphone, tablet eller anden Bluetooth-aktiveret enhed, og søg efter tilgængelige enheder.
- Select "STUDIOFINIX" or a similar name from the list to pair.
- Når den er parret, kan du streame lyd trådløst til amplivligere.
6.4 Wired Input Operation
De amplifier supports various wired audio sources:

Figure 6.2: Multiple External Audio Sources. This graphic illustrates the diverse input options available, including Microphone, Bluetooth, USB, AUX, and TF Card, allowing connection of various external devices.
- Optisk indgang: Connect a digital audio cable from your source (e.g., TV, game console) to the OPTICAL port on the back panel. Select Optical mode using the MODE knap.
- AUX-indgang: Connect a 3.5mm audio cable from your device to the AUX port on the front panel. Select AUX mode.
- LINJE IND: Connect RCA cables from your analog audio source (e.g., CD player) to the LINE IN (R/L) ports on the back panel. Select LINE IN mode.
- USB/TF-kort: Insert a USB drive or TF card into the respective slot on the front panel. The amplifier will automatically switch to USB or TF mode and begin playback. Use the playback controls on the top panel to manage tracks.
6.5 Karaoke-funktion
Enjoy karaoke with the built-in microphone input and echo effect.

Figure 6.3: Karaoke Ready. This image depicts individuals enjoying a karaoke session, highlighting the amplifier's capability to connect a microphone for vocal performances.
- Sæt din mikrofon i MIC-indgang på frontpanelet.
- Juster mikrofonens lydstyrke ved hjælp af MIC VOL knop.
- Tryk på EKKO button on the top panel to activate and adjust the echo effect for your vocals.
6.6 Independent Zone Control
De amplifier allows you to independently control the power for each of the four speaker zones.

Figure 6.4: 4-Zone Independent Control. This visual demonstrates how the amplifier can manage audio in four separate areas, allowing users to turn zones on or off as needed for multi-room audio customization.
- Brug den dedikerede ZONE 1, ZONE 2, ZONE 3, ZONE 4 buttons on the top panel to toggle each zone on or off.
- Note that while zones can be independently turned on/off, the overall volume, bass, and treble settings apply to all active zones simultaneously.
6.7 Justering af bas og diskant
Adjust the audio's tonal characteristics using the BASS og DISKANT knobs on the front panel to suit your preference.
7. Vedligeholdelse
- Rensning: Disconnect the power before cleaning. Use a soft, dry cloth to wipe the exterior of the unit. Do not use liquid cleaners or aerosol sprays.
- Opbevaring: If storing the unit for an extended period, disconnect it from power and store in a cool, dry place away from direct sunlight.
- Ventilation: Regularly check that ventilation openings are clear of dust and debris.
8. Fejlfinding
| Problem | Mulig årsag | Løsning |
|---|---|---|
| Ingen strøm | Power adapter not connected; Power outlet not working; Unit is off. | Ensure power adapter is securely connected and plugged into a live outlet. Turn the VOLUME/PWR ON/OFF knob clockwise. |
| Ingen lyd fra højttalerne | Incorrect input source selected; Speaker wires loose or incorrectly connected; Volume too low; Specific zone turned off. | Press MODE to select the correct input. Check speaker wire connections (positive/negative). Increase master volume. Ensure the relevant zone button is ON. |
| Bluetooth forbinder ikke | Not in Bluetooth mode; Device too far; Device already connected to another amplivligere. | Select Bluetooth mode. Move device closer to the ampAfbryd forbindelsen til andre Bluetooth-enheder, og prøv at parre igen. |
| Mikrofon virker ikke | Microphone not plugged in; MIC VOL too low. | Ensure microphone is securely plugged into the MIC input. Increase the MIC VOL knob. |
| USB/TF-kort afspiller ikke | Forkert tilstand; Inkompatibel file format; Beskadiget medie. | Select USB or TF mode. Ensure audio fileer i et understøttet format (f.eks. MP3). Prøv et andet USB-drev eller TF-kort. |
9. Specifikationer
| Feature | Specifikation |
|---|---|
| Mærke | STUDIOFINIX |
| Modelnummer | ST-AMP-8PBT-BK-US |
| Antal kanaler | 8 |
| Output Wattage | 480 watt (i alt) |
| Bluetooth version | 5.4 |
| Højttalerimpedans | 4-8 ohm |
| Indtastningsmuligheder | Optical, AUX, LINE IN, USB, TF Card, MIC, Bluetooth |
| Frekvensrespons | ±2dB@20-20kHz |
| Signal-støjforhold | 85dB |
| Dimensioner (L x B x H) | 195 mm x 40 mm x 140 mm (ca.) |
10. Garantioplysninger
This STUDIOFINIX amplifier leveres med en 1 års begrænset garanti from the date of purchase. This warranty covers manufacturing defects in materials and workmanship under normal use. It does not cover damage caused by misuse, accident, unauthorized modification, or improper installation. Please retain your proof of purchase for warranty claims.
11. Kundesupport
For technical assistance, warranty claims, or general inquiries, please contact STUDIOFINIX customer support through the retailer's platform or visit the official STUDIOFINIX webwebsted for kontaktoplysninger.
Online support: www.studiofinix.com