
Indledning
Thank you for choosing the LIORQUE Wireless Weather Station YGH6208. This device provides accurate indoor and outdoor temperature and humidity readings, weather forecasts, and features a DCF radio-controlled clock with alarm functions. This manual will guide you through the setup, operation, and maintenance of your weather station.
Pakkens indhold
- 1 x LIORQUE trådløs vejrstation (hovedenhed)
- 1 x udendørs sensor
- 3 x AAA Batteries (for Main Unit)
- 2 x AAA Batteries (for Outdoor Sensor)
- 1 x Brugermanual (dette dokument)
Produkt overview
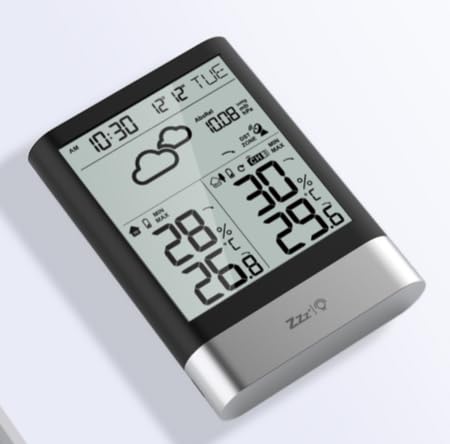
Billede 1: LIORQUE Wireless Weather Station Main Unit. This image shows the front view of the main display unit, highlighting its LCD screen and compact design.
Hovedenhedens funktioner:
- 4.3-inch LCD screen with backlight
- Indendørs temperatur og fugtighedsvisning
- Udendørs temperatur- og luftfugtighedsvisning
- Vejrudsigt ikoner
- DCF radio-controlled clock with manual setting option
- Double alarm clock with snooze function
- Calendar and day of the week display (7 languages)
- Maks./min. temperatur- og luftfugtighedsregistreringer
- Air pressure display and weather trend
- 12/24 timers tidsvisning
Outdoor Sensor Features:
- Wireless transmission up to 100m (open area)
- Temperatur- og luftfugtighedsmåling
- Supports hanging or standing placement
- Data updated every 30 seconds
- Understøtter op til 3 sensorer (én medfølger)
Opsætning
1. Batteriinstallation
- Udendørs sensor: Open the battery compartment cover on the back of the outdoor sensor. Insert 2 x AAA batteries, ensuring correct polarity (+/-). Close the cover.
- Hovedenhed: Open the battery compartment cover on the back of the main unit. Insert 3 x AAA batteries, ensuring correct polarity (+/-). Close the cover.
- The main unit will power on and display indoor readings.
2. Sensorparring
After installing batteries in both units, the main unit will automatically search for the outdoor sensor. The outdoor temperature and humidity should appear on the main unit's display within a few minutes. If the outdoor readings do not appear:
- Ensure both units are within range (up to 100m in open air).
- Press the "TX" button inside the outdoor sensor's battery compartment to manually send a signal.
- On the main unit, press and hold the "CHANNEL" button to initiate a manual search for the sensor.
3. Indledende indstillinger (tid, dato, enheder)
The weather station will attempt to synchronize with the DCF radio signal for automatic time setting. This may take several hours, especially in areas with weak signals. You can manually set the time and date if needed.
- Manuel tidsindstilling: Press and hold the "MODE" button to enter time setting mode. Use the "UP" and "DOWN" buttons to adjust values and "MODE" to confirm and move to the next setting (e.g., 12/24 hour format, hour, minute, year, month, day, language for day of week).
- Temperaturenheder: Press the "°C/°F" button to switch between Celsius and Fahrenheit.
- Air Pressure Units: Press the "BARO" button to cycle through air pressure units (e.g., hPa, inHg).
Betjeningsvejledning
Vis information
The 4.3-inch LCD screen displays various information:
- Tid og dato: Aktuel tid, dato og ugedag.
- Indendørs læsninger: Current indoor temperature and humidity.
- Udendørs læsning: Current outdoor temperature and humidity from the connected sensor.
- Vejrudsigt: Ikoner, der angiver forudsagte vejrforhold (f.eks. solrigt, overskyet, regnfuldt).
- Lufttryk: Current atmospheric pressure and trend.
- Baggrundsbelysning: The screen backlight activates with a light touch and returns to normal brightness after 10 seconds to conserve battery.
Vækkeur funktion
The weather station features a double alarm clock with snooze.
- Indstilling af alarmer: Press the "ALARM" button to view Alarm 1. Press "ALARM" again to view Alarm 2. Hold "ALARM" to enter alarm setting mode. Use "UP" and "DOWN" to adjust the hour and minute, and "ALARM" to confirm.
- Aktivering/deaktivering af alarmer: Mens viewing an alarm, press "UP" to toggle it on or off. An alarm icon will appear when active.
- Snooze-funktion: When an alarm sounds, press any button (except "ALARM OFF") to activate snooze. The alarm will sound again after a set interval. Press "ALARM OFF" to stop the alarm completely.
Maksimum og minimum rekorder
The weather station records the maximum and minimum indoor/outdoor temperature and humidity values.
- Press the "MAX/MIN" button once to display maximum recorded values.
- Press "MAX/MIN" again to display minimum recorded values.
- Press "MAX/MIN" a third time to return to current readings.
- To clear records, hold the "MAX/MIN" button while viewi optegnelserne.
Opretholdelse
- Udskiftning af batteri: Udskift batterierne i både hovedenheden og udendørssensoren, når indikatoren for lavt batteriniveau vises på displayet. Udskift altid alle batterier på samme tid.
- Rensning: Clean the display and unit surfaces with a soft, damp klæde. Brug ikke slibende rengøringsmidler eller opløsningsmidler.
- Udendørs sensorplacering: For optimal performance and longevity, install the outdoor sensor in a shaded area, protected from direct sunlight and rain. Ensure it is within the 100m wireless range of the main unit.
Fejlfinding
| Problem | Mulig løsning |
|---|---|
| Ingen visning af udendørs temperatur/fugtighed. |
|
| Forkert tidsvisning. |
|
| Skærmen er svag eller tom. |
|
| Vejrudsigten virker upræcis. |
|
Specifikationer
- Model: YGH6208
- Mærke: LIORQUE
- Skærmtype: LCD
- Strømkilde (hovedenhed): 3 x AAA batterier (medfølger)
- Strømkilde (udendørs sensor): 2 x AAA batterier (medfølger)
- Trådløs rækkevidde: Op til 100m (åbent område)
- Temperatur nøjagtighed: ±0.5 °C
- Sensorteknologi: Funk (Trådløs)
- Særlige funktioner: DCF Radio Clock, Alarm, Snooze, Weather Forecast, Max/Min Records, Backlight
- Inkluderede komponenter: Weather Station Main Unit, Outdoor Sensor
Garanti og support
LIORQUE products are designed for reliability and performance. For warranty information or technical support, please refer to the contact details provided with your purchase or visit the official LIORQUE webwebsted. Gem venligst din købsbevis til garantikrav.