
1. Introduktion
This manual provides detailed instructions for the installation, operation, and maintenance of your darkFlash DS900 Air ATX Mid-Tower PC Gaming Case. Please read this manual thoroughly before beginning assembly to ensure proper setup and safe usage. The DS900 Air is designed to offer a clear view of your components with its 270° full-view tempered glass and provides excellent cooling capabilities for high-performance systems.

Figure 1.1: darkFlash DS900 Air ATX Mid-Tower PC Gaming Case with internal components and RGB lighting.
2. Sikkerhedsoplysninger
Overhold altid følgende sikkerhedsforanstaltninger under installation og drift:
- Afbryd strømforsyningen fra stikkontakten, før du installerer eller fjerner komponenter.
- Brug en antistatisk håndledsrem for at forhindre elektrostatisk udladning (ESD) på følsomme komponenter.
- Handle tempered glass panels with care. Avoid impacts or dropping them, as they can shatter.
- Hold små dele og skruer væk fra børn.
- Sørg for tilstrækkelig ventilation omkring kabinettet for at forhindre overophedning.
- Forsøg ikke at ændre kabinettets struktur, da dette kan ugyldiggøre garantien og udgøre en sikkerhedsrisiko.
3. Specifikationer
| Feature | Specifikation |
|---|---|
| Modelnavn | DS900 Air |
| Sagstype | ATX Mid-Tower |
| Bundkort support | ATX, Micro ATX, Mini ITX |
| GPU Længde Clearance | Op til 425 mm |
| CPU-kølers højdeafstand | Op til 170 mm |
| PSU Type | ATX (Bottom-mounted) |
| Drive Bays | 2x 3.5" HDD or 2x 2.5" SSD, 2x 2.5" SSD |
| Udvidelsesslots | 7 PCIe slots |
| I/O-porte | 1x USB-C, 1x USB 3.0, Audio (HD Audio) |
| Fan Support | Bottom: 3x 120mm; Top: 3x 120mm or 2x 140mm; Rear: 1x 120mm; Right Side: 2x 120mm |
| Radiatorstøtte | Top: Up to 360mm; Side: Up to 240mm |
| Materialer | Stål, hærdet glas |
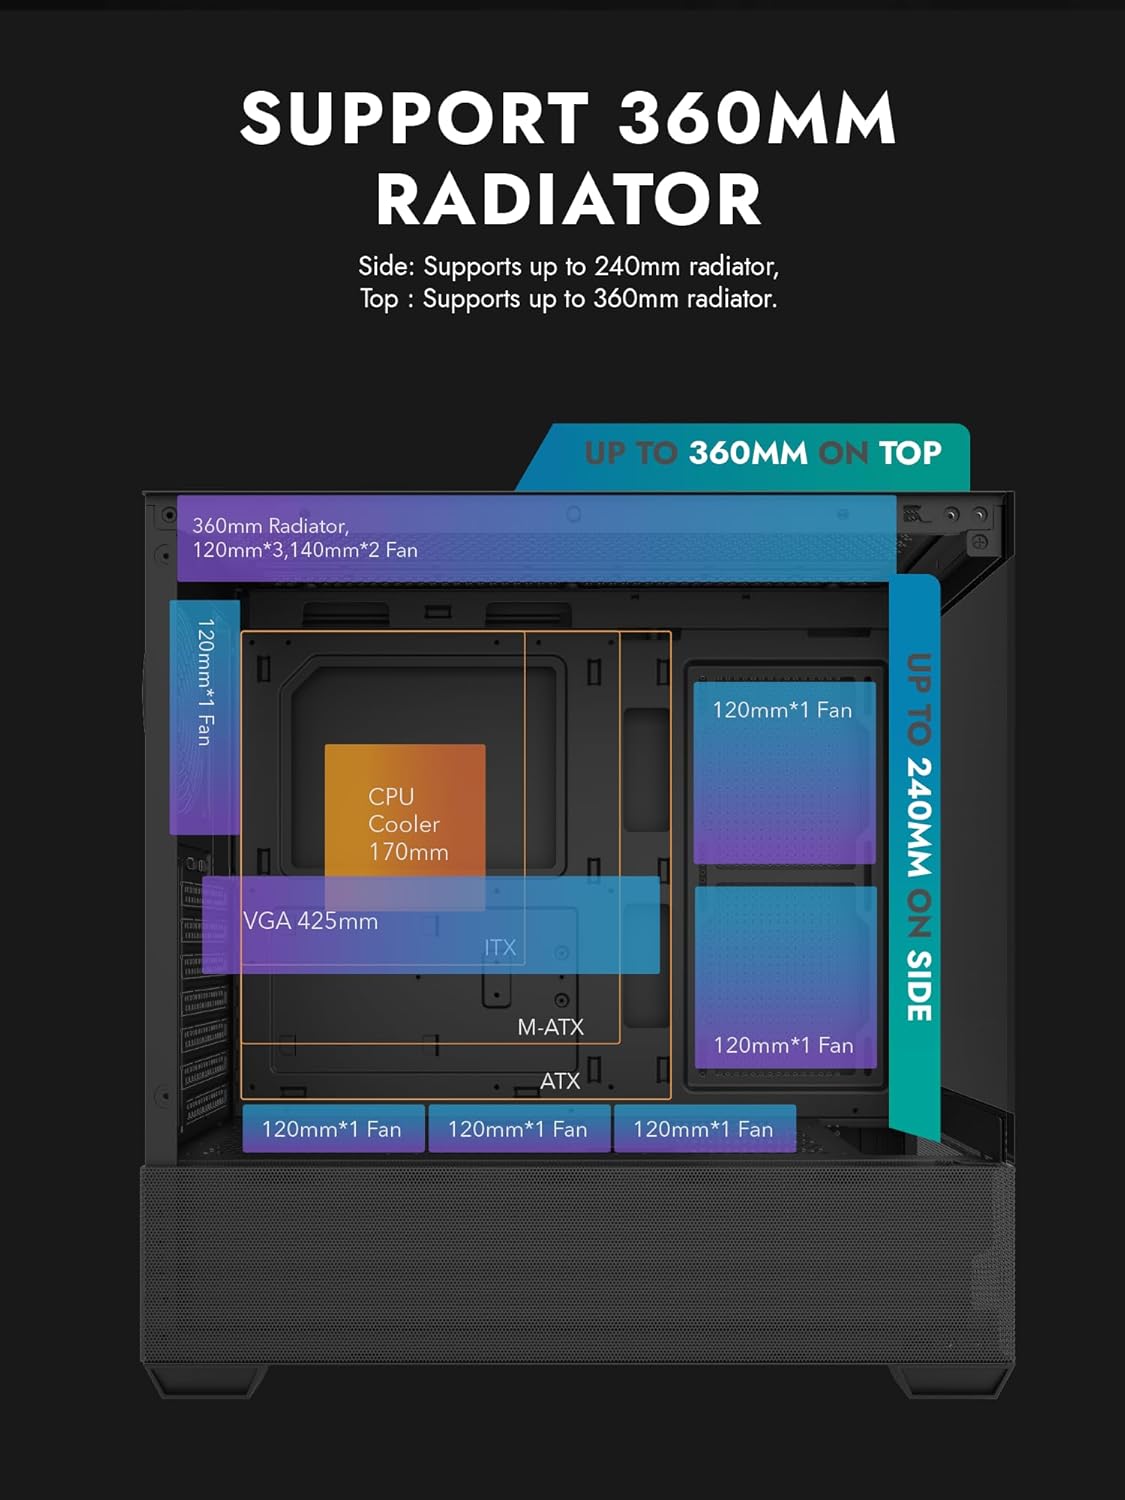
Figure 3.1: Radiator and fan support diagram for the DS900 Air case, illustrating maximum component dimensions.
4. Opsætning og installation
Follow these steps to assemble your PC components within the darkFlash DS900 Air case.
4.1. Forberedelse af sagen
- Fjern sidepaneler: The DS900 Air features a tool-free clamshell side panel. Gently pull the top edge of the tempered glass side panel to unlatch it, then lift it off. Repeat for the other side panel if necessary.
- Tilbehørsboks: Find tilbehørsæsken inde i kabinettet, som indeholder skruer, kabelbindere og andet monteringsudstyr.
4.2. Installation af bundkort
- Installer I/O-skjoldet i den bageste åbning af kabinettet.
- Align your ATX, Micro-ATX, or Mini-ITX motherboard with the standoffs inside the case. Ensure the I/O ports align with the I/O shield.
- Fastgør bundkortet med de medfølgende skruer.
4.3. Installation af strømforsyningsenhed (PSU)
- The DS900 Air has a dedicated bottom PSU chamber. Slide your ATX power supply into the chamber from the rear of the case.
- Fastgør strømforsyningen med skruer fra bagsiden af kabinettet.
- Route necessary power cables through the cutouts into the main compartment.
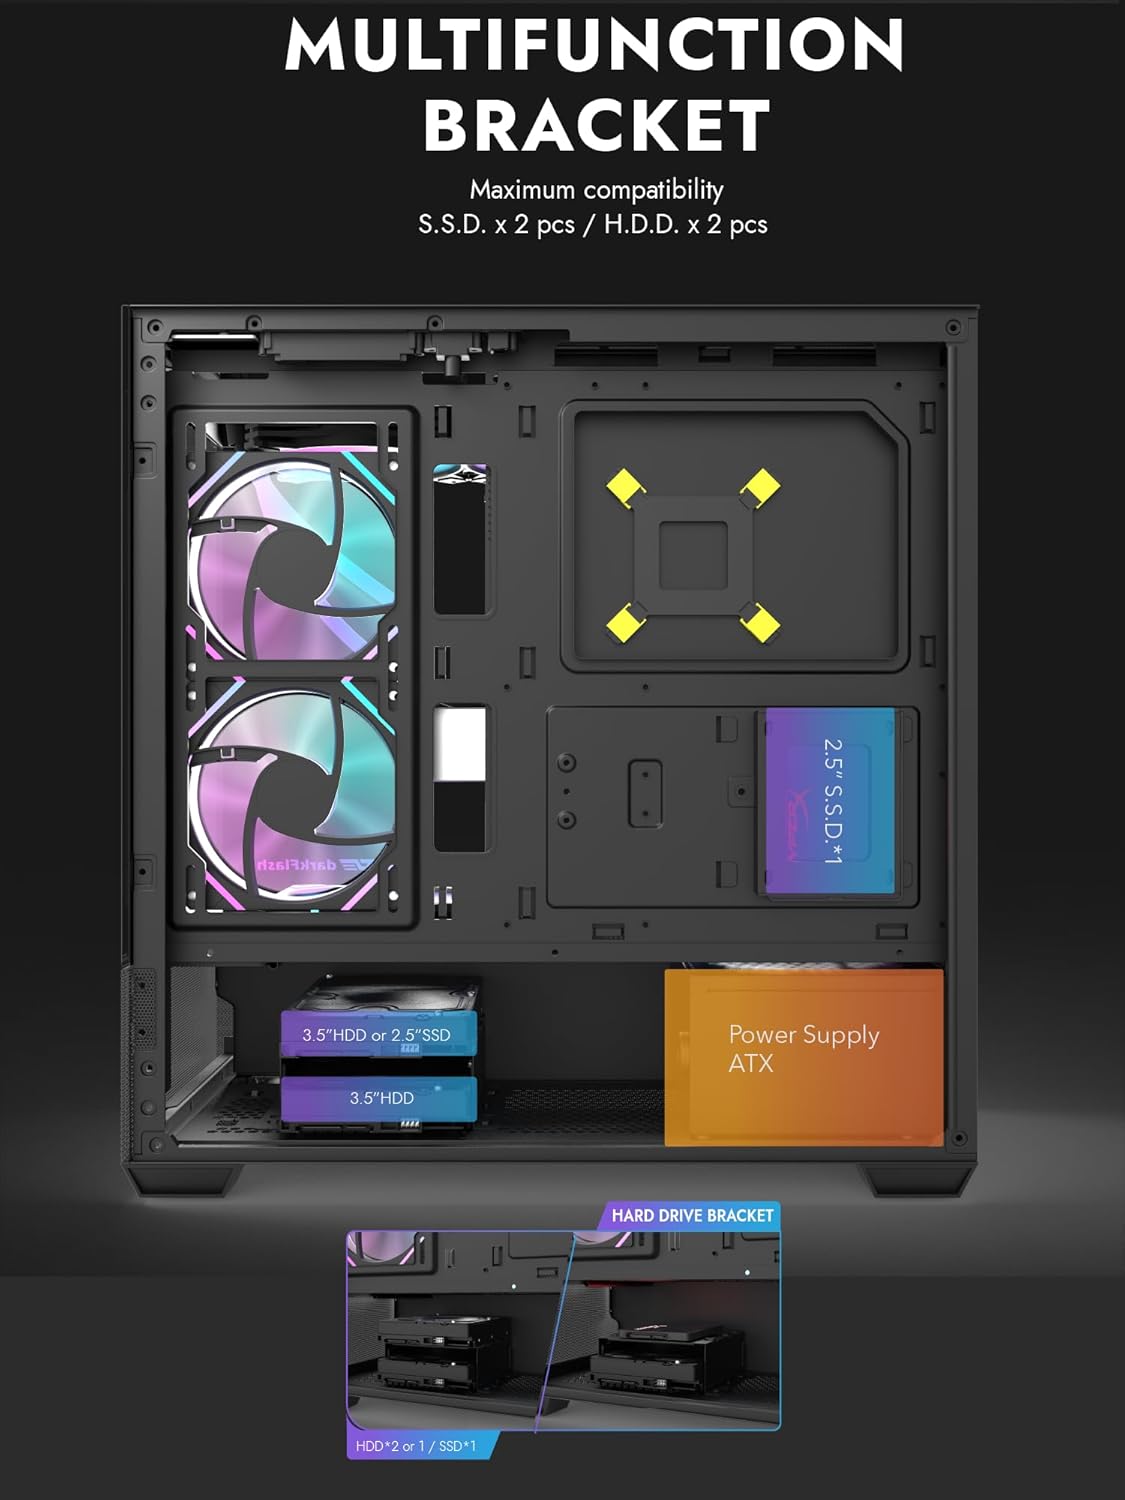
Figure 4.1: Internal layout showing the multifunction drive bracket and the bottom-mounted PSU chamber.
4.4. Installation af lagerenhed
The case supports up to two 3.5" HDDs or 2.5" SSDs in the hard drive bracket, and two additional 2.5" SSDs on the multifunction bracket.
- 3.5" harddisk / 2.5" SSD: Install drives into the removable hard drive bracket located in the PSU chamber. Secure with screws.
- 2.5" SSD: Mount 2.5" SSDs onto the multifunction bracket located on the motherboard tray. Secure with screws.
4.5. Installation af grafikkort (GPU)
- Fjern de nødvendige PCIe-slotdæksler fra bagsiden af kabinettet.
- Indsæt dit grafikkort i det relevante PCIe-slot på bundkortet.
- Fastgør grafikkortet med skruer. Kabinettet understøtter GPU'er op til 425 mm i længden.
4.6. Cooling System Installation (Fans/Radiators)
The DS900 Air offers extensive cooling options:
- Top: Supports up to 3x 120mm fans or 2x 140mm fans, or a 360mm radiator.
- Bund: Supports up to 3x 120mm fans.
- Bag: Supports 1x 120mm fan.
- Højre side: Supports 2x 120mm fans or a 240mm radiator.
Install fans and radiators using the appropriate screws and mounting points. Ensure correct airflow direction for optimal cooling.

Figure 4.2: Fan support locations and quantities within the DS900 Air chassis.

Figure 4.3: Airflow diagram demonstrating optimal cooling paths through the case.
4.7. Connecting Front I/O Cables
Connect the front panel cables (USB-C, USB 3.0, HD Audio, Power, Reset, LED) to their corresponding headers on your motherboard. Refer to your motherboard manual for exact header locations.

Figure 4.4: Top-right I/O panel featuring USB-C and USB 3.0 ports.
4.8. Kabelforvaltning
Brug kabelføringsudskæringerne og fastgørelsespunkterne bag bundkortbakken til at håndtere kabler. Dette forbedrer luftgennemstrømningen og æstetikken.
5. Betjening af din pc
Once all components are installed and cables are connected, replace the side panels. Connect your monitor, keyboard, mouse, and power cable. Press the power button on the case to start your system. Ensure all fans are spinning and components are receiving power.
6. Vedligeholdelse
Regelmæssig vedligeholdelse er med til at sikre optimal ydeevne og levetid for dine pc-komponenter.
- Støvrensning: Periodically clean dust filters and internal components using compressed air. The DS900 Air features mesh panels that help filter dust.
- Luftstrøm: Sørg for, at der ikke er nogen forhindringer, der blokerer indsugnings- eller udstødningsventilerne på kabinettet.
- Kabelstyring: Re-evaluate cable routing periodically to ensure no cables are interfering with fan blades or airflow.
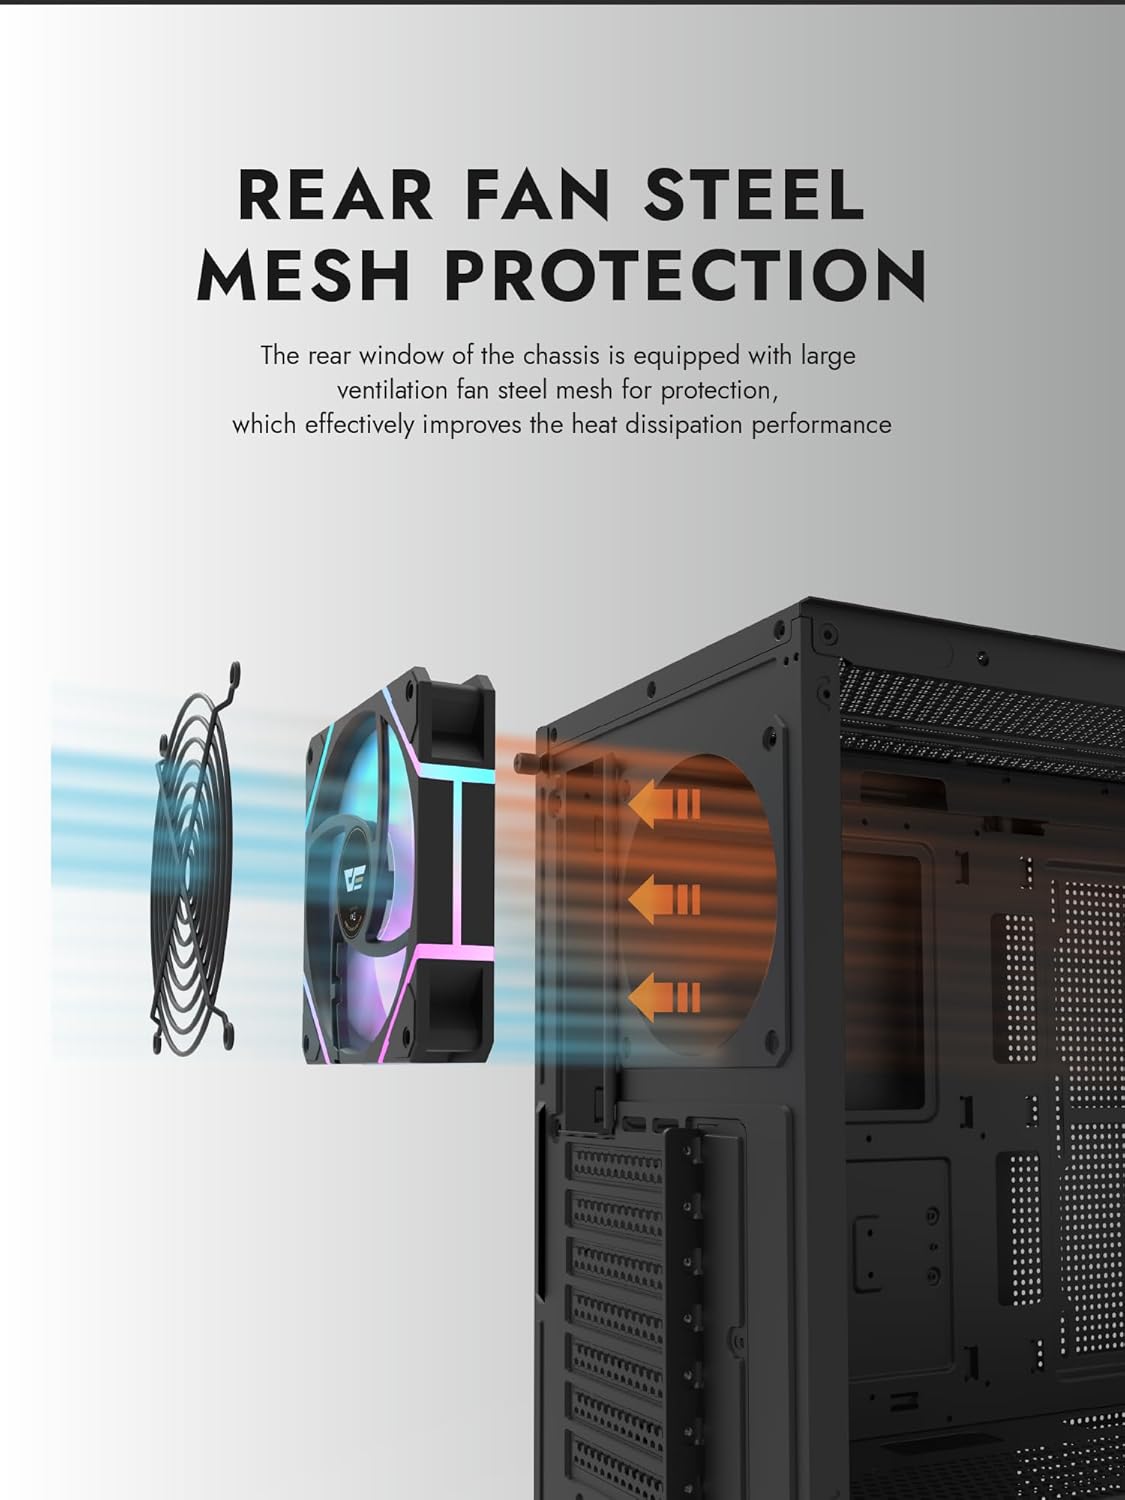
Figure 6.1: Rear fan steel mesh protection, designed to improve heat dissipation.
7. Fejlfinding
Hvis du støder på problemer med din pc, kan du overveje følgende almindelige fejlfindingstrin:
- Ingen strøm: Check all power connections, including the PSU to the wall, PSU to motherboard, and front panel power switch cable to the motherboard.
- Ingen visning: Ensure your monitor is connected to the graphics card (not the motherboard I/O unless using integrated graphics). Reseat the graphics card and RAM.
- Overophedning: Verify all fans are spinning correctly and are oriented for proper airflow. Check CPU cooler installation.
- Komponent ikke fundet: Reseat the component (e.g., RAM, GPU, storage drive) and check its power and data connections.
8. Garanti og support
darkFlash products are manufactured to high-quality standards. For warranty information or technical support, please refer to the official darkFlash webwebstedet eller kontakt din forhandler. Gem din købsbevis til garantikrav.