
1. Introduktion
Thank you for choosing the KEENSTAR 20Bar Espresso Machine. This manual provides essential information for the safe operation, maintenance, and troubleshooting of your new espresso machine. Please read it thoroughly before first use and keep it for future reference.
2. Vigtige sikkerhedsinstruktioner
- Læs alle instruktioner før brug af apparatet.
- Rør ikke ved varme overflader. Brug håndtag eller knopper.
- For at beskytte mod brand, elektrisk stød og personskade må ledning, stik eller apparat ikke nedsænkes i vand eller anden væske.
- Tæt opsyn er nødvendigt, når et apparat bruges af eller i nærheden af børn.
- Træk stikket ud af stikkontakten, når det ikke er i brug, og før rengøring. Lad det køle af, før du sætter dele på eller af, og før du rengør apparatet.
- Betjen ikke noget apparat med en beskadiget ledning eller stik, eller efter at apparatet ikke fungerer korrekt eller er blevet beskadiget på nogen måde.
- Brug af tilbehør, der ikke er anbefalet af apparatets producent, kan resultere i brand, elektrisk stød eller personskade.
- Må ikke bruges udendørs.
- Lad ikke ledningen hænge ud over kanten af bordet eller bordpladen eller røre ved varme overflader.
- Må ikke placeres på eller i nærheden af en varm gas- eller elektrisk brænder eller i en opvarmet ovn.
- Sæt altid stikket i apparatet først, og sæt derefter ledningen i stikkontakten. For at afbryde forbindelsen skal du slukke for en vilkårlig knap og derefter tage stikket ud af stikkontakten.
- Brug ikke apparatet til andet end tilsigtet brug.
- Udvis ekstrem forsigtighed ved bortskaffelse af varm damp.
- Dette apparat er kun til husholdningsbrug.
3. Pakkens indhold
Kontroller venligst pakkens indhold ved udpakning for at sikre, at alle varer er til stede og ubeskadigede.
Billede: All components included in the KEENSTAR 20Bar Espresso Machine package. This includes the main unit, portafilter with handle, single and double shot filters, coffee spoon with tamper, and a removable drip tray. The water tank and steam nozzle are also visible.
- KEENSTAR 20Bar Espresso Machine Main Unit
- Portafilterhåndtag
- 1-Shot Filter Basket
- 2-Shot Filter Basket
- Kaffeske med Tamper
- Aftagelig drypbakke
- Brugermanual
4. Produktet er slutview
Gør dig bekendt med de forskellige dele af din espressomaskine.

Billede: Front view of the KEENSTAR 20Bar Espresso Machine, showcasing its sleek stainless steel design and key operational areas.
- Vandtank: Detachable, 1.1 Liter capacity. Located at the back of the machine.
- Kontrolpanel: Intuitive touch screen for selecting brew options (Espresso, Americano, Espresso Cool, Steam, ON/OFF, 2X Espresso).
- Portafilter: Indeholder formalet kaffe til brygning.
- Dampstang: For frothing milk for lattes and cappuccinos. Features a 360-degree rotation.
- Drypbakke: Aftagelig for nem rengøring.
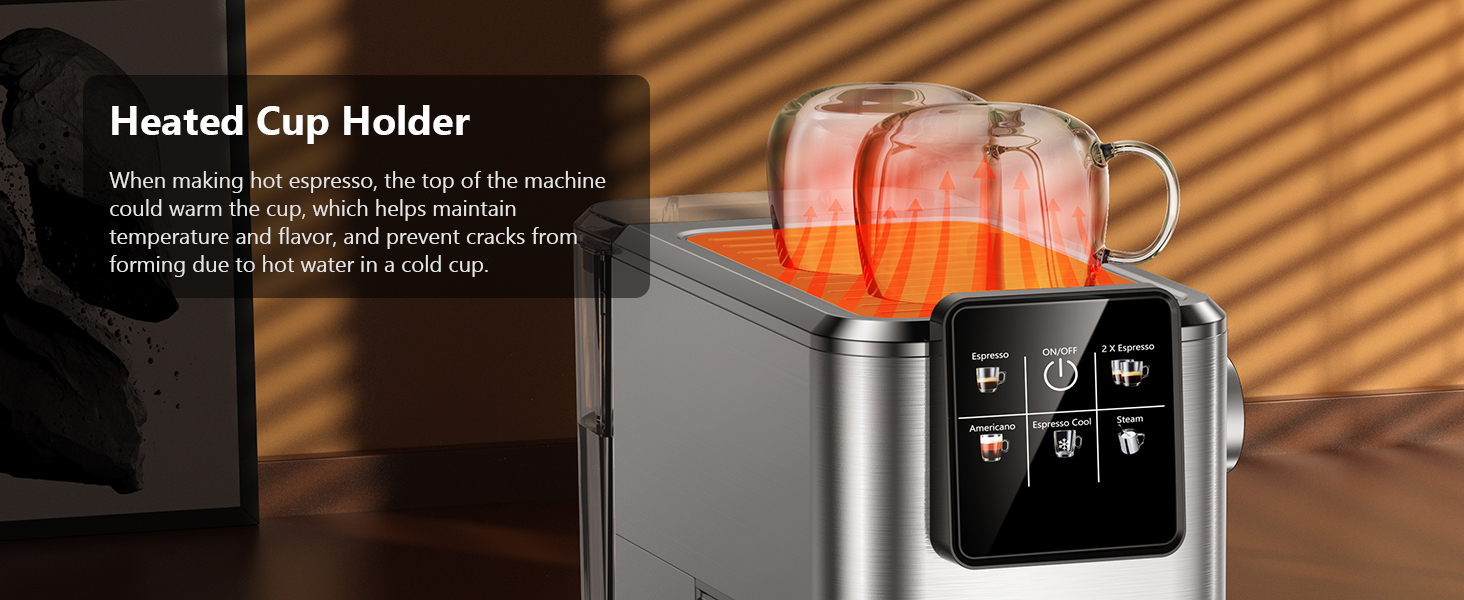
- Heated Cup Holder: Located on top of the machine to warm cups, maintaining coffee temperature.
5. Opsætning
5.1 Initial Use and Priming
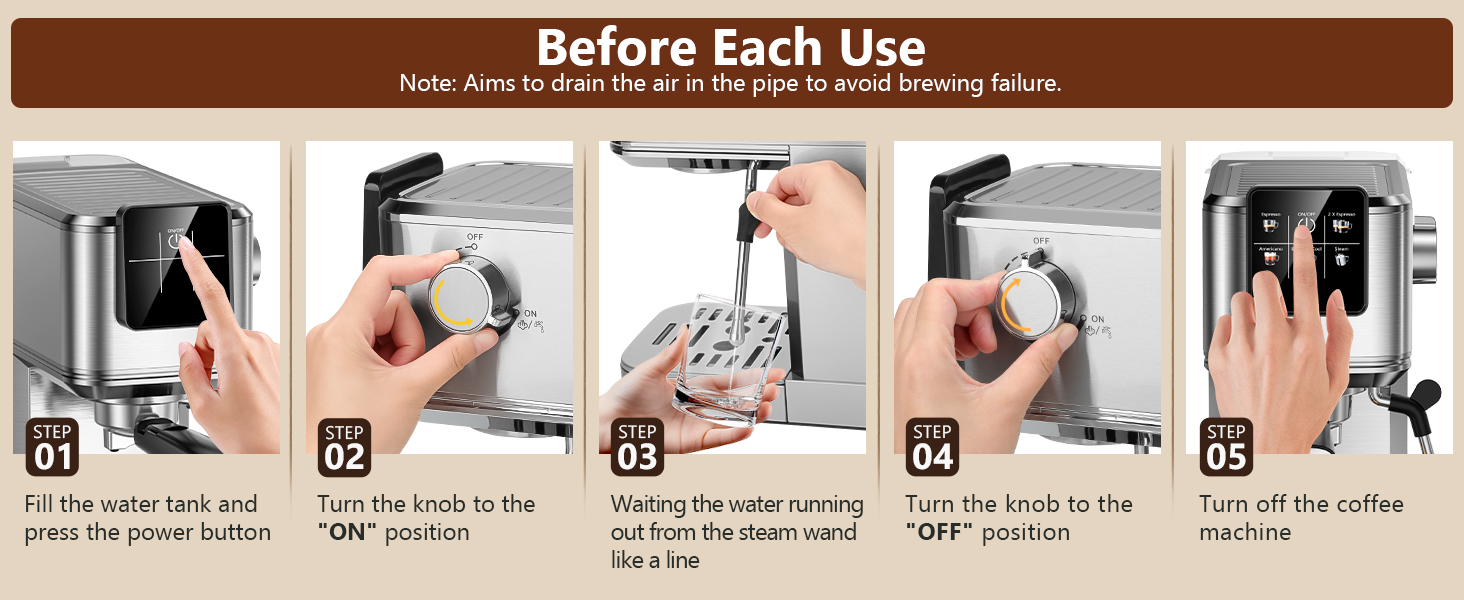
Before first use, or if the machine has not been used for a long time, it is essential to prime the system to ensure proper operation and remove any air from the pipes.
- Fill the water tank with fresh water and place it back into the machine. Ensure the tank cover is properly closed.
- Plug the machine into a power outlet. The ON/OFF button on the touch screen will illuminate.
- Press the ON/OFF button to turn on the machine. The indicator lights will blink as the machine preheats.
- Once the indicator lights are steady, the machine is ready.
- Placer en tom kop under damprøret.
- Turn the steam knob to the "ON" position. Water will run out from the steam wand like a line. Let it run for about 10-15 seconds to purge air.
- Drej dampknappen til "OFF"-positionen.
- Press the ON/OFF button to turn off the machine. The machine is now primed and ready for use.

Billede: Visual steps for priming the espresso machine before its first use or after a period of inactivity. This process drains air from the internal pipes.
5.2 Vandtank påfyldning
The water tank has a maximum capacity of 1200ml. Do not exceed the maximum fill line to prevent overflow.
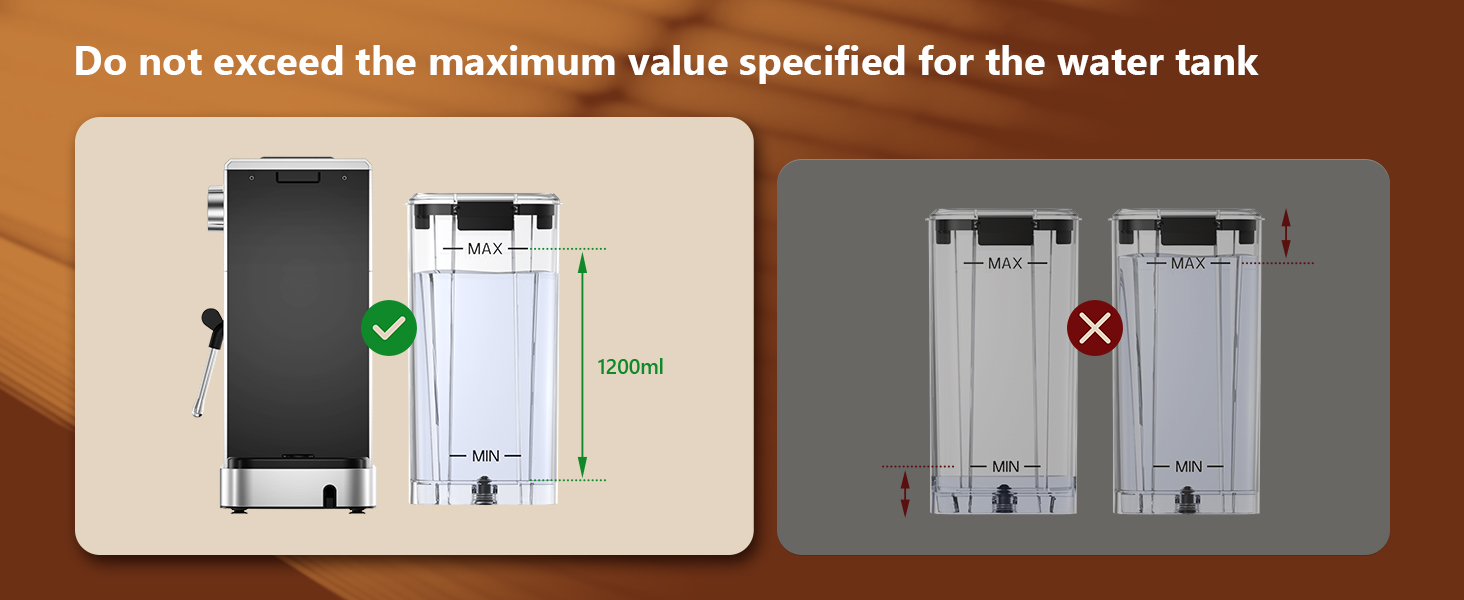
Billede: Guidance on filling the water tank, indicating the 1200ml maximum fill level to avoid overfilling.
6. Betjeningsvejledning
6.1 Brygning af espresso
The machine features a 20-bar pressure system and pre-soak technology for rich espresso extraction.
- Ensure the steam knob is set to the "OFF" position before brewing coffee.
- Fill the water tank with fresh water and press the ON/OFF button to power on. Wait for the indicator to become steady, signifying preheating is complete.
- Select the appropriate filter basket (1-shot or 2-shot) and place it into the portafilter.
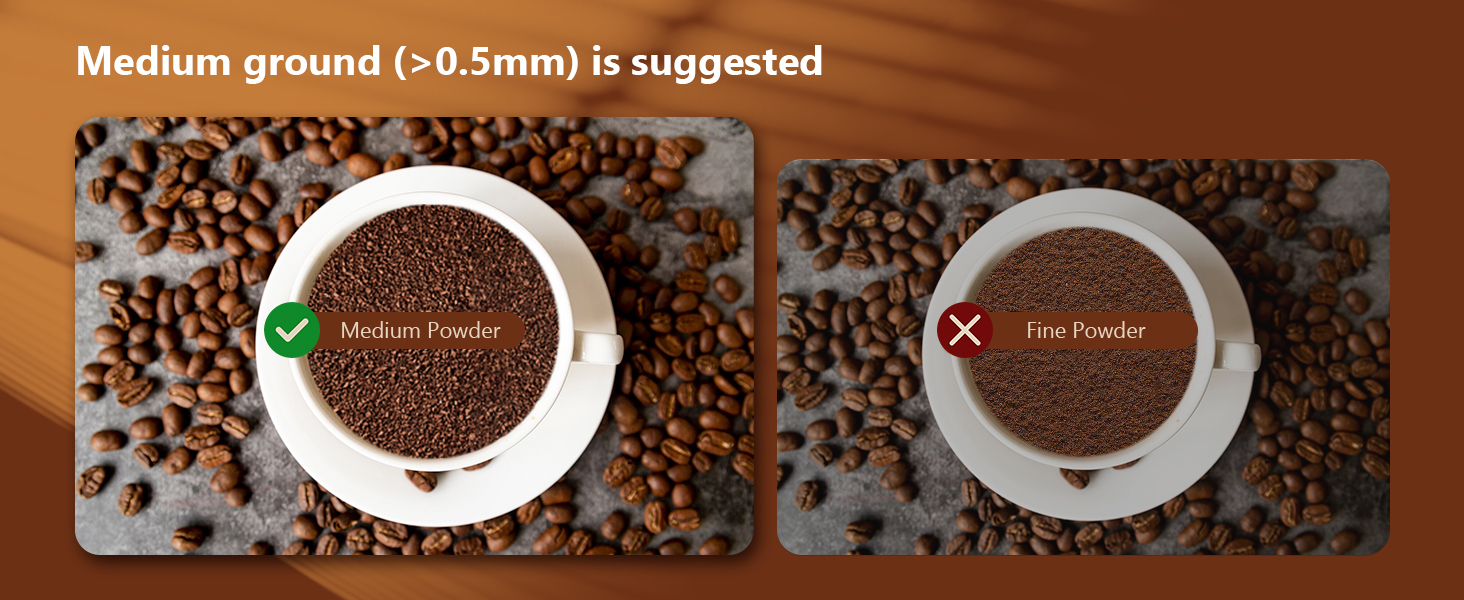
- Add ground coffee to the filter basket. Use medium ground coffee (greater than 0.5mm) for optimal results.
- Tamp the ground coffee firmly and evenly using the coffee tampeh.
- Attach the portafilter to the machine, ensuring it is fully locked into place.
- Placer din(e) kopp(er) på drypbakken under portafilteret.
- Select "Espresso" for a single shot or "2 X Espresso" for a double shot on the touch screen. The machine will begin brewing.
- Når brygningen er færdig, stopper maskinen automatisk.

Billede: Step-by-step visual instructions for brewing espresso, from preparing the machine to the final extraction.
Billede: Illustration demonstrating the correct way to lock the portafilter before brewing to prevent leaks and ensure proper extraction.

Billede: Recommended coffee grind size (medium, >0.5mm) for optimal espresso extraction, contrasting it with fine ground coffee.
6.2 Brygning af koldbrygget espresso
This machine offers a rapid cold brew function, producing smooth cold brew in as little as 10 minutes.
- Ensure the water tank is filled with iced water for the cold brew function.
- Prepare the portafilter with ground coffee as described in Section 6.1.
- Attach the portafilter to the machine and place a cup underneath.
- Select "Espresso Cool" on the touch screen. The machine will begin the cold brew process.
- Enjoy your rapid cold brew espresso.

Billede: The espresso machine preparing cold brew, emphasizing the requirement for iced water in the tank.
6.3 Skumning af mælk
The powerful steam wand allows you to create creamy microfoam for lattes and cappuccinos.
- Fill the water tank with fresh water and press the ON/OFF button to power on.
- Press the "Steam" button on the touch screen to preheat the steam function. The indicator will blink during preheating and become steady when ready.
- After preheating, turn the steam knob to the "ON" position to release any remaining water in the pipe before frothing.
- Insert the steam nozzle approximately 1 inch into the surface of your milk.
- Gradually turn the steam knob to increase steam until the desired foam consistency is achieved.
- Once finished, turn the steam knob to the "OFF" position and clean the steam wand immediately.
Billede: Visual instructions for frothing milk, detailing the steps from preheating to creating microfoam.
7. Vedligeholdelse og rengøring
Regelmæssig rengøring sikrer din espressomaskines levetid og optimale ydeevne.
- Generel rengøring: Tør maskinens ydre af med adamp klæde. Brug ikke slibende rengøringsmidler eller skuremidler.
- Drypbakke: Den aftagelige drypbakke bør tømmes og rengøres regelmæssigt.
- Portafilter og filterkurve: Fjern portafilteret efter hver brug, og kasser brugt kaffegrums. Skyl portafilteret og filterkurven under rindende vand.
- Dampstang: Tør dampdysen af med en mundfuld umiddelbart efter mælkeskumning.amp cloth to prevent milk residue from drying. Purge steam briefly to clear any internal blockages.
- Vandtank: Rengør vandtanken regelmæssigt med et mildt rengøringsmiddel, og skyl den grundigt.
- Afkalkning: Depending on water hardness, descale the machine every 2-3 months. Follow the instructions provided with a suitable descaling solution.

Billede: Important cleaning instruction: All accessories must be washed by hand and are not dishwasher safe.
8. Fejlfinding
Se dette afsnit for almindelige problemer og deres løsninger.
| Problem | Mulig årsag | Løsning |
|---|---|---|
| Ingen kaffe udløber / Langsom flow |
|
|
| Water leaks from portafilter edge |
|
|
| Dampstang producerer ikke damp |
|
|
| Kaffe er ikke varm nok |
|
|
9. Specifikationer
- Mærke: KEENSTAR
- Modelnavn: JH-C5210
- Pressure System: 20 Bar
- Magt: 1350W
- Vandtankkapacitet: 1.1 liter (37 oz)
- Produktdimensioner: 11.8" D x 12.6" B x 5.5" H
- Varens vægt: 4.6 pund
- Materiale: Rustfrit stål
- Speciel funktion: Programmable, Touch Screen, Milk Frother, Hot & Rapid Cold Brew
- Kaffeindgangstype: Malet kaffe
- Filtertype: Genanvendelig
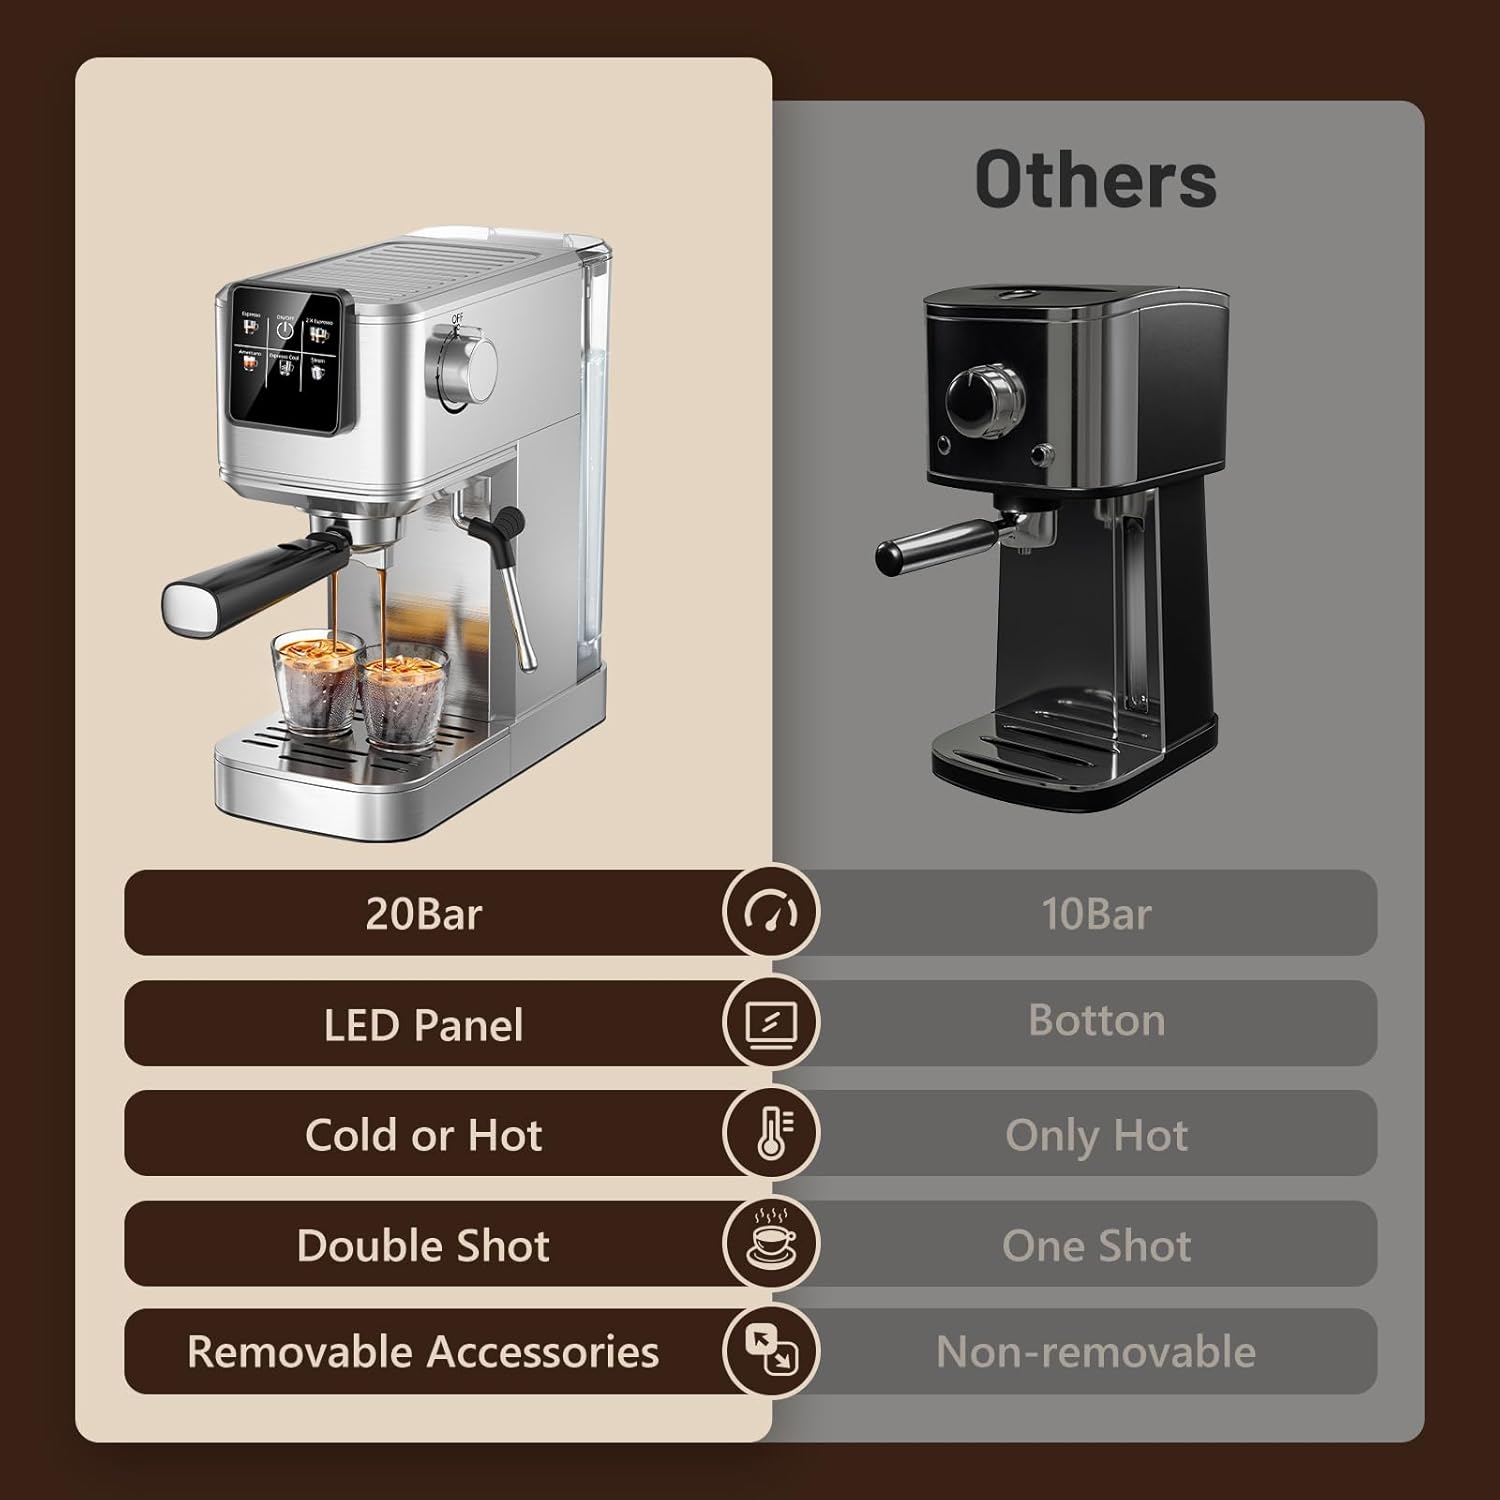
Billede: Feature comparison of the KEENSTAR machine, emphasizing its 20Bar pressure, LED panel, and versatility for hot and cold beverages.

Billede: Dimensions of the KEENSTAR espresso machine, indicating its compact size.
10. Garanti og support
For warranty information or technical support, please refer to the contact details provided on the product packaging or visit the official KEENSTAR webwebsted. Gem din købsbevis i tilfælde af garantikrav.