1. Introduktion
This manual provides essential instructions for the installation, operation, and maintenance of your Aninerel 3000W Hybrid Solar Inverter, model ANJ-3KW-LV-WIFI. This device is designed to convert 24V DC power to 110V AC pure sine wave power, suitable for various off-grid and backup power applications. Please read this manual thoroughly before installation and use to ensure safe and efficient operation.
Figur 1.1: Forside view of the Aninerel 3000W Hybrid Solar Inverter. The inverter features a blue casing with the Aninerel logo and a central LCD display panel with control buttons.
2. Sikkerhedsinstruktioner
Overhold altid følgende sikkerhedsforanstaltninger for at mindske risikoen for elektrisk stød, brand eller personskade:
- Read all instructions and cautionary markings on the unit and in this manual before installation or operation.
- Do not disassemble the inverter. Refer servicing to qualified personnel. Incorrect reassembly may result in electric shock or fire.
- For at mindske risikoen for elektrisk stød skal alle ledninger frakobles, før der udføres vedligeholdelse eller rengøring.
- This inverter is designed for indoor or semi-outdoor use with an IP65 rating. Avoid direct exposure to rain or snow.
- Ensure proper ventilation around the inverter to prevent overheating. Do not block ventilation openings.
- Brug passende værktøj og personlige værnemidler under installationen.
- Ensure all wiring connections are tight and secure to prevent loose connections that can cause overheating.
- Do not connect the inverter to a public utility grid without proper authorization and safety measures.
3. Produktet er slutview
The Aninerel 3000W Hybrid Solar Inverter integrates a pure sine wave inverter, an MPPT solar charge controller, and a battery charger into one compact unit. It is designed to provide uninterrupted power support.
3.1 Nøglefunktioner
- 3000W Pure Sine Wave Output: Converts 24V DC to 110V AC, providing stable power for sensitive electronics.
- Integrated 100A MPPT Solar Charge Controller: Maximizes solar energy harvesting with up to 500VDC PV input.
- Flexible Charging and Output Modes: Offers multiple modes (Solar Only, AC Priority, Hybrid Charging; Mains Priority, PV Priority, Hybrid Output) for diverse power management.
- Bred batterikompatibilitet: Supports AGM, GEL, Lead-acid, Li-ion, and LiFePO4 24V batteries.
- Smart LCD-skærm: Provides real-time monitoring and allows for easy configuration of system settings.
- Indbygget Wi-Fi: Enables remote monitoring of the inverter status (registration required).
- Robust design: IP65-rated enclosure for durability in various environments, with intelligent cooling.
- Omfattende beskyttelse: Inkluderer overvoltage, undervoltage, reverse polarity, and short circuit protection.

Figur 3.1: For- og bagpanel overview. This diagram labels the LCD display, indicators, function buttons, RS485 communication port, grounding terminal, battery input, dry contact port, built-in Wi-Fi, AC input, AC output, PV input, and power on/off switch.
3.2 Frontpanel og indikatorer
- LCD-skærm: Shows system status, operational data, and configuration settings.
- Opladningsindikator: Illuminates to indicate battery charging status.
- Statusindikator: Provides general operational status of the inverter.
- Fejlindikator: Lights up to signal system errors or warnings.
- Funktionsknapper (ESC, OP, NED, ENTER): Bruges til at navigere i menuer og justere indstillinger på LCD-skærmen.
3.3 Bagpaneltilslutninger
- RS485 kommunikationsport: For external communication and monitoring.
- Jordforbindelse Terminal: Vigtig for sikker jordforbindelse.
- Batteriindgang: Tilsluttes 24V batteribanken.
- Tør kontakt port: Til ekstern styring eller signalering.
- Built-in Wi-Fi Module: For wireless monitoring.
- AC-indgang: Connects to grid utility or generator AC power.
- AC-udgang: Tilsluttes husholdningsforbrugere.
- PV-indgang: Forbindes til solpaneler.
- Tænd/sluk-knap: Styrer hovedstrømmen til inverteren.
4. Installation og opsætning
Proper installation is crucial for the safe and efficient operation of your hybrid solar inverter. Ensure all connections are made by a qualified electrician and adhere to local electrical codes.
4.1 Montering af inverteren
- Vælg et egnet sted, der er tørt, godt ventileret og beskyttet mod direkte sollys og fugt.
- Ensure sufficient clearance around the inverter for proper airflow and cooling.
- Monter inverteren lodret på en stabil overflade med passende fastgørelseselementer.
4.2 Ledningsforbindelser
Follow the wiring diagram carefully. All wiring should be performed with the inverter and all power sources disconnected.
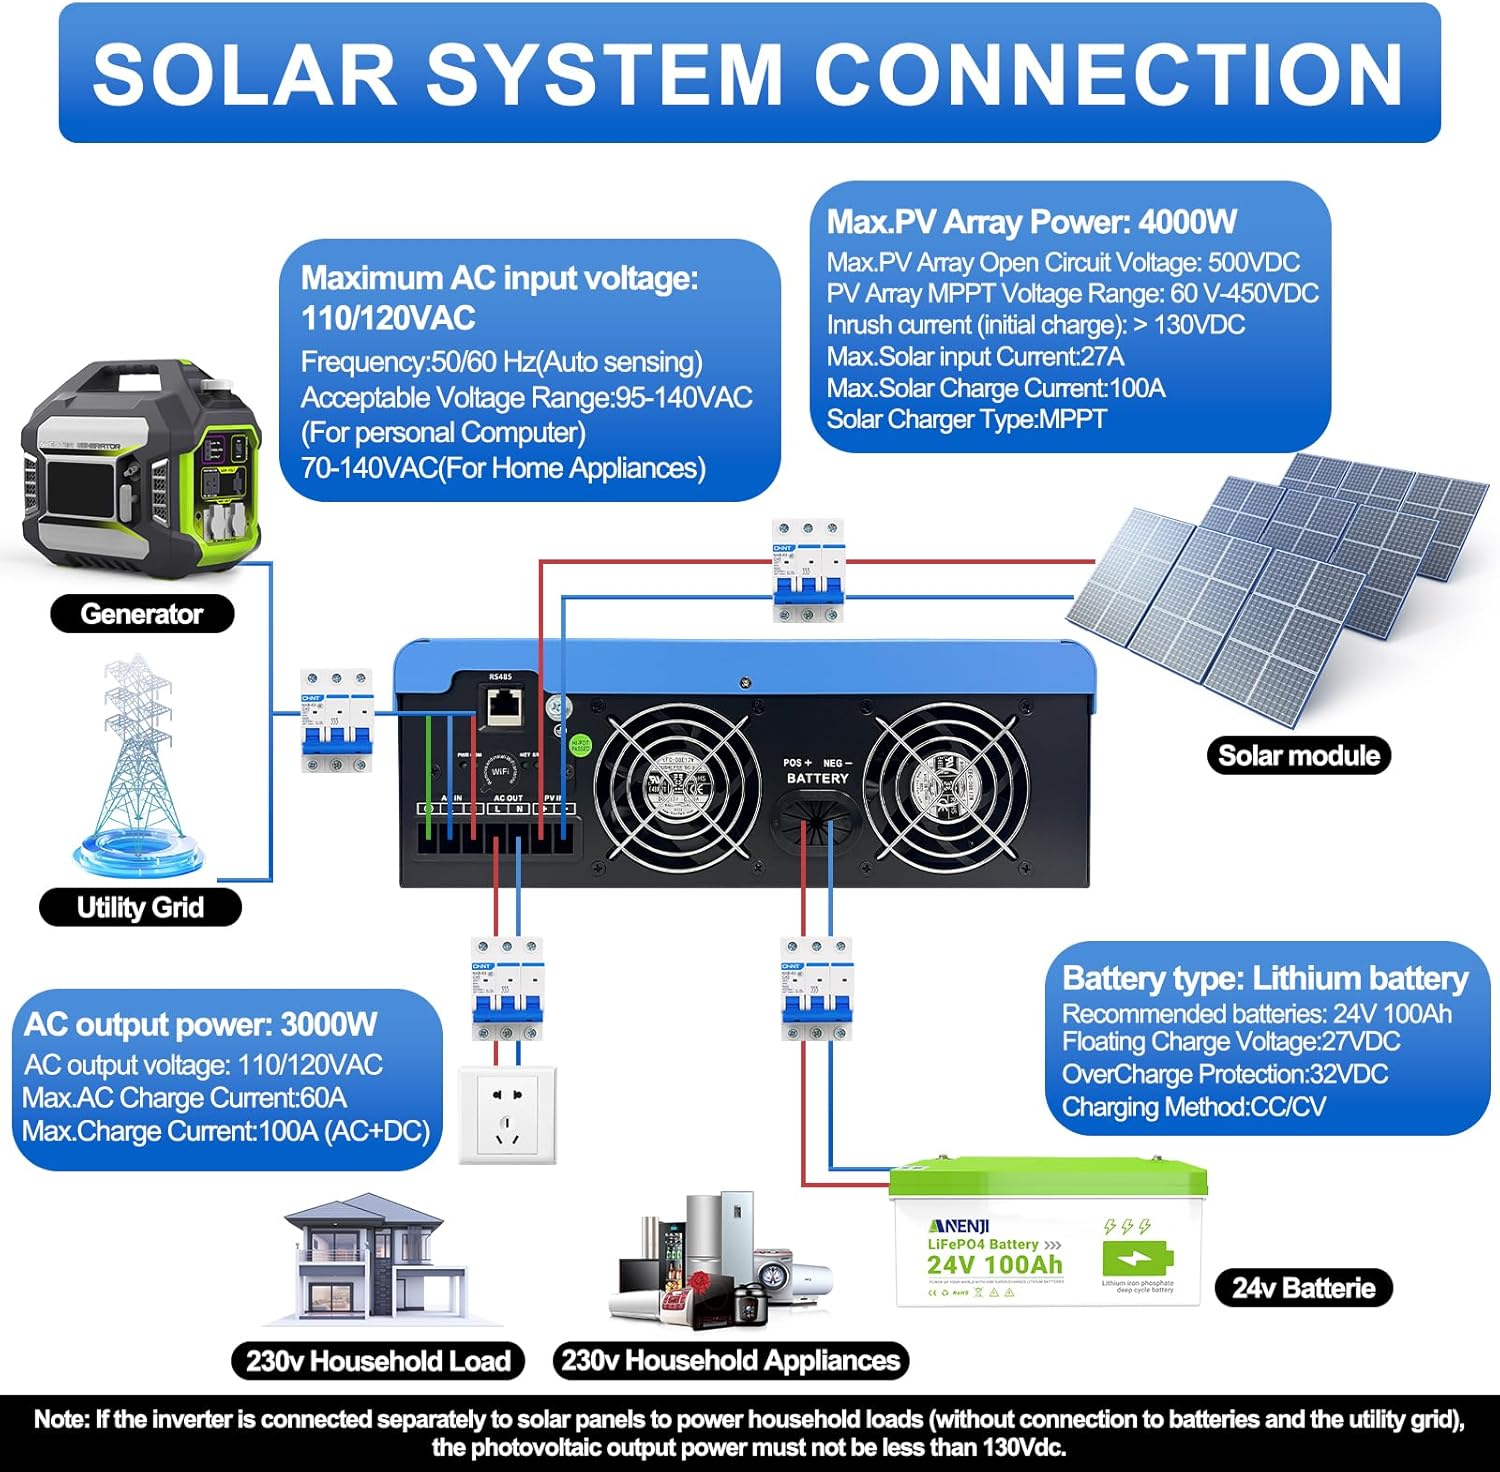
Figure 4.1: Solar System Connection Diagram. This diagram illustrates the connections for solar panels, generator, utility grid, 24V battery, and household loads to the inverter. It shows the PV input, battery input, AC input, and AC output terminals.
4.2.1 Batteritilslutning
- Connect the 24V battery bank to the battery input terminals on the inverter. Ensure correct polarity (+ to + and - to -).
- Use appropriate cable gauges for the battery connections to handle the expected current.
- The ANJ-3KW-LV-WIFI model supports a 24-volt DC system and is recommended for use with batteries of at least 100 ampere-hours capacity.

Figure 4.2: Inverter Battery Connection. This diagram shows wiring configurations for both 12-volt and 24-volt battery systems, emphasizing correct series/parallel connections for the desired voltage.
4.2.2 PV (Solar Panel) Connection
- Tilslut solpanelpanelet til PV-indgangsterminalerne. Overhold korrekt polaritet.
- Ensure the total open circuit voltagPV-panelets e overstiger ikke 500 VDC.
- The MPPT voltage range is 60-450VDC. Ensure your PV array voltage falls within this range for optimal charging.
4.2.3 AC-indgangsforbindelse
- Connect the utility grid or generator AC power to the AC input terminals.
- The inverter supports 110/120VAC input with auto-sensing frequency (50/60Hz).
4.2.4 AC-udgangsforbindelse
- Connect your household loads or appliances to the AC output terminals.
- The inverter provides 3000W continuous AC output at 110/120VAC.
4.3 Indledende opstart
- Når alle forbindelser er sikre, skal du først tænde for batteriafbryderen.
- Tænd derefter for PV-panelets afbryder (hvis relevant).
- Finally, switch on the AC input breaker (if applicable) and the inverter's main power switch.
- Observe the LCD display for initial boot-up and status indicators.
5. Betjening
The inverter offers various configurable settings to optimize power management based on your specific needs.
5.1 LCD-skærm og indstillinger
The LCD display provides real-time information and allows you to configure operational parameters using the function buttons.
- Brug UP og NED knapper til at navigere gennem menupunkter.
- Trykke ENTER for at vælge en mulighed eller bekræfte en indstilling.
- Trykke ESC to exit a menu or cancel an action.
5.2 Charging Priority Modes
These settings determine how the battery bank is charged from available power sources.

Figure 5.1: Charger Source Priority. This diagram illustrates three charging priority options: Solar First (solar panels charge first, AC input only if solar is unavailable), Solar and AC Input Simultaneously (both solar and utility charge at the same time), and Solar Only (solar energy is the exclusive charging source).
- Solar First: Prioritizes solar power for charging. AC input will only charge the battery when solar power is insufficient or unavailable.
- AC Priority (Utility Priority): Prioritizes AC input (utility or generator) for charging. Solar power will supplement or take over if AC input is unavailable.
- Kun solenergi: The inverter will only charge the battery bank from solar power. AC input will not be used for charging.
5.3 Output Priority Modes
These settings determine the power source for your connected loads.

Figure 5.2: Output Source Priority. This diagram shows three output priority options: Solar First (power from solar first, AC input supplements if solar is insufficient), AC First (redirects AC input to power loads, uses solar/batteries when AC is unavailable), and DC Priority (prioritizes solar first, then battery, then AC input only when voltage drops to a programmable value).
- Solar First (PV Priority): Prioritizes solar power to supply loads. If solar power is insufficient, the battery bank will supplement, and then AC input will be used.
- AC First (Mains Priority): Prioritizes AC input (utility or generator) to power loads. If AC input is unavailable, the inverter will switch to battery power.
- DC Priority (Battery Priority): Prioritizes solar power first, then battery power. AC input will only engage when the battery voltage drops below a programmable threshold.
5.4 Wi-Fi-overvågning
The built-in Wi-Fi module allows for remote monitoring of your inverter's performance and status via a dedicated application. Registration may be required to access this feature.

Figure 5.3: Wi-Fi Monitoring. This image depicts a user monitoring the hybrid inverter's status wirelessly via a smartphone application, highlighting the convenience of the built-in Wi-Fi feature.
6. Vedligeholdelse
Regular maintenance helps ensure the longevity and optimal performance of your Aninerel Hybrid Solar Inverter.
- Rensning: Rengør jævnligt inverterens yderside med en tør klud. Sørg for, at ventilationsåbningerne er fri for støv og snavs.
- Forbindelser: Annually check all electrical connections (battery, PV, AC input/output) for tightness and corrosion. Tighten any loose connections.
- Miljø: Sørg for, at installationsmiljøet forbliver inden for de angivne temperatur- og luftfugtighedsintervaller.
- Firmware: Tjek producentens webwebstedet for tilgængelige firmwareopdateringer til forbedret ydeevne eller nye funktioner.
7. Fejlfinding
Dette afsnit indeholder løsninger på almindelige problemer, du kan støde på. Hvis problemet fortsætter, skal du kontakte kundesupport.
| Problem | Mulig årsag | Løsning |
|---|---|---|
| Inverteren tænder ikke | Ingen batteriforbindelse eller lav batterispændingtage; Power switch off; Loose wiring. | Kontroller batteriforbindelser og voltage; Ensure power switch is ON; Verify all wiring is secure. |
| Ingen AC-udgang | Overload; Short circuit on output; Inverter in fault mode; Output priority setting. | Reduce load; Check for short circuits; Refer to LCD fault codes; Adjust output priority settings. |
| Batteriet oplades ikke fra solcelleanlægget | Lav PV-volumentage; Incorrect PV connection; Solar charging disabled; Faulty solar panels. | Kontroller PV-generatorens volumentage (must be >60VDC); Verify PV polarity; Check charging priority settings; Inspect solar panels. |
| Advarsel om overophedning | Utilstrækkelig ventilation; For høj omgivelsestemperatur; Overbelastning. | Ensure clear airflow around inverter; Relocate to cooler area; Reduce connected load. |
| Wi-Fi-overvågning virker ikke | No Wi-Fi signal; Incorrect app configuration; Registration issue. | Check Wi-Fi signal strength; Reconfigure app settings; Contact support for registration issues. |
8. Specifikationer
Technical specifications for the Aninerel 3000W Hybrid Solar Inverter ANJ-3KW-LV-WIFI:
| Feature | Specifikation |
|---|---|
| Modelnummer | ANJ-3KW-LV-WIFI |
| Kontinuerlig strømudgang | 3000W |
| Spidseffekt | 6000W |
| DC Input Voltage | 24V |
| AC Output Voltage | 110V AC |
| Output bølgeform | Ren Sine Wave |
| Maks. PV-indgangseffekt | 4000W |
| MPPT-controllerstrøm | 100A |
| Maks. PV Open Circuit Voltage | 500VDC |
| PV Array MPPT VoltagRækkevidde | 60-450VDC |
| Maks. AC-indgangsstrøm | 60A |
| Udgangsfrekvens | 50/60Hz (automatisk registrering) |
| Batterikompatibilitet | AGM, GEL, Lead-acid, Li-ion, LiFePO4 (24V) |
| Beskyttelsesvurdering | IP65 |
| Produktdimensioner | 15 x 6.98 x 18 tommer |
| Varens vægt | 16.5 pund |
9. Garanti og support
For warranty information, please refer to the warranty card included with your product or visit the official Aninerel website. For technical support, troubleshooting assistance, or service inquiries, please contact Aninerel customer service through their official channels.
Manufacturer: Shenzhen Anenji Energy Technology Co.,Ltd