1. Produktet er slutview
The MONTECH HyperFlow Digital 240 CPU Liquid Cooler is an all-in-one (AIO) liquid cooling solution designed for efficient heat dissipation in computer systems. It features a powerful pump, two 120mm E28 ARGB fans, and a real-time digital display for monitoring CPU and GPU temperatures. This cooler is compatible with various Intel and AMD platforms.
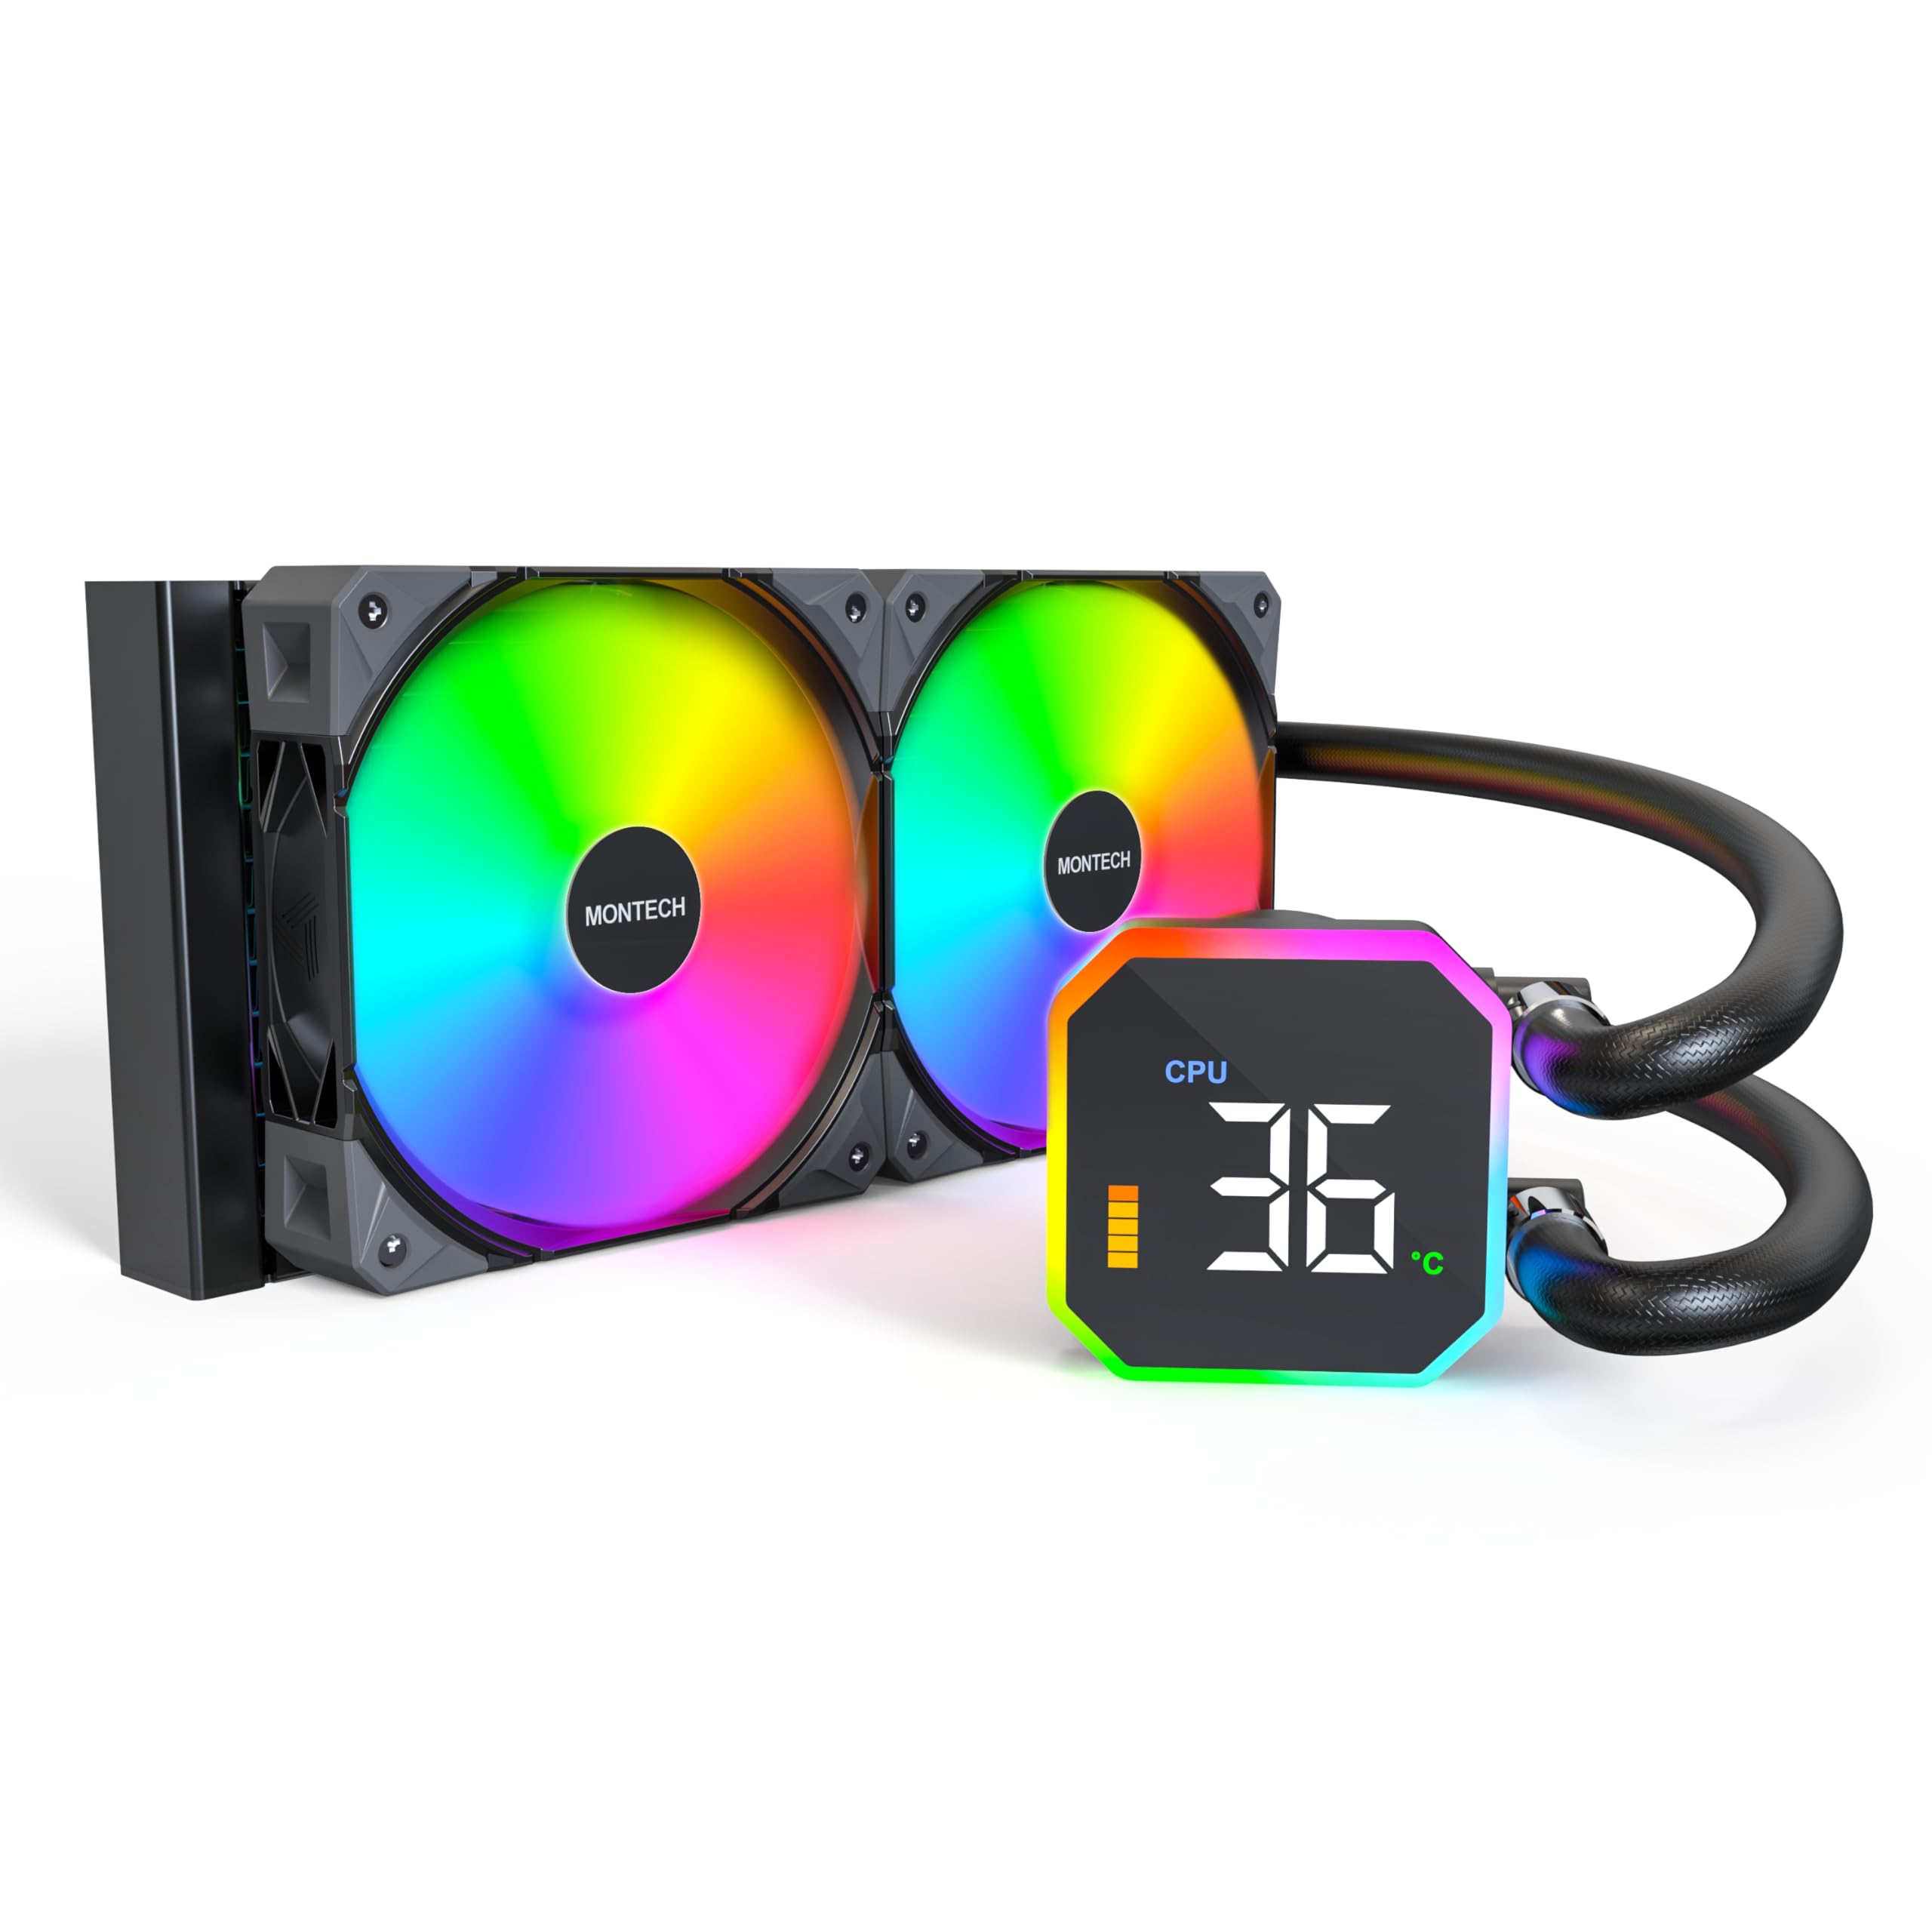
Image: The MONTECH HyperFlow Digital 240 CPU Liquid Cooler, showcasing the radiator, fans, pump, and digital display.
2. Pakkens indhold
Kontroller, at alle komponenter er til stede i pakken, før du fortsætter installationen.
- MONTECH HyperFlow Digital 240 AIO Liquid Cooler (Radiator, Pump with Digital Display, Pre-installed Fans)
- Mounting Hardware for Intel Sockets (1151/1200/1700/1851/20XX)
- Mounting Hardware for AMD Sockets (AM3/AM4/AM5)
- Cables (Fan power, ARGB, USB for display)
- Brugervejledning (dette dokument)

Billede: En overview diagram illustrating the main components and features of the HyperFlow Digital AIO cooler.
3. Tekniske specifikationer
| Feature | Specifikation |
|---|---|
| Produktdimensioner | 11.08 cm L x 1.07 cm B x 4.8 cm H |
| Afkølingsmetode | Vand |
| Pumpehastighed | 3100 RPM (±10%) |
| Fan type | E28 ARGB Fans |
| Fan størrelse | 120 mm |
| Maximum Fan Rotational Speed | 2200 RPM (±10%) |
| Luftmængde kapacitet | 96.27 kubikfod pr. minut (CFM) |
| Statisk tryk | 4.13 mmHXNUMX |
| Støjniveau | 36.25 decibel (maks.) |
| Radiator Thickness | 27 mm |
| Radiator FPI | 20 FPI (Fins Per Inch) |
| Strømstik type | 4-Pin PWM |
| Voltage | 12 volt |
| Materiale | Aluminium (radiator) |
| Kompatible enheder | CPU, stationær computer |
| Intel Socket Support | 1151/1200/1700/1851/20XX |
| AMD Socket Support | AM3/AM4/AM5 |
| Varens vægt | 4.6 pund |
4. Installationsvejledning
The MONTECH HyperFlow Digital 240 is designed for hassle-free installation with pre-installed fans and pre-applied thermal paste.
4.1. Forbered dit system
- Sluk for computeren, og frakobl alle kabler.
- Åbn computerens kabinet for at få adgang til bundkortet og CPU-området.
- Remove any existing CPU cooler. Clean the CPU surface if necessary.
4.2. Monter radiatoren og ventilatorerne
The fans are pre-installed on the radiator. Determine the optimal mounting location in your case (e.g., top, front) ensuring adequate clearance.

Image: Illustration of radiator and fan dimensions (27mm radiator, 28mm fan thickness) to ensure proper fit within a PC case.

Image: A visual guide demonstrating how the radiator and fans fit into a computer case, highlighting the total thickness of 55mm.
4.3. Installer pumpen/kølepladen
The cold plate has pre-applied thermal paste. Select the appropriate mounting brackets for your CPU socket (Intel or AMD).

Billede: Et nærbillede view of the pump and cold plate, showing the pre-applied thermal paste for convenience.

Image: Visual representation of the different mounting brackets for Intel (1151/1200/1700/1851/20XX) and AMD (AM3/AM4/AM5) sockets.

Image: A detailed diagram showing the compatibility of the cooler with various Intel and AMD CPU sockets.
4.4. Tilslut kabler
Connect the pump's USB cable to a Motherboard USB 2.0 header. Connect the fan and ARGB cables to appropriate headers on your motherboard or a compatible controller.

Image: Step-by-step guide for connecting the pump to the motherboard's USB 2.0 header and installing the necessary software.
5. Betjeningsvejledning
5.1. Digital displayovervågning
The integrated digital display provides real-time monitoring of your CPU and GPU temperatures. This allows for quick assessment of your system's thermal performance.
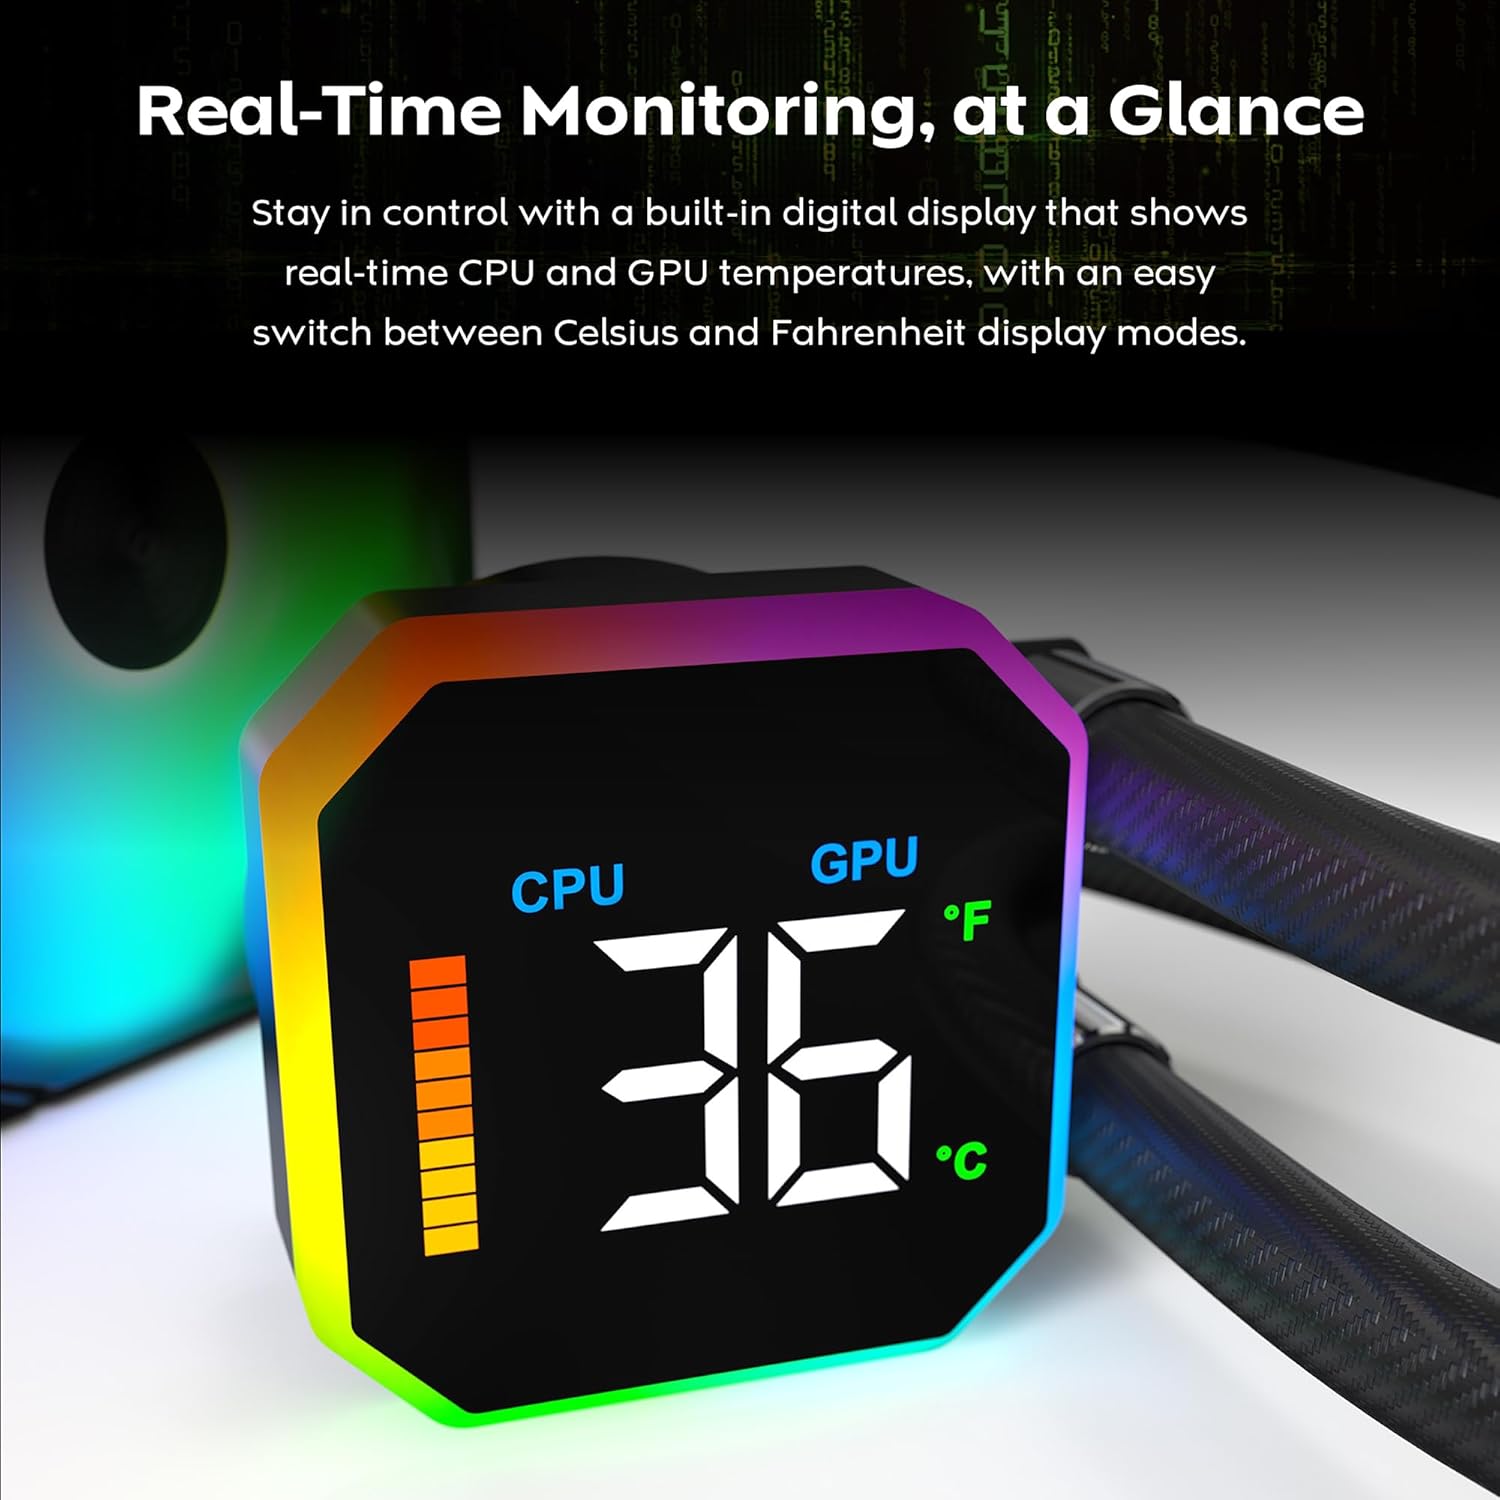
Image: The digital display on the pump head showing real-time CPU temperature and a temperature bar graph.

Billede: Et nærbillede view of the digital display, clearly showing the CPU temperature reading.
5.2. Skift af temperaturenhed
The display allows for quick switching between Celsius (°C) and Fahrenheit (°F) temperature units. Refer to the software interface for this setting.

Image: The software interface demonstrating the options to switch between CPU/GPU temperature display and Celsius/Fahrenheit units.
5.3. Fan Performance
The E28 performance fans operate up to 2200 RPM, providing strong airflow and static pressure for efficient heat dissipation. Fan speeds are typically controlled via PWM signals from the motherboard or dedicated fan controller.

Image: Details of the E28 ARGB Performance Fan, highlighting its fan speed, static pressure, and airflow capabilities.

Image: A visual representation of the fan's operational speed range (800-2200 RPM) and its 28mm thickness.
6. Vedligeholdelse
Regelmæssig vedligeholdelse er med til at sikre optimal ydeevne og levetid for din væskekøler.
- Støvrensning: Rengør regelmæssigt køleribberne og ventilatorbladene for støv med trykluft. Sørg for, at ventilatorerne ikke drejer under rengøringen for at forhindre skader.
- Visuel inspektion: Regularly check the tubing for any signs of kinks, leaks, or damage. Inspect the pump block for secure mounting.
- Termisk pasta: The cooler comes with pre-applied thermal paste. If you need to remount the cold plate, clean off the old thermal paste from both the CPU and cold plate, and apply a new layer of high-quality thermal paste.
7. Fejlfinding
If you encounter issues with your MONTECH HyperFlow Digital 240, refer to the following common troubleshooting steps:
- No Display/Incorrect Temperature Readings:
- Ensure the USB 2.0 cable from the pump is securely connected to a motherboard header.
- Verify that the MONTECH software is correctly installed and running.
- Check for any software updates for the cooler.
- High CPU/GPU Temperatures:
- Confirm that the pump is running (you may feel a slight vibration or hear a low hum).
- Check that the fans are spinning correctly and are not obstructed.
- Ensure the cold plate is making proper contact with the CPU. Re-seat the cooler if necessary, applying new thermal paste.
- Verify that the radiator is free of dust and has adequate airflow.
- For meget ventilatorstøj:
- Check if any cables are interfering with the fan blades.
- Sørg for, at ventilatorerne er sikkert monteret og ikke vibrerer mod kabinettet.
- Adjust fan curves in your motherboard's BIOS or fan control software to reduce speeds at lower temperatures.
- ARGB-belysning virker ikke:
- Ensure all ARGB cables are correctly connected to the motherboard's ARGB header or a dedicated controller.
- Check your motherboard's ARGB software or dedicated controller software for lighting settings.
8. Garanti og support
The MONTECH HyperFlow Digital 240 CPU Liquid Cooler comes with a 6 års garanti fra købsdatoen. Denne garanti dækker fejl i materialer og udførelse ved normal brug.
For technical support, warranty claims, or further assistance, please visit the official Montech webwebstedet eller kontakt deres kundeserviceafdeling. Du kan også besøge Montech Store on Amazon for produktinformation og supportressourcer.
9. Officiel produktvideo
Video: En officiel produktvideoasing the features and functionality of the MONTECH HyperFlow Digital Liquid AIO CPU Cooler. This video demonstrates the real-time temperature display, fan performance, and overall design.