1. Introduktion
This manual provides detailed instructions for the installation, operation, and maintenance of your plplaaoo 100A MPPT Solar Charge Controller. This advanced controller is designed to optimize energy harvest from your solar panels and manage battery charging efficiently for 12V, 24V, 36V, and 48V solar power systems. Please read this manual thoroughly before installation and use to ensure proper function and safety.
2. Sikkerhedsinstruktioner
Overhold venligst følgende sikkerhedsforanstaltninger under installation og drift:
- Sørg for, at alle ledninger er korrekt tilsluttet og forsvarligt fastgjort for at forhindre løse forbindelser og overophedning.
- Frakobl altid solpanelet og batteriet, før du installerer eller justerer controlleren.
- Use appropriate tools and wear protective gear, including eye protection, during installation.
- Install the controller in a well-ventilated area, away from flammable gases and liquids.
- Du må ikke selv adskille eller forsøge at reparere controlleren. Kontakt kvalificeret personale for service.
- Ensure the battery bank is properly sized and compatible with the controller's voltage og aktuelle vurderinger.
- Avoid short-circuiting the solar panel, battery, or load terminals.
3. Produktfunktioner
- Maksimal effektpunktssporing (MPPT): Achieves up to 98% conversion efficiency by intelligently tracking the maximum power point of solar panels under varying conditions.
- Automatisk voltage Adaptation: Registrerer og tilpasser sig automatisk til 12V, 24V, 36V eller 48V batterisystemer.
- Multifunktionel kontrol: Supports various operating modes including PWM charging, constant current output, and voltage regulering.
- Integrated USB and DC Outputs: Features dual 5V 1A USB ports and a 2A DC output for charging external devices.
- Omfattende beskyttelse: Includes safeguards against overvoltage, overcurrent, overtemperature, overload, short circuits, and reverse polarity.
- Brugervenlig grænseflade: Equipped with a backlit LCD display for real-time monitoring and intuitive buttons for configuration.
- Holdbar konstruktion: Features an aluminum heatsink for efficient cooling and robust design for harsh environments (0°C to 60°C).
- Batterikompatibilitet: Compatible with gel, sealed lead-acid, and lithium batteries.
4. Pakkens indhold
- 1 x plplaaoo 100A MPPT Solar Charge Controller
- 1 x brugermanual
5. Produktet er slutview og komponenter
Familiarize yourself with the main components and interface of the solar charge controller.

Figur 5.1: Front view of the solar charge controller, highlighting the LCD screen and various connection terminals.
The controller features an intuitive LCD display and clearly labeled ports for easy connection. The display provides real-time information about the system's status.
Figur 5.2: Detaljeret view of the controller's connection ports.

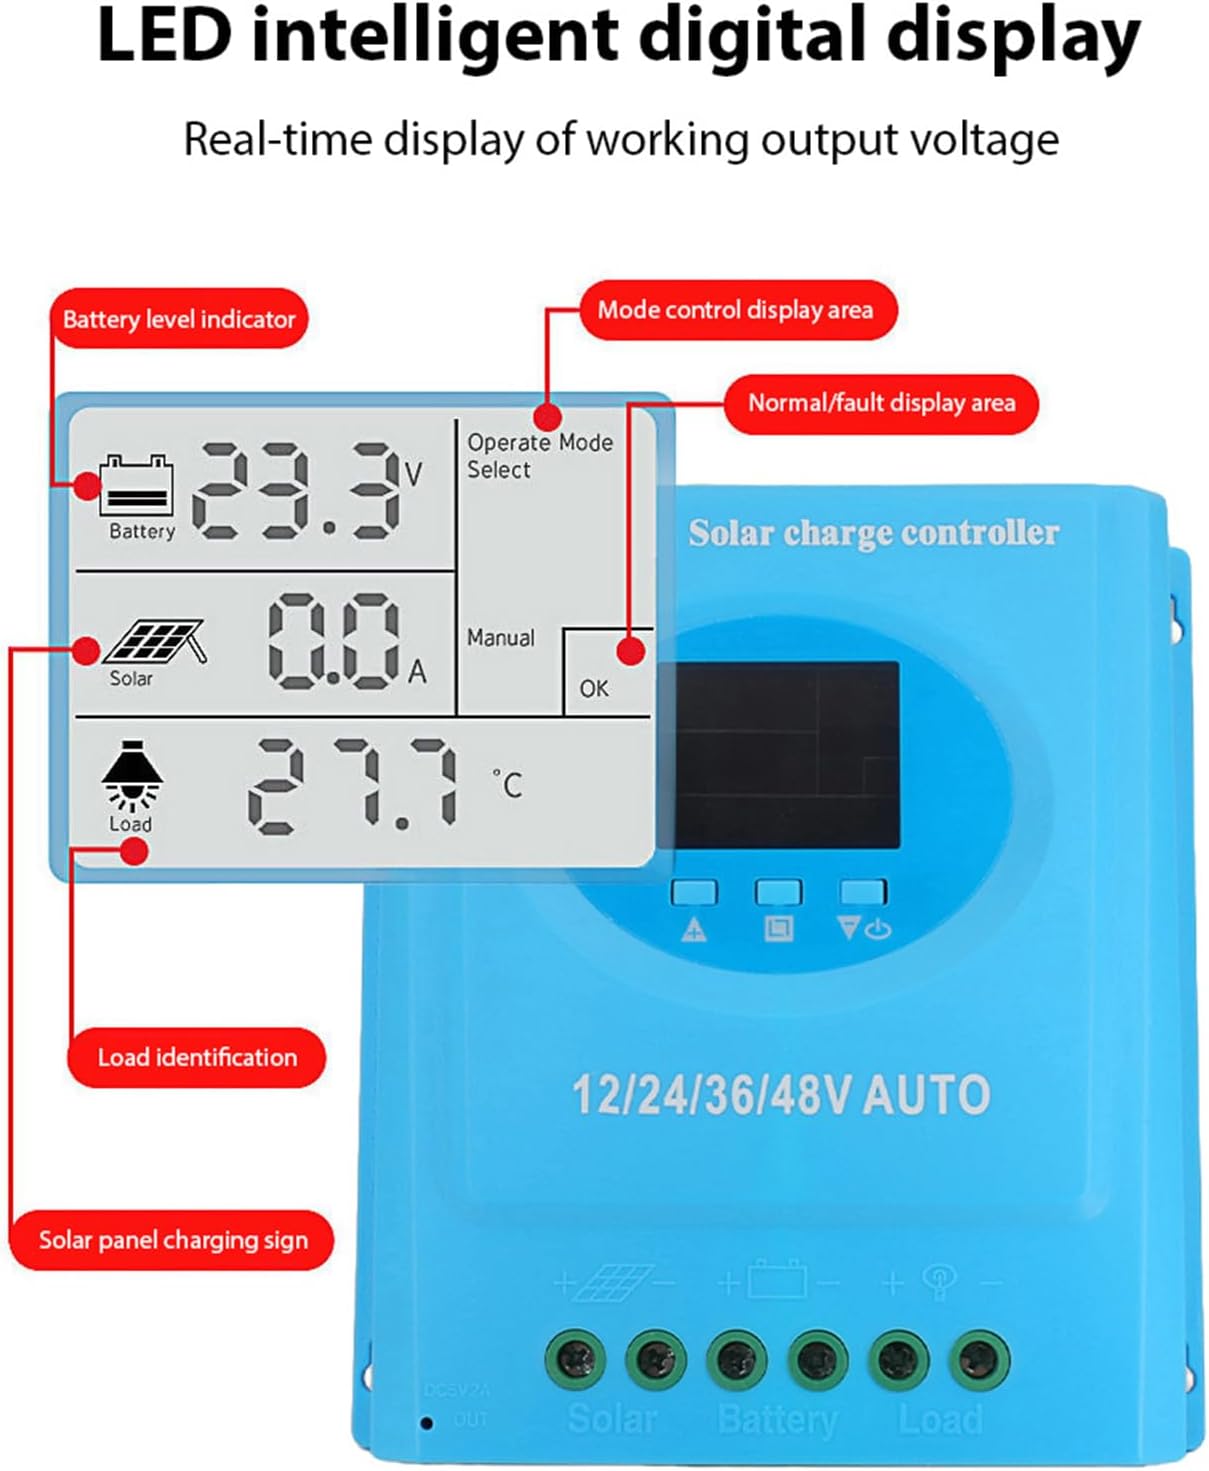
Figur 5.3: Detaljeret view of the LCD display, indicating battery level, solar panel charging sign, load identification, operating mode, and real-time voltage.
5.1. Tilslutningsporte
- Dobbelt USB-grænseflade: Two 5V 1A USB ports for charging mobile devices.
- Solpanelport: Connects to your solar panels (positive and negative).
- Batteriport: Connects to your battery bank (positive and negative).
- DC-belastningsport: Connects to your DC loads (positive and negative).
- DC udgangsport: Additional DC output.
6. Opsætning og installation
Follow these steps for proper installation of the solar charge controller. Ensure all power sources are disconnected before beginning.
6.1. Ledningsmetode
Tilslut komponenterne i følgende rækkefølge for at undgå skader:
- Tilslut batteriet: Connect the battery to the controller's battery terminals (positive to positive, negative to negative). The controller will automatically detect the battery voltage.
- Tilslut solpanelet: Connect the solar panel to the controller's solar panel terminals (positive to positive, negative to negative).
- Tilslut DC-belastningen: Connect the DC load to the controller's load terminals (positive to positive, negative to negative).
Vigtig: Tilslut altid batteriet først, derefter solpanelet og til sidst belastningen. Frakobl i omvendt rækkefølge.

Figur 6.1: Solar energy system wiring diagram. Note the correct polarity for all connections.
6.2. Montering
Mount the controller vertically on a flat surface in a well-ventilated area, ensuring adequate clearance for air circulation around the heatsink. Avoid direct sunlight, high temperatures, and humid environments.
7. Betjeningsvejledning
Once installed, the controller will automatically begin operating. The LCD display provides real-time system status.
7.1. LCD Display Information
LCD-skærmen viser forskellige parametre:
- Batteriniveauindikator: Shows the current charge status of the battery.
- Solar Panel Charging Sign: Indicates when the solar panels are actively charging the battery.
- Load Identification: Shows the status of the connected DC load.
- Operating Mode Display Area: Displays the current operating mode (e.g., manual, automatic).
- Normal/Fault Display Area: Indicates normal operation or displays error codes if a fault occurs.
- Real-time Working Output Voltage: Viser det aktuelle lydstyrkeniveautage af systemet.
7.2. Knapfunktioner
The controller typically features multiple buttons for navigation and setting adjustments:
- Menu-knap: Used to enter and exit the menu settings.
- Op/Ned knapper: Used to navigate through menu options and adjust parameter values.
- OK knap: Used to confirm selections and save settings.
Refer to the on-screen menu for specific parameter adjustments such as battery type, load control mode, and charging thresholds.
8. Vedligeholdelse
Regelmæssig vedligeholdelse sikrer optimal ydeevne og levetid for din solcelleladeregulator.
- Rensning: Rengør controllerens yderside med jævne mellemrum med en tør klud for at fjerne støv og snavs. Sørg for, at ventilationsåbningerne er frie.
- Tilslutningskontrol: Kontrollér årligt alle ledningsforbindelser for tæthed og korrosion. Efterspænd om nødvendigt.
- Miljøtjek: Ensure the installation environment remains within the specified operating temperature range and is free from excessive moisture or dust.
- Batteriinspektion: Regularly check the battery terminals for corrosion and ensure the battery is in good condition.
9. Fejlfinding
Hvis du støder på problemer med din solcelleladeregulator, kan du se følgende almindelige problemer og løsninger:
| Problem | Mulig årsag | Løsning |
|---|---|---|
| Controlleren tænder ikke / LCD-skærmen er tom |
|
|
| Batteriet oplades ikke |
|
|
| Indlæsningen virker ikke |
|
|
| Fejlkode vises | Specifik systemfejl. | Refer to the controller's display for the specific error code and consult the full product documentation or contact support for detailed interpretation and resolution. |
10. Specifikationer
| Parameter | Værdi |
|---|---|
| Model | plplaaoozi6egog4wm-0A |
| Mærke | plplaaoo |
| Nominel strøm | 100A |
| System Voltage | 12V / 24V / 36V / 48V Automatic Adaptation |
| Opladningstype | MPPT (Maksimal Power Point Tracking) |
| Konverteringseffektivitet | Op til 98 % |
| USB udgang | Dual 5V 1A ports |
| DC-udgang | 2A |
| Driftstemperatur | 0°C til 60°C |
| Dimensioner (ca.) | 19.5 cm x 18.3 cm x 6.8 cm (7.7 tommer x 7.2 tommer x 2.7 tommer) |

Figur 10.1: Approximate dimensions of the solar charge controller.
11. Garanti og support
For garantioplysninger, teknisk support eller serviceforespørgsler bedes du kontakte din forhandler eller producenten direkte. Gem din købskvittering som købsbevis.