1. Introduktion
Thank you for choosing the Antec VCX300 ARGB ATX/M-ATX PC Case. This manual provides detailed instructions for the installation, operation, and maintenance of your new computer chassis. Please read this manual thoroughly before installation to ensure proper setup and optimal performance.
2. Sikkerhedsoplysninger
- Afbryd altid strømforsyningen, før du installerer eller fjerner komponenter.
- Handle components with care to avoid damage from electrostatic discharge. Use an anti-static wrist strap if available.
- Keep the case away from water, moisture, and direct heat sources.
- Sørg for tilstrækkelig ventilation omkring kabinettet for at forhindre overophedning.
- Do not attempt to open or repair the power supply unit inside the case. Refer to qualified service personnel.
3. Pakkens indhold
Kontroller venligst, at alle varer er til stede i din pakke:
- Antec VCX300 ARGB ATX/M-ATX PC Case
- Accessory Box (Screws, standoffs, cable ties)
- Brugervejledning (dette dokument)
4. Produktet er slutview
Familiarize yourself with the various parts of your Antec VCX300 ARGB PC Case.
4.1 Frontpanel I/O
- Power knap
- Nulstil knap
- USB 3.0 porte
- USB 2.0 porte
- Lydstik (hovedtelefon/mikrofon)
- LED Control Button (for ARGB lighting)
4.2 Intern indretning
The VCX300ARGB case supports ATX and Micro-ATX motherboards. It features multiple drive bays for storage and ample space for cooling solutions.
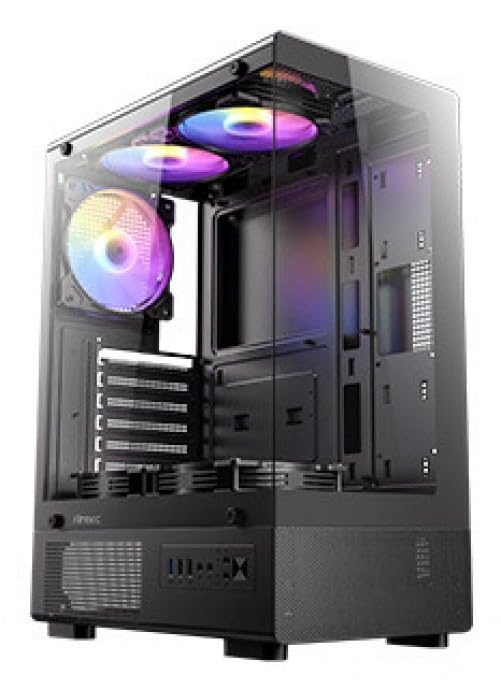
Figur 1: Forside view of the Antec VCX300 ARGB PC Case, showcasing the ARGB lighting elements and front panel I/O ports.
5. Opsætning og installation
Follow these steps to install your components into the Antec VCX300 ARGB PC Case.
5.1 Forberedelse af sagen
- Placer etuiet på en flad, stabil overflade.
- Fjern sidepanelerne ved at skrue fingerskruerne på bagsiden af kabinettet ud og skubbe panelerne bagud.
5.2 Installation af bundkort
- Installer I/O-skjoldet i den bageste åbning af kabinettet.
- Juster bundkortet med de forudinstallerede afstandsstykker. Sørg for, at skruehullerne på bundkortet passer til afstandsstykkerne.
- Secure the motherboard with the provided screws from the accessory box.
5.3 Installation af strømforsyning
- Position the power supply unit (PSU) in the designated compartment at the bottom rear of the case.
- Fastgør strømforsyningen med skruer fra ydersiden af bagsiden af kabinettet.
5.4 Installation af lagerdrev (HDD/SSD)
- Locate the drive bays. The VCX300ARGB typically features dedicated bays for 3.5" HDDs and 2.5" SSDs.
- For 3.5" HDDs, slide the drive into the bay and secure it with screws or tool-less clips if available.
- For 2.5" SSDs, mount the drive onto the designated brackets or trays and secure with screws.
5.5 Expansion Card Installation (GPU, etc.)
- Fjern de nødvendige dæksler til udvidelsespladserne fra bagsiden af kabinettet.
- Insert the expansion card (e.g., graphics card) into the appropriate PCIe slot on the motherboard.
- Fastgør kortet med en skrue.
5.6 Kabelstyring
Brug kabelføringsudskæringerne og fastgørelsespunkterne bag bundkortbakken til at håndtere kabler. Dette forbedrer luftgennemstrømningen og æstetikken.
- Connect all power cables from the PSU to the motherboard and components.
- Connect front panel I/O cables (USB, audio, power/reset switches, LED) to the corresponding headers on the motherboard.
- Connect ARGB cables from the case fans/strips to the motherboard's ARGB header or the integrated ARGB controller.
6. Betjening
6.1 Tænd
- Ensure all components are correctly installed and cables are connected.
- Luk og fastgør sidepanelerne.
- Tilslut strømkablet til strømforsyningen og en stikkontakt.
- Flip the power switch on the PSU to the "ON" position.
- Press the Power Button on the front panel of the case.
6.2 ARGB-lysstyring
The Antec VCX300 ARGB case features customizable ARGB lighting. You can control the lighting effects in two ways:
- LED-kontrolknap: Press the dedicated LED control button on the front panel to cycle through various pre-set ARGB lighting modes and colors. Hold the button for a few seconds to turn off/on the lighting.
- Bundkortsoftware: If the ARGB cables are connected to a compatible motherboard ARGB header, you can synchronize and customize lighting effects using your motherboard's proprietary software (e.g., ASUS Aura Sync, MSI Mystic Light Sync, Gigabyte RGB Fusion, ASRock Polychrome Sync). Refer to your motherboard manual for specific instructions.
7. Vedligeholdelse
Regelmæssig vedligeholdelse er med til at sikre optimal ydeevne og levetid for dine pc-komponenter.
- Støvfiltre: The VCX300ARGB includes dust filters. Regularly remove and clean these filters to prevent dust buildup inside the case, which can impede airflow and cooling performance. Use compressed air or a soft brush.
- Indvendig rengøring: Periodically open the case and use compressed air to remove dust from fans, heatsinks, and other components. Ensure the system is powered off and unplugged before cleaning.
- Udvendig rengøring: Tør ydersiden af kabinettet af med en blød, tør klud.amp klud. Undgå barske kemikalier eller slibende materialer.
8. Fejlfinding
| Problem | Mulig årsag | Løsning |
|---|---|---|
| PC'en tænder ikke. | Power cable disconnected, PSU switch off, front panel power button not connected, faulty PSU. | Check power cable connections. Ensure PSU switch is ON. Verify front panel power button cable is correctly connected to motherboard. Test PSU if possible. |
| ARGB lighting not working. | ARGB cables disconnected, incompatible motherboard header, LED control button issue. | Ensure ARGB cables are securely connected to the motherboard or controller. Try cycling modes with the LED control button. Verify motherboard ARGB header compatibility. |
| Dårlig luftgennemstrømning/overophedning. | Dust buildup, incorrect fan orientation, obstructed vents. | Clean dust filters and internal components. Ensure fans are oriented correctly for optimal airflow (intake/exhaust). Check for any obstructions. |
9. Specifikationer
| Feature | Detalje |
|---|---|
| Modelnavn | VCX300ARGB |
| Sagstype | Mid Tower |
| Bundkort support | ATX, Micro-ATX |
| Mål (D x B x H) | 8.07 cm D x 17.72 cm B x 450 cm H (ca. 370 mm x 205 mm x 14.57 mm) |
| Varens vægt | 3.6 kilo |
| Interne drevbåse | 5 (combination of 3.5" HDD and 2.5" SSD) |
| Front I / O-porte | USB 3.0, USB 2.0, Audio In/Out, Power, Reset, LED Control Button |
| Særlige funktioner | Built-In Fan, Dust Filter, LED Control Button, Noise Reduction Technology, Partition Plate Cooling Technology, ARGB Lighting |
| Farve | Sort |
10. Garanti og support
Antec products come with a limited warranty. Please refer to the official Antec website or your regional distributor for specific warranty terms and conditions applicable to your product.
For technical support, product registration, or further inquiries, please visit the official Antec support page: www.antec.com/support
Importørens kontaktoplysninger: Ariisto House, 5th Floor, Junction of N.S.Phadke Road, Telli Gali, Andheri (E), Mumbai- 400 069 Maharashtra, India