1. Produktet er slutview
The Joy Pebble Espresso Machine CM8031-BLACK is a semi-automatic espresso machine designed for home use, featuring a 15-bar pump, integrated grinder, milk frother, and steam wand. This manual provides detailed instructions for its safe and efficient operation.

Billede 1.1: Forside view of the Joy Pebble Espresso Machine CM8031-BLACK, showing the bean hopper, control panel, portafilter, and two espresso cups.
2. Hvad er der i æsken
Pak forsigtigt alle komponenter ud, og sørg for, at følgende er til stede:
- Joy Pebble Espresso Machine (CM8031-BLACK)
- Portafilter
- Single & Dual Wall Filter Baskets
- Tamper
- Mælk Jug
- Rengøringsbørste
- Rengøringsstift
- Værktøjskasse
- Instruktionsmanual (dette dokument)

Image 2.1: All components included with the Joy Pebble Espresso Machine, laid out on a table.
3. Opsætning
- Placering: Place the machine on a stable, level, and dry surface. Ensure adequate clearance around the machine for ventilation.
- Vandtank: The 75 oz (77.8 oz) transparent water tank is removable for easy filling. Remove the water tank from the back of the machine, fill it with fresh, cold water up to the MAX line, and securely place it back into position.
- Bønnetragt: Open the lid of the bean hopper located on top of the machine. Pour fresh whole coffee beans into the hopper. Close the lid securely.
- Indledende skylning: Before first use, perform an initial rinse cycle. Fill the water tank, place a large container under the portafilter and steam wand, and run a cycle without coffee to flush the system. Refer to the 'Operating' section for basic brewing steps.
- Strømtilslutning: Sæt netledningen i en jordet stikkontakt.

Image 3.1: Illustration of the removable 77.8oz water tank being accessed from the side of the machine.
4. Betjeningsvejledning
4.1 Maling af kaffebønner
The machine features an integrated grinder with 30 precise grind settings. Adjust the coarseness based on your preference and coffee type.
- Juster kværningsindstilling: Use the grind adjustment dial to select your desired coarseness. Finer settings (lower numbers) are for slower extraction, coarser settings (higher numbers) for faster extraction.
- Grind Time: The machine allows adjustment of grinding time to control the amount of coffee powder.
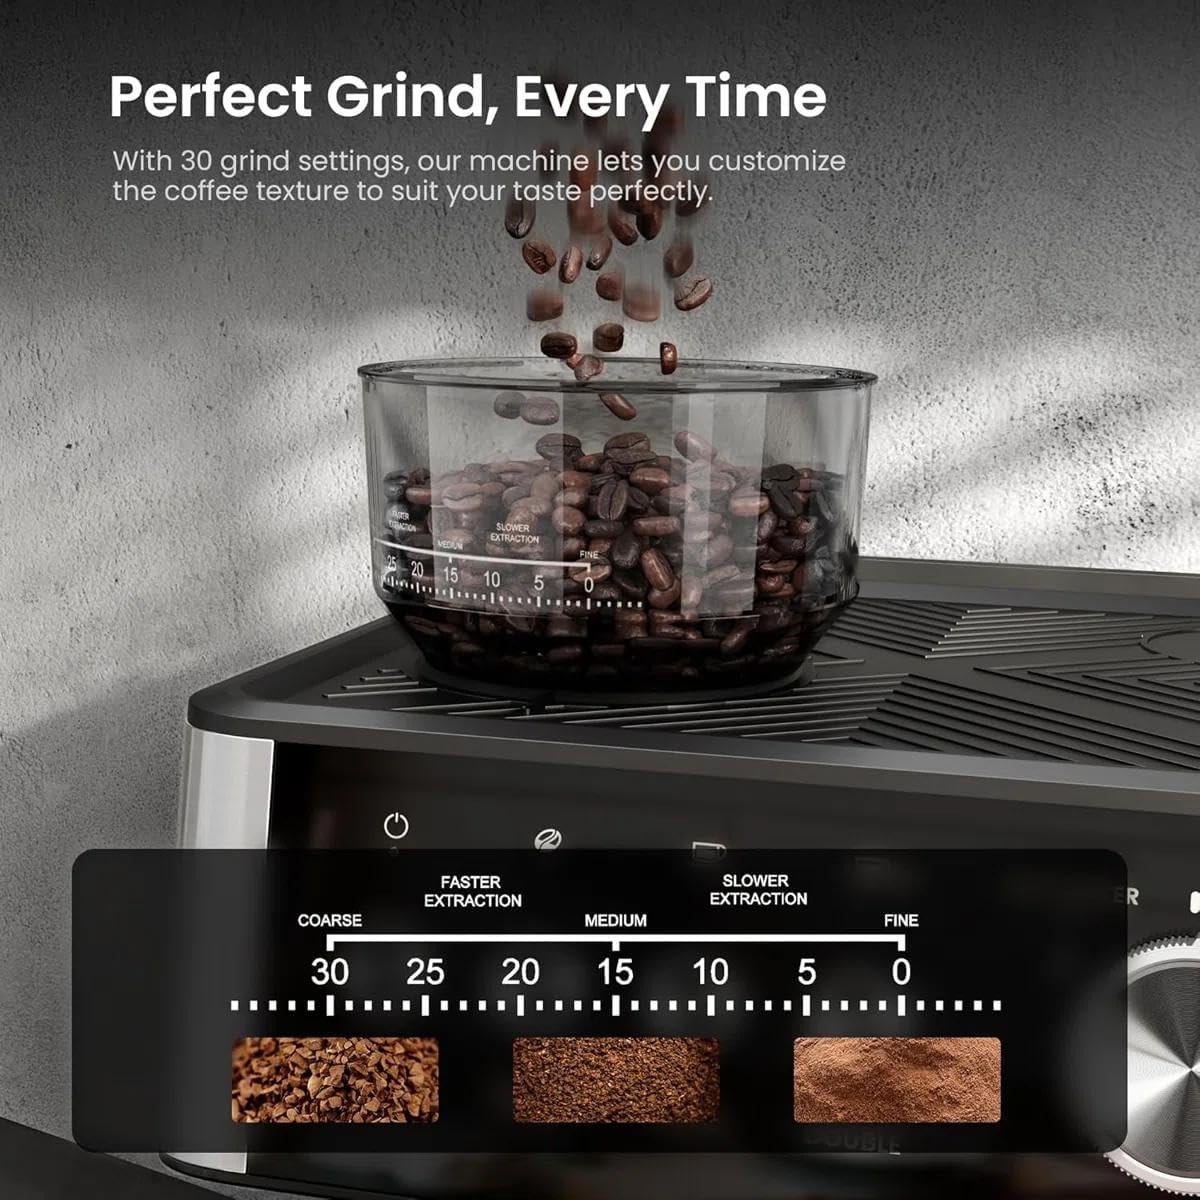
Image 4.1: Close-up of the bean hopper and grind setting display, illustrating the 30 grind levels from coarse to fine.
4.2 Brygning af espresso
Follow these steps for brewing a single or double espresso:
- Klargør portafilter: Insert the appropriate filter basket (single or dual wall) into the portafilter.
- Male: Place the portafilter under the grinder outlet. Press the 'GRIND' button to start grinding. The machine is engineered with an upgraded grinding path to prevent clogging.
- Tamp: Once ground, use the tamper to press the coffee grounds firmly and evenly into the filter basket.
- Fastgør portafilter: Securely attach the portafilter to the group head by twisting it into place.
- Vælg brygning: Place your cup(s) under the portafilter spouts. Press the 'SINGLE' or 'DOUBLE' button to start brewing. The PID Intelligent Temperature Control System ensures optimal extraction temperature.
- Præ-infusion: The machine utilizes low-pressure pre-infusion to allow coffee grounds to absorb water evenly before full pressure extraction.

Image 4.2: Visual guide showing the four main steps for brewing coffee: Grinding beans, Tamping grounds, Brewing espresso, and Frothing milk.
4.3 Using the Steam Wand (Milk Frother)
The powerful steam wand allows you to create rich, delicate milk foam for cappuccinos and lattes.
- Forbered mælk: Fyld mælkekanden med kold mælk.
- Aktiver Steam: Turn the control knob to the 'STEAM' position. Wait for the machine to reach optimal steaming temperature.
- Skummælk: Immerse the steam wand tip just below the surface of the milk. Open the steam valve to release steam. Move the jug up and down to create microfoam.
- Rengør stav: Tør dampdysen af med en klud umiddelbart efter skumdannelsen.amp en klud for at fjerne eventuelle mælkerester. Tøm kortvarigt dampen ud for at rense dysen.

Image 4.3: A hand holding a milk jug while the steam wand froths milk, creating silky smooth microfoam.
4.4 Varmtvandsfunktion
The machine can dispense hot water for tea or Americanos.
- Aktivér varmt vand: Drej betjeningsknappen til positionen 'VARMT VAND'.
- Dispensere: Place a cup under the hot water spout and allow the desired amount of hot water to dispense.

Image 4.4: Split image showing the milk frother in action on the left and the hot water function dispensing into a glass on the right.
5. Vedligeholdelse
5.1 Daglig rengøring
- Portafilter og filterkurve: Efter hver brug skal du fjerne portafilteret, kassere kaffegrums, og skylle portafilteret og filterkurven under varmt vand.
- Dampstang: As mentioned in section 4.3, wipe and purge the steam wand immediately after use.
- Drypbakke: Tøm og skyl drypbakken regelmæssigt.
- Ydre: Tør maskinens ydre af med en blød, damp klæde. Brug ikke slibende rengøringsmidler.
5.2 Afkalkning
Regelmæssig afkalkning er afgørende for at opretholde maskinens ydeevne og forlænge dens levetid. Hyppigheden afhænger af vandets hårdhed og brug.
- Brug en kommerciel afkalkningsopløsning, der er specielt designet til espressomaskiner.
- Følg instruktionerne, der følger med afkalkningsopløsningen.
- Rinse the machine thoroughly with several cycles of fresh water after descaling.
5.3 Rengøring af kværn
Periodically clean the grinder path to ensure optimal performance and prevent clogging, especially with oily beans.
- Sørg for, at maskinen er taget ud af stikkontakten.
- Remove any remaining beans from the hopper.
- Use the provided cleaning brush to clear any coffee residue from the grinding path.
6. Fejlfinding
Hvis du støder på problemer med din espressomaskine, kan du se følgende almindelige problemer og løsninger:
| Problem | Mulig årsag | Løsning |
|---|---|---|
| Ingen kaffeudløb | Water tank empty; clogged filter basket; machine not primed. | Refill water tank; clean filter basket; perform initial rinse cycle. |
| Svag espresso / for hurtig ekstraktion | Coffee grounds too coarse; not enough coffee; tamper for let. | Adjust grind to a finer setting; increase coffee dose; tamp mere fast. |
| Espresso drips slowly / too slow extraction | Coffee grounds too fine; too much coffee; tampfor hårdt. | Adjust grind to a coarser setting; reduce coffee dose; tamp lettere. |
| Ingen damp fra stangen | Dampdysen er tilstoppet; maskinen har ikke nået damptemperatur. | Clean steam wand with cleaning pin; wait for steam indicator light. |
| Kværn virker ikke | Bønnebeholderen er tom; kværnen er tilstoppet. | Refill bean hopper; clean grinder path. |
Hvis problemet fortsætter efter at have forsøgt disse løsninger, bedes du kontakte kundesupport.
7. Specifikationer
| Mærke | Joy Pebble |
| Modelnavn | CM8031-SORT |
| Farve | Sort |
| Produktdimensioner | 13" D x 11.15" B x 16.1" H |
| Vægt | 16.8 LBS (approximate, inferred from image) |
| Særlige funktioner | Auto Clean Function, Cup Warmer, Milk Frother, Removable Tank, Integrated Grinder, PID Intelligent Temperature Control |
| Kaffemaskine type | Espressomaskine |
| Driftstilstand | Semi-automatisk |
| Vandtankkapacitet | 75 oz (77.8 oz) |
| Kaffe input type | Hele bønner |
| Slibeindstillinger | 30 præcise indstillinger |
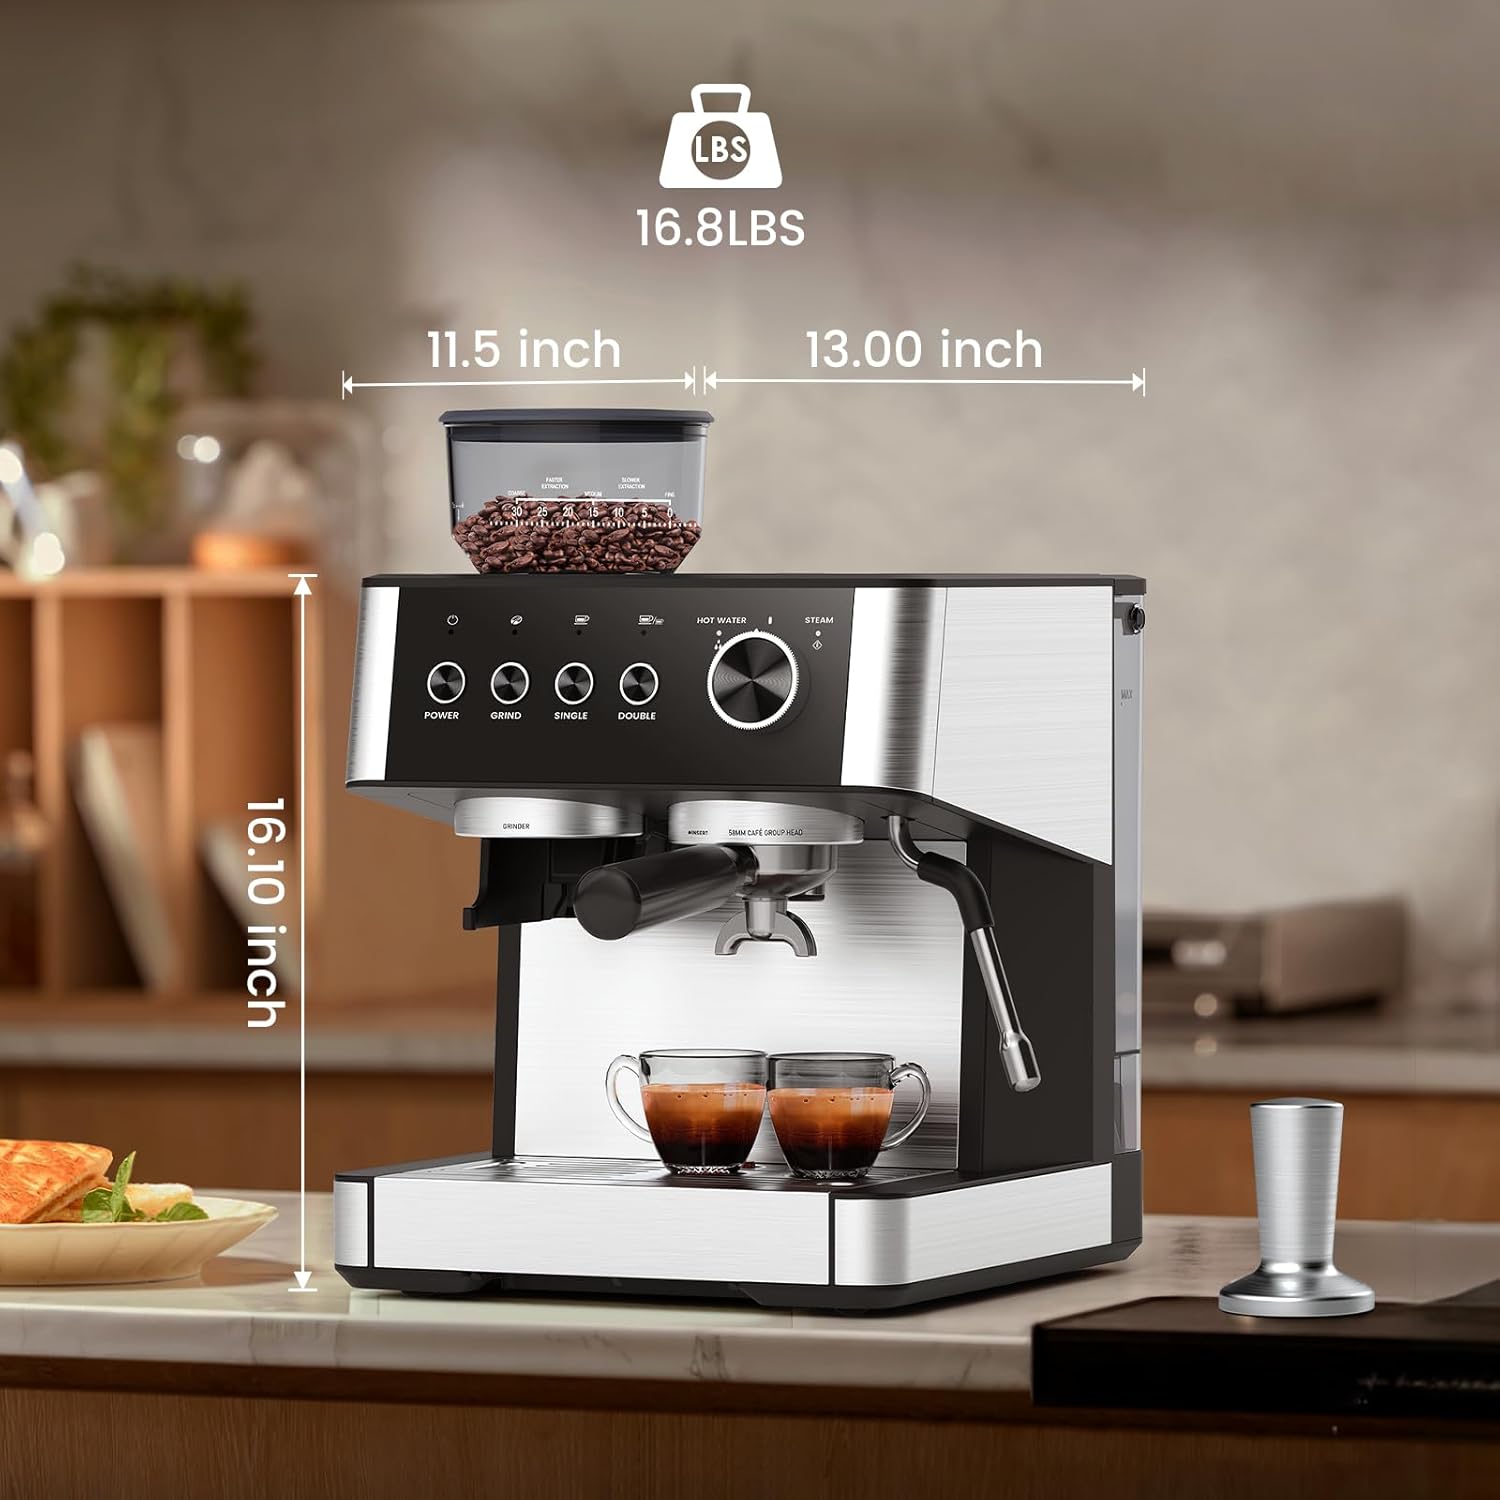
Image 7.1: Diagram illustrating the dimensions (13.00"D x 11.5"W x 16.10"H) and weight (16.8 LBS) of the espresso machine.
8. Garanti og support
For warranty information and customer support, please refer to the documentation included with your purchase or visit the official Joy Pebble webwebsted. Gem din købsbevis til garantikrav.
The machine features a safety design with automatic shut-off after 2 hours of inactivity to save energy.

Image 8.1: Illustration highlighting the automatic power-off feature after 2 hours of non-use, emphasizing energy saving and safety.